12
STEP 5
—
Please ensure ALL bolts and screws are fully tightened before use. Your rower is now fully
assembled and ready for filling the Water Tank.
—
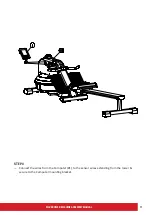
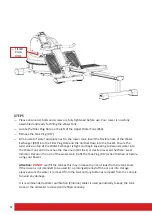
Locate the Filler Plug Hole on the left of the Upper Water Tank (#16).
— Remove the Tank Plug (#17)
—
Fill a bucket of water and place next to the rower tank. Insert the flexible hose of the Water
Exchanger (#89) into the Filler Plug Hole and the Vertical Hose into the bucket. Ensure the
twist valve on top of the Water Exchanger is tight and begin squeezing to decanter water into
the Water Tank until it reaches the maximum (12 Litres) or desired level on the Water Level
Indicator Decal on the side of the water tank. Refit the Tank Plug (#17) when finished or before
using your Rower.
Attention:
DO NOT
overfill the tank as this may increase the risk of leaks from the tank seals.
If the rower is not intended to be used for a prolonged period of time or put into storage,
please ensure the water is removed from the tank and any batteries removed from the console
to avoid any damage.
It is recommended a Water purification (Chlorine) tablet is used periodically to keep the tank
clean or the old water removed and refilled annually.
— FILLER
PLUG
HOLE


