RW973 MkⅡ
User Manual
2
Content
..................................................................................................
3.2 Printing Media Specification
....................................................................................................
3.2.1 Continuous Thermal Paper Specification
......................................................................
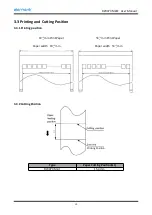
3.3 Printing and Cutting Position
..................................................................................................
4.2 Installation Site and Direction of Printer
................................................................................
4.4.1 Specification of LED Indicator
......................................................................................
4.6 Interface Cable Connection
....................................................................................................
4.8.1 Serial interface (RS-232C)
............................................................................................
4.8.2 Interfaces of USB and Ethernet
...................................................................................
4.8.3 Auto Cutter Enable/Disable Selection
.........................................................................
4.9.2 Printing of Windows Driver Program
..........................................................................
Summary of Contents for RW973 Mk2
Page 1: ...Desktop POS Printer RW973 MkⅡ User Manual ...
Page 9: ...RW973 MkⅡ User Manual 6 2 2 Appearance and Components ...
Page 34: ...RW973 MkⅡ User Manual 31 3 Click Next 4 Click Install ...
Page 35: ...RW973 MkⅡ User Manual 32 5 Click Finish Utility is installed successfully ...
Page 57: ...RW973 MkⅡ User Manual 54 Function Setting Choose the item and click Setting ...
Page 70: ...RW973 MkⅡ User Manual 67 8 3 Firmware Update 1 Click FW Update ...
Page 78: ...RW973 MkⅡ User Manual 75 Cut Paper ...
Page 79: ...RW973 MkⅡ User Manual 76 Feed paper Cash drawer ...
Page 80: ...RW973 MkⅡ User Manual 77 Custom command ...
Page 82: ...RW973 MkⅡ User Manual 79 Click Download Click Add to add a logo BMP format is recommended ...
Page 85: ...RW973 MkⅡ User Manual 82 Click the Advanced then click Logo ...
Page 87: ...RW973 MkⅡ User Manual 84 Then click OK ...
Page 88: ...RW973 MkⅡ User Manual 85 Click Print Test Page to view the printing effect ...
Page 89: ...RW973 MkⅡ User Manual 86 Buzzer Note this setting need to be set in utility Code Page ...
Page 93: ...RW973 MkⅡ User Manual 90 1 Add Barcode firstly ...
Page 94: ...RW973 MkⅡ User Manual 91 2 Set the Font Name and the Barcode Option ...
Page 97: ...RW973 MkⅡ User Manual 94 1 ...
Page 98: ...RW973 MkⅡ User Manual 95 2 3 ...
Page 99: ...RW973 MkⅡ User Manual 96 ...
Page 102: ...RW973 MkⅡ User Manual 99 5 Select the System Font for example Arial ...
Page 103: ...RW973 MkⅡ User Manual 100 6 Select the font to that you went to replace ...
Page 104: ...RW973 MkⅡ User Manual 101 7 Click Set ...
Page 105: ...RW973 MkⅡ User Manual 102 ...
Page 107: ...RW973 MkⅡ User Manual 104 3 Click Port to change the other connecting port ...
Page 108: ...RW973 MkⅡ User Manual 105 4 Click Advanced to set the available time for using ...


