


6
FIRST STEPS WITH THE ANALOG KEYS
SETTING UP THE ANALOG KEYS
Make sure you place the Analog Keys on a stable support, such as a sturdy table with sufficient cable space or a synth
stand capable of a 10 kg load.
1
Before you connect the Analog Keys to other equipment, make sure all units are switched off.
2
Plug the included AC cable into a power outlet and the Analog Keys.
3
Connect the main out L/R from the Analog Keys to your mixer or amplifier.
4
Switch on all units.
STARTING THE ANALOG KEYS
Switch on the unit by pressing the Power rocker switch located at the back of the unit. Before restarting the unit, wait 2
seconds after the LCD backlight goes out.
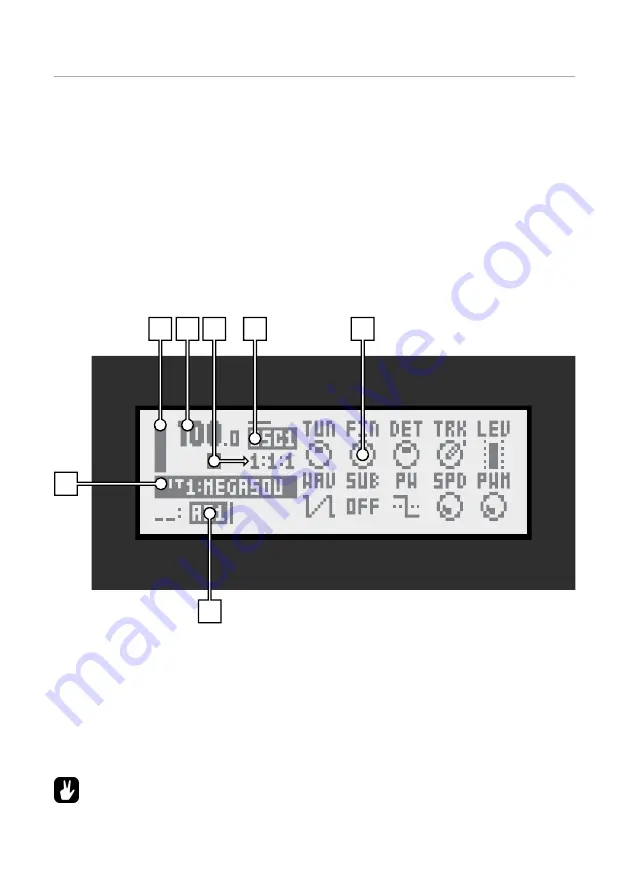
THE USER INTERFACE
The center of Analog Keys editing is the LCD display. The main interface screen is shown below.
1
Bar indicating the main volume level setting of the active track.
2
The current tempo displayed with one decimal.
3
The playback/recording status of the sequencer indicated by the standard »record«, »play«, »pause« and »stop« symbols:
.
To the right is a counter displaying how many bars, beats and steps the sequencer has played.
4
Information about which
PARAMETER
page is active. The line above the text indicates the active sub page of the
PARAMETER
page. A fully drawn line means no sub page is available.
5
Up to ten track parameters. They show what the
DATA ENTRY
knobs control and also indicate the current parameter values.
Press and turn a knob to adjust its parameters in larger increments (whole octaves, for instance, where appropriate).
6
The currently active pattern.
7
The currently active kit. When turning a
DATA ENTRY
knob, the full name of the parameter being adjusted is shown here.
All windows can be closed using the [NO/RELOAD] key.
1
2
4
5
7
6
3
Summary of Contents for Analog Keys
Page 1: ......


