


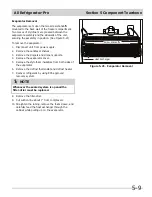


Section 5 Component Teardown
5-6
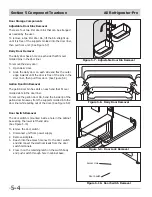
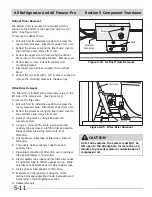
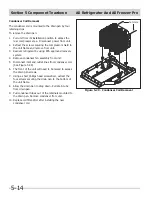
Figure 5-14. Light Shield and Fixture Removal
Light Shield Removal
To remove the light shield, extract the two screws
securing the light shield to the compartment ceiling.
Light Fixture Removal
The light fixture is secured with retaining latches into the
interior cabinet ceiling behind the light shield.
(See Figure 5-14)
To remove the light fixture:
1. Disconnect unit from power supply.
2. Remove light bulb by turning counter-clockwise.
3. Pull down on the front of the light fixture while
turning the fixture a quarter turn to release the
retaining latches.
4. Disconnect wire leads from light fixture terminals.
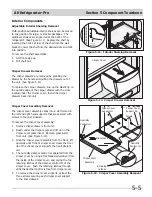
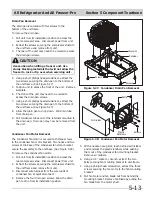
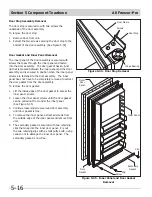
Baffle Plate Removal
To remove the baffle plate, with one hand grab the
baffle plate from the center and pull back while with
the other hand, reach behind to disengage the retaining
latches. (See Figure 5-15)
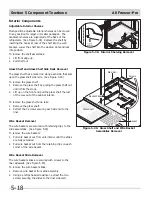
Evaporator Cover Removal
The evaporator cover is secured with screws to the
back wall and bottom of the freezer compartment. The
evaporator cover has a gasket on each side to create
proper airflow in the compartment. (See Figure 5-16)
To remove the evaporator cover:
1. Disconnect unit from power supply.
2. Remove the cantilever shelves.
3. Remove the crispers and crisper supports.
4. Using a phillips head screwdriver, extract the ten
(10) screws securing the evaporator cover to the
refrigerator compartment.
5. Pull the thermostat knob from thermostat shaft.
6. Carefully pull the evaporator cover away from the
back wall enough to access the wire harness
connections to the light fixtures and thermostat. Use
caution not to damage the gaskets on both sides of
the evaporator cover.
7. From behind the evaporator cover, disconnect the
wire leads from the light fixture terminals.
8. Compress the thermostat spring clip then pull the
thermostat from the back of the evaporator cover.
Evaporator cover may now be removed from unit.
Light Shield
Light Fixture
Light Bulb
Figure 5-15. Baffle Plate Removal
Baffle Plate
Figure 5-16. Evaporator Cover Removal
Gasket
1 of 2 shown
Screws
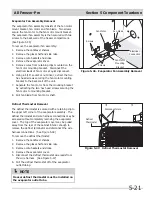
Light Bulb
Screw
Screw
All Refrigerator-Pro
Summary of Contents for FPUH17D7KF All Freezer Professional Series
Page 2: ......
Page 20: ...Section 2 Installation Information 2 12 Figure 2 20 Figure 2 21 ...
Page 21: ...Section 2 Installation Information 2 13 Figure 2 22 Figure 2 23 ...
Page 24: ...Section 2 Installation Information 2 16 Notes ...
Page 26: ...Section 3 Electronic Control 3 2 Notes ...
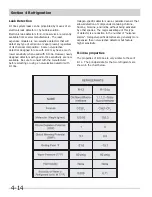
Page 41: ...Section 4 Refrigeration 4 15 HFC 134a CFC 12 Pressure Temperature Chart ...
Page 44: ...Section 4 Refrigeration 4 18 Notes ...
Page 68: ...Section 6 Parts List 6 2 All Refrigerator Cabinet Exploded View And Parts List ...
Page 70: ...Section 6 Parts List 6 4 All Refrigerator Sealed System Exploded View And Parts List ...
Page 72: ...Section 6 Parts List 6 6 All Freezer Door Exploded View And Parts List ...
Page 74: ...Section 6 Parts List 6 8 All Freezer Cabinet Exploded View And Parts List ...
Page 76: ...Section 6 Parts List 6 10 All Freezer Sealed System Exploded View And Parts List ...
Page 78: ...Section 6 Parts List 6 12 Notes ...
Page 82: ...Section 7 Troubleshooting 7 4 Notes ...
Page 83: ...Section 8 Wiring Diagram 8 1 All Refrigerator Wiring Diagram ...
Page 84: ...8 2 Section 8 Wiring Diagram All Freezer Wiring Diagram ...


