


Section 4 Refrigeration
4-7
Filter-Drier Installation
Any time the sealed system is opened and the
refrigerant charge is removed, the liquid line filter-drier
must be replaced and the system thoroughly evacuated
before replacing refrigerant.
1. Disconnect electrical supply to refrigerator/freezer.
2. Recover refrigerant by using EPA approved
recovery
system.
3. Using a 3 cornered file, score a groove around
capillary tube as close to old filter-drier as possible.
Break capillary tube along score mark from
filter-drier.
4. Cut condenser outlet tube at filter-drier. Discard
filter-drier.
5. Thoroughly clean condenser outlet tube and
capillary
tube.
6. Place inlet connection of filter-drier over condenser
tube approximately ¼” and solder.
7. Insert capillary tube input end into filter-drier outlet.
Do not allow tube to bottom against screen. Solder
carefully so that solder does not plug capillary tube.
8. Install process tube adapter to filter-drier.
9. Evacuate and charge system using the
recommended procedure described under Evacuating
and Recharging.
10. Reassemble unit.
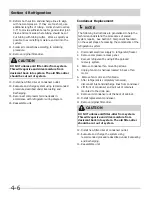
Evaporator and Suction Line Replacement
1. Disconnect electrical supply to refrigerator/freezer.
2. Recover refrigerant by using EPA approved
recovery
system.
3. Remove shelving.
4. Remove evaporator cover.
5. Remove evaporator from its installation position.
6. Cut or remove suction line from compressor.
7. Cut filter-drier from condensing unit.
8. Remove sealant from cabinet where suction line
enters.
9. Remove evaporator and suction line as one piece.
10. Install new evaporator with attached suction line.
11. Seal cabinet.
12. Install new filter drier at condenser outlet.
13. Evacuate and charge system using the
recommended procedure described under Evacuating
and Recharging.
DO NOT unbraze old filter-drier from system.
This will vaporize and drive moisture from
desiccant back into system. The old filter-drier
should be cut out of system.
CAUTION
The following instructions are generalized to help the
technician understand the procedures of sealed
system repairs. See Section 5 Component Teardown
on the exact steps of accessing the components of the
refrigeration system.
NOTE
The following instructions are generalized to help the
technician understand the procedures of sealed
system repairs. See Section 5 Component Teardown
on the exact steps of accessing the components of the
refrigeration system.
NOTE
DO NOT unbraze old filter-drier from system.
This will vaporize and drive moisture from
desiccant back into system. The old filter-drier
should be cut out of system.
CAUTION
Summary of Contents for FPUH17D7KF All Freezer Professional Series
Page 2: ......
Page 20: ...Section 2 Installation Information 2 12 Figure 2 20 Figure 2 21 ...
Page 21: ...Section 2 Installation Information 2 13 Figure 2 22 Figure 2 23 ...
Page 24: ...Section 2 Installation Information 2 16 Notes ...
Page 26: ...Section 3 Electronic Control 3 2 Notes ...
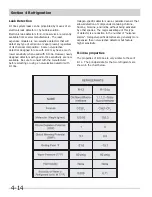
Page 41: ...Section 4 Refrigeration 4 15 HFC 134a CFC 12 Pressure Temperature Chart ...
Page 44: ...Section 4 Refrigeration 4 18 Notes ...
Page 68: ...Section 6 Parts List 6 2 All Refrigerator Cabinet Exploded View And Parts List ...
Page 70: ...Section 6 Parts List 6 4 All Refrigerator Sealed System Exploded View And Parts List ...
Page 72: ...Section 6 Parts List 6 6 All Freezer Door Exploded View And Parts List ...
Page 74: ...Section 6 Parts List 6 8 All Freezer Cabinet Exploded View And Parts List ...
Page 76: ...Section 6 Parts List 6 10 All Freezer Sealed System Exploded View And Parts List ...
Page 78: ...Section 6 Parts List 6 12 Notes ...
Page 82: ...Section 7 Troubleshooting 7 4 Notes ...
Page 83: ...Section 8 Wiring Diagram 8 1 All Refrigerator Wiring Diagram ...
Page 84: ...8 2 Section 8 Wiring Diagram All Freezer Wiring Diagram ...


