background image

Detergent dispenser drawer

 Compartment for detergent used for pre-

wash and soak phase or for stain remover
used during the stain action phase (if availa-
ble). The prewash and soak detergent is
added at the beginning of the wash pro-
gramme. The stain remover is added during
the stain action phase.

 Compartment for powder or liquid deter-

gent used for main wash. If using liquid de-
tergent pour it 

just before

 starting the pro-

gramme.

 Compartment for liquid additives (fabric

softener, starch).
Follow the product manufacturer’s recom-
mendations on quantities to use and do not
exceed the 

«MAX»

 mark in the detergent

dispenser drawer. Any fabric softener or
starching additives must be poured into the
compartment before starting the wash pro-
gramme.

Control panel

Below is a picture of the control panel. It shows the programme selector dial as well as
the buttons, pilot lights and the display. These are presented by relevant numbers on
the following pages.

1

2

3

4

5

6

7

8

9

1

Programme selector dial

2

TEMPERATURE button

3

SPIN reduction button

4

EASY IRON button

5

EXTRA RINSE button

6

DELAY START button

7

Display

8

START/PAUSE button

9

TIME MANAGER buttons

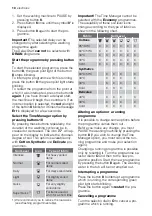
Programme Selector Dial

It allows you to switch the appliance on/off
and/or to select a programme.

Temperature

This button allows you to increase or de-
crease the washing temperature.

electrolux 

 5

Summary of Contents for EWF10771 W

Page 1: ...user manual Washing Machine EWF 10771 W ...

Page 2: ...d appliance If parts are damaged contact your supplier If the appliance is delivered in the winter months when there are minus tempera tures Store it at room temperature for 24 hours before using for the first time General safety It is dangerous to alter the specifications or attempt to modify this product in any way During high temperature wash pro grammes the door glass may get hot Do not touch ...

Page 3: ... empty and buttons and zips are fas tened Avoid washing frayed or torn arti cles and treat stains such as paint ink rust and grass before washing Under wired bras must NOT be machine washed Garments which have been in contact with volatile petroleum products should not be machine washed If volatile cleaning fluids are used care should be taken to ensure that the fluid is removed from the garment b...

Page 4: ...eatment of laundry with low water energy and detergent consumption Its new washing system allows total use of detergent and reduces water consumption so saving energy 1 2 3 4 5 1 Detergent dispenser drawer 2 Control panel 3 Door opening handle 4 Drain pump 5 Adjustable feet 4 electrolux ...

Page 5: ...eed the MAX mark in the detergent dispenser drawer Any fabric softener or starching additives must be poured into the compartment before starting the wash pro gramme Control panel Below is a picture of the control panel It shows the programme selector dial as well as the buttons pilot lights and the display These are presented by relevant numbers on the following pages 1 2 3 4 5 6 7 8 9 1 Programm...

Page 6: ...ure icons Cold During the washing cycle the display shows the temperature icon animated to indicate that the appliance has started the heating phase of the water in the tub 7 3 Spin value 7 4 Spin speed icons No spin Rinse Hold Night Cycle During the spinning phase the spiral is ani mated No spin option eliminates all the spin phases and increases the number of rinses for some programmes Rinse Hol...

Page 7: ... started this icon is lighted on and only the phase running icon stays on When the programme has finished three flashing zero 0 00 are displayed and this icon dis appears 7 11 Washing programme phase icons Prewash Wash Rinses Drain Spin By selecting the wash programme the washing programme phase icons corre sponding to the various phases making up the programme are shown in the upper part of the d...

Page 8: ...start the machine 2 After pressing button 8 it will be impos sible to change any other programme or option To enable or disable this option press simul taneously for about 6 seconds buttons 5 and 6 until on the display the icon appears or disappears Daily use Load the laundry Open the door by carefully pulling the door handle outwards Place the laundry in the drum one item at a time shaking them o...

Page 9: ...e spin speed if you want your laundry to be spun at a different speed Select the available options by pressing buttons 3 4 and 5 Depending on the programme different functions can be combined These must be selected after choosing the desired pro gramme and before pressing button 8 When these buttons are pressed the corre sponding icons appear on the display When they are pressed again the icons di...

Page 10: ...items Light For slightly soiled items Quick For very slightly soiled items Super Quick 1 For items used or worn for a short time 1 We recommend you to reduce the load sizes see Washing programmes table Important The Time Manager cannot be selected with the Economy programmes The availability of these soil level icons change according to the type of fabric as shown in the following chart Fabric Soi...

Page 11: ...ut another wash close the water tap Leave the door open to pre vent the formation of mildew and unpleasant smells Stand By If your laundry is not removed within 10 minutes after the programme is fin ished the back light of the display switches off and the energy saving system will be en abled Only the pilot light of the button 8 is blinking to indicate that the appliance has to be switched off By ...

Page 12: ...the garment on a soft cloth and dab the stain Lipstick moisten with acetone as above then treat stains with methylated spirits Treat any residual marks with bleach Red wine soak in water and detergent rinse and treat with acetic or citric acid then rinse Treat any residual marks with bleach Ink depending on the type of ink moisten the fabric first with acetone1 then with acetic acid treat any resi...

Page 13: ... soiled items SPIN RINSE HOLD NO SPIN NIGHT CY CLE EASY IRON EX TRA RINSE TIME MANAGER COTTONS ECONOMY 90 40 Main wash Rinses Maximum spin speed 1000 rpm Max load 6 kg White and fast coloured cotton This programme can be selected for slightly or normally soiled cotton items The temperature will decrease and the washing time will be extended This allows to obtain a good washing efficiency so saving...

Page 14: ...tems This allows to obtain a good wash ing efficiency so saving energy The washing tempera ture is 40 C SPIN NO SPIN RINSE HOLD NIGHT CYCLE EASY IRON EXTRA RINSE SYNTHETICS ECONOMY WITH PREWASH 40 Prewash Main wash Rinses Maximum spin speed 900 rpm Max load 3 kg This programme can be selected for synthetics and mixed fabric items with stains This allows to obtain a good washing efficiency by savin...

Page 15: ...bras and underwear etc SPIN NO SPIN RINSE HOLD NIGHT CYCLE SILK 30 Main wash Rinses Maximum spin speed 700 rpm Max load 1 kg Delicate washing programme suitable for silk and mixed synthetic items SPIN NO SPIN RINSE HOLD NIGHT CYCLE JEANS 40 Main wash Rinses Maximum spin speed 1000 rpm Max load 3 kg With this programme it is possible to wash items like pants shirts or jackets in Jeans and also jers...

Page 16: ...NSE DRAIN Draining of water Max load 6 kg For emptying out the water of the last rinse in pro grammes with the Rinse Hold and Night Cycle option selected SPIN Drain and long spin Maximum spin speed 1000 rpm Max load 6 kg Separate spin for hand washed garments and after pro grammes with the Rinse Hold and Night Cycle option selected You can choose the spin speed by pressing the relevant button to a...

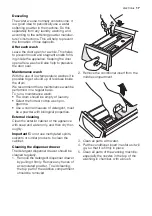
Page 17: ...rum should be empty of laundry Select the hottest cotton wash pro gramme Use a normal measure of detergent must be a powder with biological properties External cleaning Clean the exterior cabinet of the appliance with soap and water only and then dry thor oughly Important Do not use methylated spirits solvents or similar products to clean the cabinet Cleaning the dispenser drawer The detergent dis...

Page 18: ...tergent Door seal Check from time to time the door seal and eliminate eventual possible objects that could be trapped in the fold Drain pump The pump should be inspected regularly and particularly if the machine does not empty and or spin the machine makes an unusual noise dur ing draining due to objects such as safety pins coins etc blocking the pump Proceed as follows 1 Disconnect the appliance ...

Page 19: ...water inlet hose is not blocked 1 Turn off the water tap 2 Unscrew the hose from the tap 3 Clean the filter in the hose with a stiff brush 4 Screw the hose back onto the tap Emergency emptying out If the water is not discharged proceed as follows to empty out the machine 1 pull out the plug from the power socket 2 close the water tap 3 if necessary wait until the water has cooled down 4 open the p...

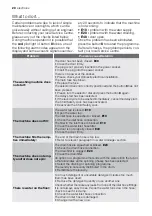
Page 20: ...ed If the laundry are to be washed immediately cancel the delay start The Child Safety Lock has been activated Deactivate the Child Safety Lock The machine does not fill The water tap is closed E10 Open the water tap The inlet hose is squashed or kinked E10 Check the inlet hose connection The filter in the inlet hose is blocked E10 Clean the water inlet hose filter The door is not properly closed ...

Page 21: ...e is very little laundry in the drum Load more laundry Spinning starts late or the machine does not spin The electronic unbalance detection device has cut in because the laundry is not evenly distributed in the drum The laundry is redis tributed by reverse rotation of the drum This may happen several times before the unbalance disappears and normal spinning can re sume If after 10 minutes the laun...

Page 22: ...amme duration Minutes White Cottons 95 2 1 52 For the duration of the programmes please refer to the display on the con trol panel Cottons 60 1 3 48 Cotton ECO 60 1 0 9 37 Cottons 40 0 6 48 Synthetics 60 0 85 45 Synthetics 40 0 5 42 Delicates 40 0 45 64 Wool Handwash 40 0 4 54 1 Cottons Eco at 60 C with a load of 6 kg is the reference programme for the data entered in the energy label in complianc...

Page 23: ...itted if the machine ever has to be transported again 1 After removing all the packaging carefully lay machine on it s back to remove the polystyrene base from the bottom 2 Remove the power supply cable and the draining and inlet hose from the hose holders on the rear of the appliance 3 Unscrew the three bolts 4 Slide out the relevant plastic spacers electrolux 23 ...

Page 24: ...ck that the machine does not touch the wall or other kitchen units Level the washing ma chine by raising or lowering the feet The feet may be tight to adjust as they incorporate a self locking nut but the machine MUST be level and stable If necessary check the set ting with a spirit level Any necessary adjust ment can be made with a spanner Accurate levelling prevents vibration noise and dis place...

Page 25: ... hose specially designed for this type of use Important Before connecting up the machine to new pipework or to pipework that has not been used for some time run off a reasonable amount of water to flush out any debris that may have collected in the pipes Water drainage The end of the drain hose can be positioned in three ways Hooked over the edge of a sink using the plastic hose guide supplied wit...

Page 26: ...ate collection point for the recycling of electrical and electronic equipment By ensuring this product is disposed of correctly you will help prevent potential negative consequences for the environment and human health which could otherwise be caused by inappropriate waste handling of this product For more detailed information about recycling of this product please contact your local council your ...

Page 27: ... Measure out detergent according to the water hardness the degree of soiling and the quantity of laundry being washed electrolux 27 ...

Page 28: ...132961750 00 372008 www electrolux com web portal 1 web portal 2 ...

Reviews: