


18
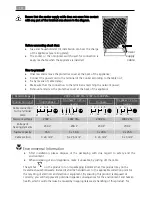
Ensure that the cooker supply cable does not come into contact
with any part of the hatched area shown in the diagram.
Before connecting check that:
•
fuse and household electric installation can bear the charge
of the appliance (see rating plate);
•
The socket or the omnipolar switch used for connection is
easily reachable when the appliance is installed.
How to proceed?
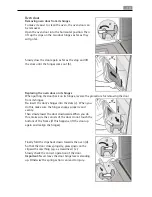
•
Unscrew and remove the protective cover at the back of the appliance;
•
Connect the power cord to the terminal of the cooker according to the table no.1;
•
Fix by means of cable clamp;
•
Make sure that the connection to the terminal is matching the network power;
•
Remount and screw the protective cover at the back of the appliance.
Rated voltage
230V ~/ 400V 3N~/ 230V 3~/ 400V 2N~
Connection type
Single phase
Tri-phase Y 3 ph. +
neutral
Tri-phase
Tri-phase Y 2 ph. +
neutral
Cable connection
to the terminal
plate
1 2 3 4 5
L1
N
3
L3
L1
4 5
N
L2
1 2
L3
5
1 2 3 4
L1
L2
4 5
N
2 3
L2
L1
1
Network voltage
230V ~
400V 3N~
230V 3~
400V 2N~
Voltage of
heating elements
230 V
230 V
230 V
230 V
Fusible capacity
35 A
3 x 16 A
3 x 20 A
2 x 25 A
Cable section
3 x 6 mm
2
5 x 2,5 mm
2
4 x 4 mm
2
4 x 4 mm
2
Environmental Information
•
After installation, please dispose of the packaging with due regard to safety and the
environment.
•
When disposing of an old appliance, make it unusable, by cutting off the cable.
The symbol
on the product or on its packaging indicates that this product may not be
treated as household waste. Instead it shall be handed over to the applicable collection point for
the recycling of electrical and electronic equipment. By ensuring this product is disposed of
correctly, you will help prevent potential negative consequences for the environment and human
health, which could otherwise be caused by inappropriate waste handling of this product. For
Power
supply
cable