Electrolux 1000FA User Manual Download Page 17


17 

The minimum distance combustible material can be fitted above the cooker in line with the 
edges of the cooker is 69 cm.
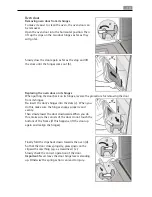


Levelling 
The appliance is provided with adjustable small feet placed in 
the back and front corners of the base. 


By adjusting the small feet it is possible to change the height 
of the appliance so as to ensure a better leveling with other 
surfaces and an even distribution of the liquids contained in 
pots and pans.


Electrical connections 

Any electrical work required to install this hob and the supply cable should be carried out by a 
qualified electrician or competent person, in accordance with the current regulations. 

This appliance must be earthed. 
The manufacturer disclaims any responsibility should these safety instructions not be carried out. 


This cooker is designed to be connected to a 230/400V, 50Hz electrical supply. 
To connect to the electricity supply, use cable type H05 RR-F. 
Before switching on, make sure the electricity supply voltage is the same as that indicated on 
the rating plate. 
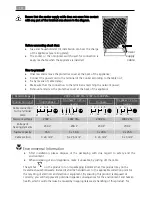
The cooker is supplied without supply cable. A flexible supply cable must be fitted, in accordance 
with the specification gave in the relevant table no. 1. 
In case of a direct connection to the mains you have to interpose an omnipolar switch with a 
minimum opening between contacts of 3 mm must be done under over voltage category III 
condition. 
The switch should be sited within 2m of the hob and be easily accessible upon completion of the 
installation.


The yellow-green grounding cable has not to be interrupted by the switch. 


NOTE: The earth wire should be about 2 cm longer than the live and neutral wires. 


If the power supply cable is damaged, it must be replaced by 
the manufacturer or its service agent or a similarly qualified 

person in order to avoid a hazard. 


After installation and connecting, the cable must be placed so 
that it cannot at any point reach a temperature of more than 

50°C above the ambient temperature. 


Power 
supply  

cable 

Summary of Contents for 1000FA

Page 1: ...1000FA Cooker User manual ...

Page 2: ...oy with your new appliance Contents Safety instructions 3 Electrical safety 3 Installation 3 Child safety 3 Safety whilst using 3 Unpacking 3 Description of appliance 4 Accessories 6 Before first use 7 Daily use 7 Electric hotplate 7 Electric oven 9 Oven cooking cooking table 10 Care and cleaning 11 Oven bulb replacement 14 Something not working 15 Technical data 16 Installation 16 Electrical conn...

Page 3: ...unsupervised when the appliance is in use Accessible parts may become hot during use Young children should be kept away This appliance is not intended for use by persons including children with reduced physical sensory or mental capabilities or lack of experience and knowledge unless the y have been given supervision or instruction concerning use of the appliance by a person responsible for their ...

Page 4: ...closed until the hob and oven are completely cold Only clean this oven in accordance with the instructions Unpacking Check that the cooker is in perfect condition and not damaged You must notify your retailer immediately of any damage that has occurred during transport For direct deliveries any transport damage must be notified to Customer Service within seven days of delivery The packaging can be...

Page 5: ...5 Control panel Hob control knobs Thermostat control knob Thermostat lamp Hob general lamp Hob Hot plate 145 1000W Hot plate 180 1500W Hot plate 145 1000W Hot plate 180 2000W Oven ventilation ...

Page 6: ...e first time Wash the shelves roasting pan etc in hot water and washing up liquid Rinse and dry Shelf For placing dishes on roast pastry mounds The dish should be put in the middle of the shelf to balance the weight Roasting tray It is used to collect juice When cooking on it place it on the 2 nd shelf If you do not use the roasting tray remove it from the oven ...

Page 7: ...the same way as a boiling kettle The oven vents allow some of this steam to escape However always stand back from the oven when opening the oven door to allow any build up of steam or heat to release If the steam comes into contact with a cool surface on the outside of the oven e g a trim it will condense and produce water droplets This is quite normal and is not a fault with the oven To prevent d...

Page 8: ...s for the correct setting of the plates are given in the following table OFF 0 Very Gentle 1 To keep food warm To melt butter and chocolate Gentle 2 To prepare cream sauces stews and milk puddings or to fry eggs Slow 3 Dried vegetables frozen food fruit boiling water or milk Medium 4 Boiled potatoes fresh vegetables pâtés soups broths pancakes or fish High 5 Larger stews meat roll fish omelet s st...

Page 9: ...the overheated splashes could easily ignite If the control knobs become difficult to turn please contact your local Service Force Centre Electric oven The oven has removable side racks for the shelves with four rungs on each side Oven functions For all oven functions the oven indicator light comes on when the oven is heating and goes out when the set temperature is reached goes on and off as the t...

Page 10: ...of the oven only This position of the oven function knob is suitable for finishing cooked dishes e g lasagna shepherds pie cauliflower cheese etc It is not necessary to preheat the oven How to proceed 1 Insert the meal on the 3 rd level 2 Turn the oven function knob on position To turn off the oven turn the knob clockwise to position off 0 Oven cooking cooking table The data in the chart bellow ar...

Page 11: ... cake 1 3 15 20 190 200 25 35 Stuffed yeast cake 1 2 15 20 170 180 20 30 Buttered cake 1 3 15 20 190 200 25 35 Care and cleaning The oven should be kept clean at all times A build up of fats or other foodstuffs could result in a fire Before cleaning ensure all control knobs are in the OFF position and the appliance has cooled completely Before any maintenance or cleaning can be carried out you mus...

Page 12: ...on a medium setting for 30 seconds then turn off Pour a very small amount of salt free oil onto a dry cloth or kitchen paper Apply a thin coat of oil to the hotplate surface and wipe off any excess Heat the hotplate on a medium setting for 1 minute To apply restorative agent first heat the hotplate on a medium setting for 30 seconds then turn off Apply a very thin coating of Collo Electrol using t...

Page 13: ...for removing the door from its hinges Re insert the door s hinges into the slots c When you do this make sure the hinges engage properly and evenly Then slowly lower the door downwards When you do this make sure the corners of the door do not touch the bottom of the frame if this happens lift the door up again and realign the hinges Finally fold the clips back down towards the oven d So that the d...

Page 14: ...whilst the oven is in use or still hot To open Catch the drawer from bottom and pull it out To remove the drawer Pull it out till the stop than lift it slowly and pull it out completely Reassemble the drawer following the same procedure in reverse Oven bulb replacement Ensure that the appliance is switched off and disconnected from the electricity supply before replacing the bulb to avoid possibil...

Page 15: ...in an approved electrician The oven does not come on Check check if a cooking function temperature has been selected correctly the socket switch or the switch from the mains supply to the cooker are ON It takes too long to finish the dishes or they are cooked too fast Check the temperature may need adjusting If after these checks the appliance still does not work contact your local Service Force C...

Page 16: ...nstallation be carried out by QUALIFIED PERSONNEL in accordance with existing rules and regulations The appliance must be installed in accordance with Y specification EN60 335 2 6 The cooker must not be installed higher than the worktop Please ensure that when the appliance is installed it is easily accessible for the engineer in the event of a breakdown Before your appliance is connected to the m...

Page 17: ...supply use cable type H05 RR F Before switching on make sure the electricity supply voltage is the same as that indicated on the rating plate The cooker is supplied without supply cable A flexible supply cable must be fitted in accordance with the specification gave in the relevant table no 1 In case of a direct connection to the mains you have to interpose an omnipolar switch with a minimum openi...

Page 18: ...2 ph neutral Cable connection to the terminal plate 1 2 3 4 5 L1 N 3 L3 L1 4 5 N L2 1 2 L3 5 1 2 3 4 L1 L2 4 5 N 2 3 L2 L1 1 Network voltage 230V 400V 3N 230V 3 400V 2N Voltage of heating elements 230 V 230 V 230 V 230 V Fusible capacity 35 A 3 x 16 A 3 x 20 A 2 x 25 A Cable section 3 x 6 mm 2 5 x 2 5 mm 2 4 x 4 mm 2 4 x 4 mm 2 Environmental Information After installation please dispose of the pac...

Page 19: ...19 more detailed information about recycling of this product please contact your local city office your household waste disposal service or the shop where you purchased the product ...

Page 20: ...342 729 503 0A 092008 Subject to change without notice ...

Reviews: