


TV GAME
LOCATION OF CONTROLS
CH (CHANNEL)
and
buttons
Press and release the CH (CHANNEL)
or
button. The channel automatically stops
at the next channel set into memory. Press and hold the button down to change channels
more quickly.
For proper operation, before selecting channels, they should be set into the TV's
memory. See "To Memorize Channels".
DIRECT CHANNEL SELECTION buttons (0-9) -
Press these buttons to select a
channel.The channel number will appear on the upper right corner of the TV screen. If an
invalid channel number is selected, the display will revert to the previous channel.
TV MODE DIRECT CHANNEL SELECTION -
When the TV/CATV menu option is in the
TV position, all channels can be instantly selected by using two buttons (For example, to
select channel 2, press "0", then "2". If you press only "2", channel selection will be
delayed for a few seconds). For channels 10 and above, press the 2 digits in order.
To turn on the TV, press the POWER button.
The VOLUME can be adjusted to a desired level by pressing the VOL (VOLUME)
or
button.
The sound level will be indicated on the TV screen by GREEN BARS AND A NUMBER.
As the sound level increases, so do the number of BARS AND THE NUMBER on the
screen. The same is true for decreasing the level.
Set the TV/CATV menu option to the appropriate position. When shipped from the
factory, this menu option is in the CATV setting. See "To Memorize Channels".
TV OPERATION
1
2
TV - VHF/UHF channels
CATV - CABLE TV channels
3
4
1. Power Button -
Press to turn the TV on or off.
2. Remote Sensor -
Signals from the Remote Control unit are received here.
3. Channel
▲
/
▼
Buttons -
Press to select a higher or lower numbered channel set into memory.
(Enter Button) -
Press to enter or select information for On-Screen operations.
(Reset Button) -
Press, while in the On-Screen menu mode, to reset the On-Screen picture
adjustments to their factory preset positions.
4. Volume
▲
/
▼
Buttons -
Press to raise or lower the level of the sound.
(Menu Buttons) -
Press both Volume
▲
/
▼
buttons at the same time to display the On-
Screen menu functions.
(Set – / + Buttons) -
Press to select the desired setting during On-Screen operations.
5. Audio/Video In Jacks -
Audio and video signal cables from an external source can be
connected here.
6. PHONES (Earphone) Jack -
Plug an earphone or monaural headphones with a 3.5mm
miniplug into this jack for private listening.
CLOSED CAPTION
WHAT IS CLOSED CAPTIONING?
This television has the capability to decode and display Closed Captioned television programs.
Closed Captioning will display text on the screen for hearing impaired viewers or it will
translate and display text in another language.
TO VIEW CLOSED CAPTIONS
Press the TV/CAP/TEXT button on the remote control to switch between normal TV and the two
Closed Caption Modes (Captions and 1/2 of Full Screen Text).
Captions:
This Closed Caption Mode will display text on the screen in English or another
language (depending on the setting of the Closed Captions CH.1/2 button). Generally, Closed
Captions in English are transmitted on Captions Channel 1 and Closed Captions in other
languages are transmitted on Captions Channel 2.
Text:
The Text Closed Caption Mode will usually fill 1/2 of full screen with a programming
schedule or other information. After selecting a Closed Caption Mode, it will stay in effect until
it is changed, even if the channel is changed. If the Captions signal is lost due to a commercial
or a break in the signal, the Captions will reappear when the signal is received again. If the
channels are changed, the Captions will be delayed approximately 10 seconds.
The Captions will appear in places on the screen where they will least interfere with the
picture, usually on the bottom of the screen. News programs will usually show three-line
Closed Captions which scroll onto the screen. Most other shows provide two or three lined
Captions placed near the character who is speaking so the viewer can follow the dialogue.
Words in italics or underlined describe titles, words in foreign languages or words requiring
emphasis. Words that are sung usually appear enclosed by musical notes.
For television programs broadcasting with Closed Captions, look in your TV guide for the
Closed Captions symbol (CC).
• When selecting Closed Captions, the captioning will be delayed approximately 10
seconds.
• Closed Captioned text is only displayed in locations where it is available.
• If no caption signal is received, no captions will appear, but the television will remain in
the Caption Mode.
• Misspellings or unusual characters may occasionally appear during Closed Captioning.
This is normal with Closed Captioning, especially with live programs. This is because
during live programs, captions are also entered live. These transmissions do not allow
time for editing.
• When Captions are being displayed, on-screen displays, such as volume and mute may
not be seen or may interfere with Closed Captions.
• Some cable systems and copy protection systems may interfere with the Closed
Captioned signal.
• If using an indoor antenna or if TV reception is very poor, the Closed Caption Decoder
may not appear or may appear with strange characters or misspelled words. In this case,
adjust the antenna for better reception or use an outdoor antenna.
CATV mode direct channel selection
When the TV/CATV menu option is in the CATV position, channels can be selected as
follows:
1-9
10-12
13-99
100-125
Press "0" twice, then 1-9 as needed.
Example, to select channel 2, press "002".
Press "0", then remaining 2 digits.
Example, to select channel 12, press "012".
Press the 2 digits in order.
Example, to select channel 36, press "36".
Press the 3 digits in order.
Example, to select channel 120, press "120".
NOTE:
If the station being viewed stops broadcasting, the TV will automatically shut off
after 15 minutes.
NOTE:
If Spanish or French is chosen, the on-screen display will be in the selected language, but the
Closed Caption text will not be affected by the language selection.
Press the MENU button.
Press the SET + or – button to select the LANGUAGE
mode, then press the ENTER button.
Press the SET + or – button until the " " indicator
points to the desired language: English (ENGLISH),
Spanish (ESPAÑOL) or French (FRANCAIS), then
press the ENTER button.
Press the MENU button again.
3
4
1
2
FRANCAIS
ENGLISH
ESPAÑOL
LANGUAGE / IDIOMA / LANGUE
〈
+ / – / ENTER / MENU
〉
This TV can display the channel number, on screen displays and picture adjustments on the
screen in English, Spanish or French.
On-screen language selection (step 3) will automatically appear on the screen when you press
the MENU button initially. Select the language you prefer first, then proceed with the other menu
options.
SETTING LANGUAGE
CONNECTION TO OTHER EQUIPMENT
The exact arrangement you use to interconnect various video and audio components to the TV is
dependent on the model and features of each component. Check the Owner's Manual provided with
each component for the location of video and audio inputs and outputs.
The connection diagrams in the following are offered as suggestions. You may need to modify them to
accommodate your particular assortment of components. The diagrams are intended to show compo-
nent video and audio interconnections only.
Press the TV/AV selector button to select the AV mode to use the TV as a monitor.
If you connect the TV to VCR, camcorder Video
Game System, you can select by pressing the TV/
AV button.
Press the TV/AV button repeatedly to select the
desired mode.
"AUX" will display on the screen for 4 seconds.
TV/AV SELECTION
Front of TV
To playback from the camcorder, con-
nect the camcorder to the TV as shown.
3. To connect the TV to a Camcorder
The TV can also be used as a display
device for many video games. However,
due to the wide variety of different types of
signal generated by these devices and
subsequent hook-up variations required,
they have not all been included in the
suggested connection diagrams. You'll
need to consult each component's Own-
er's Manual for additional information.
2.
To connect the TV to a Video Game System
1. To connect the TV to a VCR
AUX
(not supplied)
To AV OUT jack
To Audio/Video OUT
(not supplied)
Front of TV
(not supplied)
To Audio/Video
OUT
AUDIO
VIDEO
Front of TV
VCR
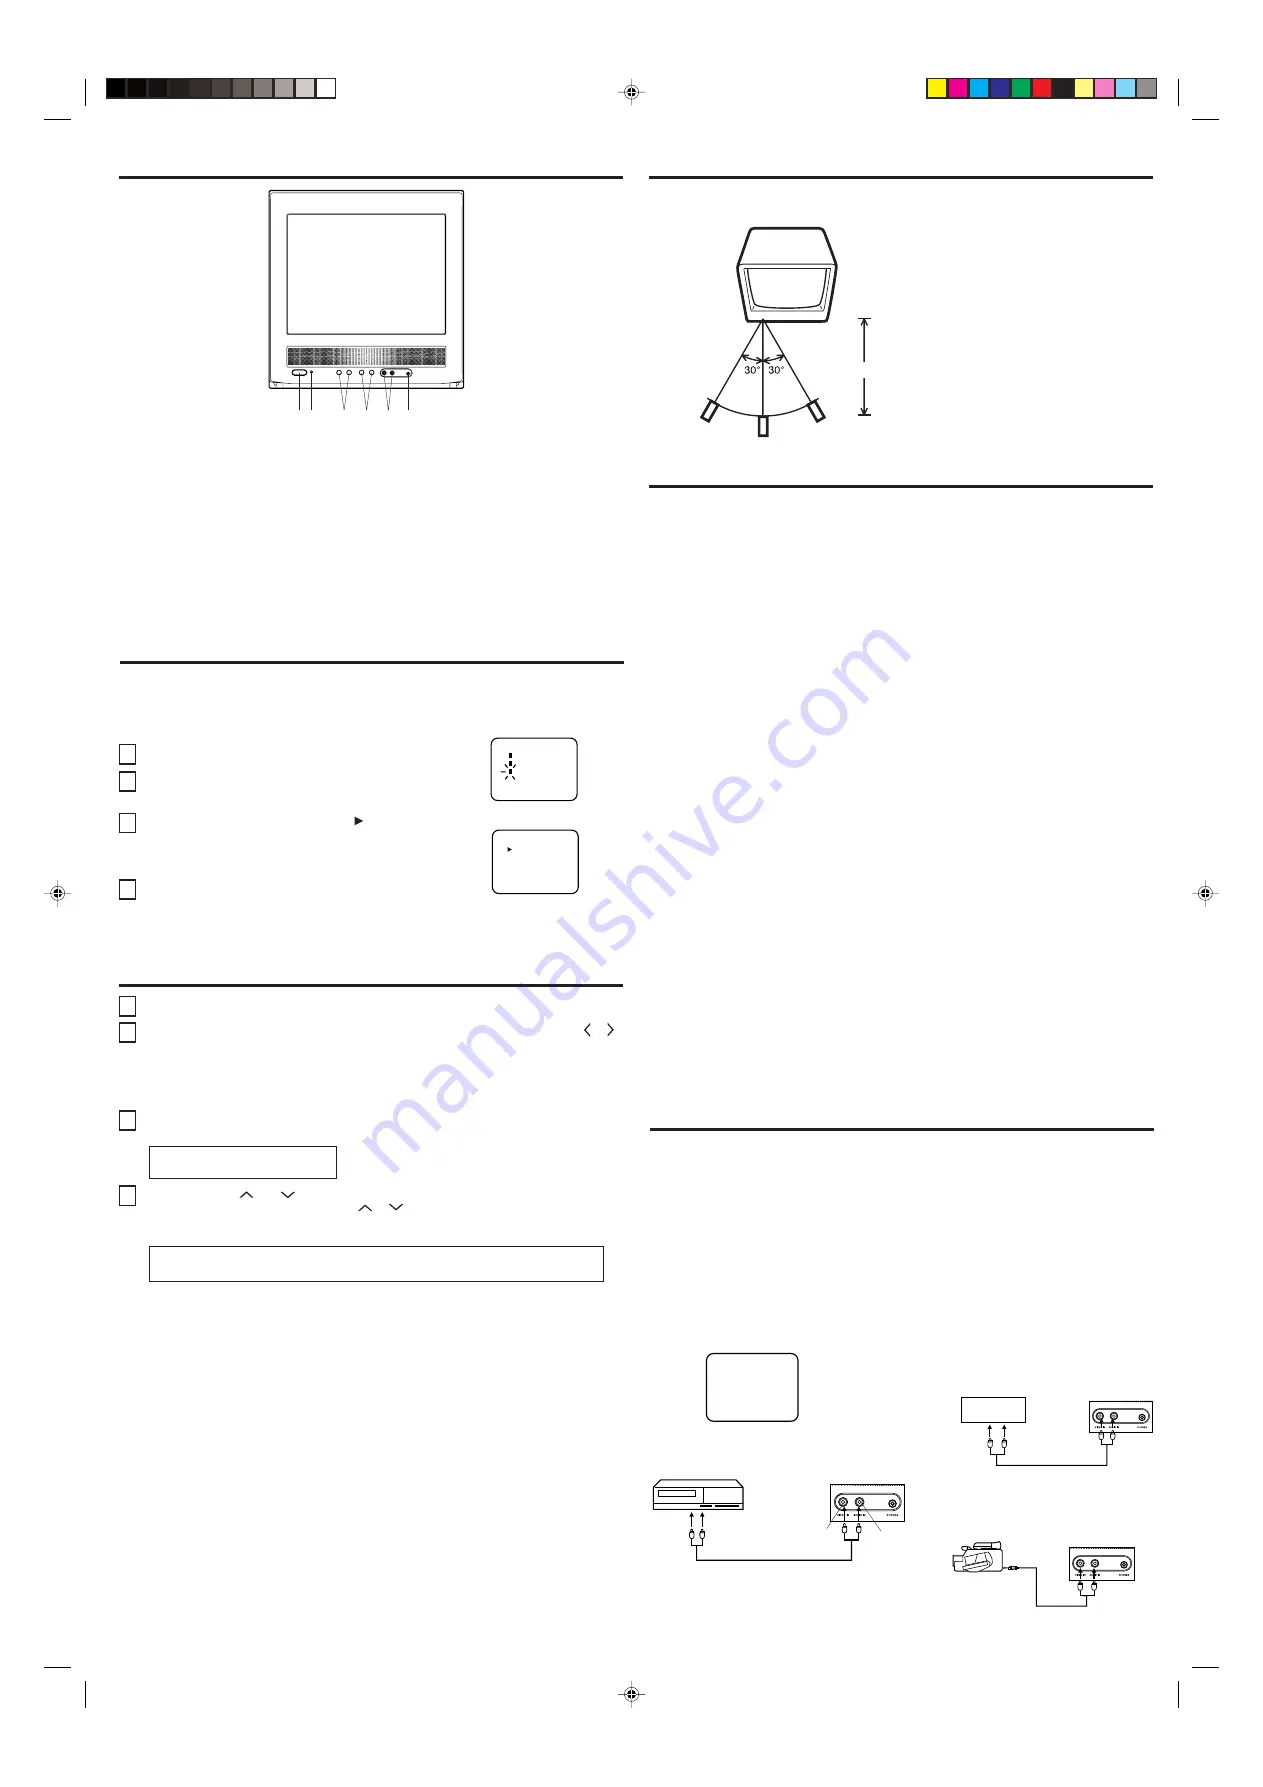
EFFECTIVE DISTANCE OF THE REMOTE CONTROL
When there is an obstacle between
the TV and the Remote Control, the
Remote Control may not operate.
When direct sunlight, an incandescent
lamp, fluorescent lamp or any other
strong light shines on the Remote
Sensor on the TV, the remote
operation may be unstable.
•
•
NOTES:
15 Feet
á ñ
Video Game
System
6
1 2
3
5
4
3Q60421A E
3/8/05, 4:13 PM
4


