background image


© ElectroCraft 2022 

43 

CPP-x06V48A-SA-CAN Drive User Manual 


WARNING! 


Installing  capacitance  value  lesser  than  50

μF  per  each  ampere  deceleration  current  could  result  in  an 

overvoltage fault condition and may result in damage to the drive.   
 

13.5  Connecting External Brake Resistor and Bulk Capacitor 

 
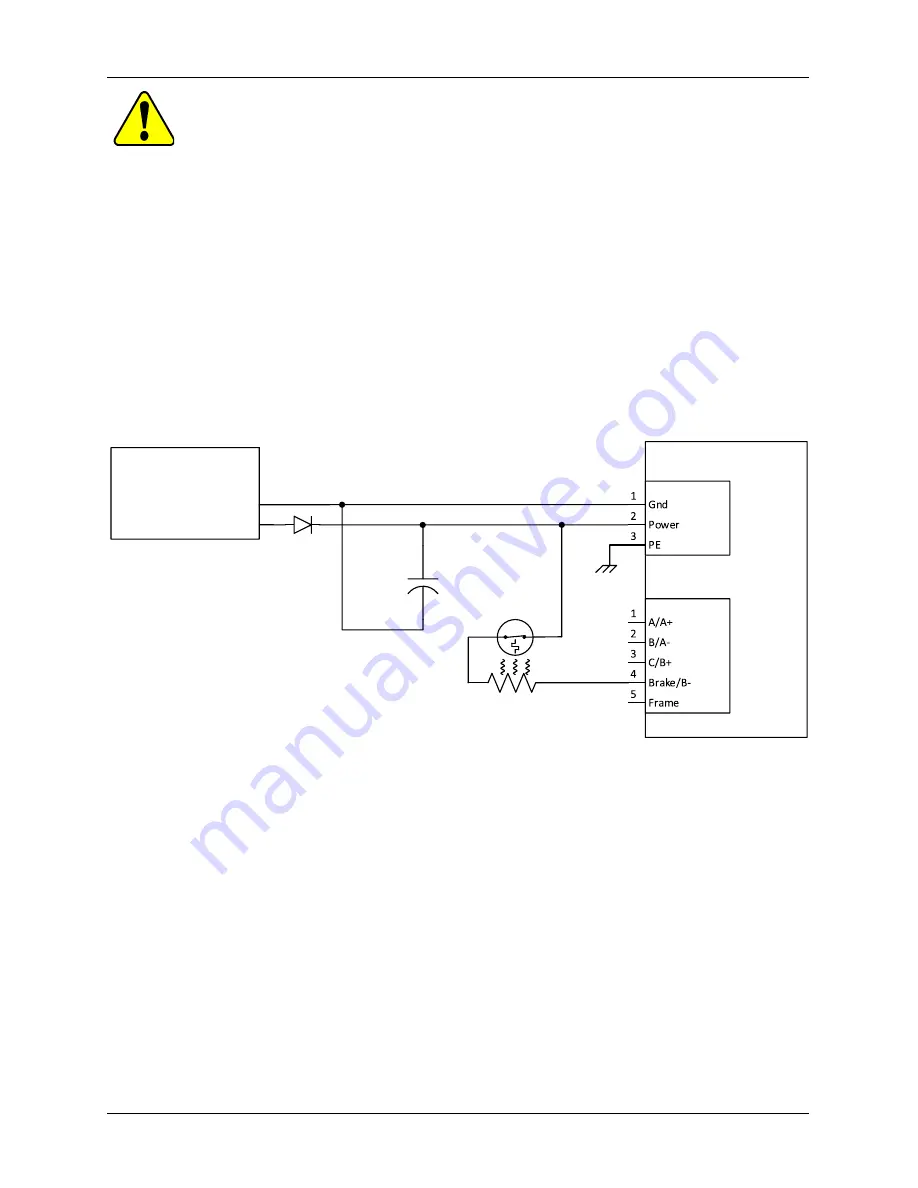
The braking resistor and bulk capacitor wiring is shown in Figure 33.  
 

Temperature Sensitive Device Connection: 

The user supplied temperature sensitive device is connected 

in  series  with  the  brake  resistor  as  shown  in  Figure  33.  Generally,  the  temperature  sensitive  device 
should  be  mounted  in  contact  with  the  surface  of  the  brake  resistor  or  very  close  to  it  for  an  effective 
operation. 
 

Optional Diode connection: 

Adding a diode between the positive terminal of the power supply and J1 pin 

2  of  the  drive  as  shown  in  Figure  33  will  protect  the  power  supply  from  any  back  fed  overvoltage  while 
braking. The diode is sized by the application’s maximum reverse voltage and forward current. 
 

Drive

J2

J1

+DC Power

-DC Power

DC Power 

Supply

+

Bulk 

Capacitor

Diode

Brake 

Resistor

Temperature 

Sensitive Device


Figure 35: External brake resistor and bulk capacitor connection to the drive 


The ElectroCraft Braking Module is designed for this purpose and is compatible with CPP-x06V48A-SA-
CAN. Refer  section 13.6 for application information. 


Summary of Contents for CompletePower Plus CPP-A06V48A-SA-CAN

Page 1: ... ElectroCraft 2022 CPP A06V48A SA CAN CPP B06V48A SA CAN Drive User Manual ElectroCraft CompletePower Plus Universal Servo Drive ElectroCraft document number 198 0000082 ...

Page 2: ...lity is disclaimed All rights reserved No part or parts of this document may be reproduced or transmitted in any form or by any means electrical or mechanical including photocopying recording or by any information retrieval system without permission in writing from ElectroCraft Inc The information in this document is subject to change without notice About This Manual This document is a Drive User ...

Page 3: ...d problems Make suggestions or report errors in documentation Contact ElectroCraft For regional technical application and sales support for ElectroCraft and Hansen Products North America USA Mexico South America Central America Contact 844 338 8114 sales electrocraft com Europe except Germany Middle East Africa Australia Contact EMEA Sales Team 44 0 1270 508800 EMEAsales electrocraft com Germany C...

Page 4: ...rrent Waveforms for Different Step values 15 3 5 Encoder Feedback 16 3 6 Motor and Sensor Configurations 16 3 7 Identification Labels 16 3 8 Status Indicator Lights 16 4 Drive Specifications 17 4 1 Physical Specifications 17 4 2 Environmental Specifications 17 4 3 Electrical Specifications 17 4 3 1 DC Supply Input 17 4 3 2 5VDC Supply Output 17 4 3 3 Motor Output 17 4 3 4 Hall Sensor Inputs 18 4 3...

Page 5: ... 1 2 Hall Sensor Signal Input Circuit 27 8 2 Incremental Encoder 28 8 2 1 Differential Encoder 28 8 2 2 Single Ended Encoder 28 8 2 3 Encoder Input Circuit 29 8 3 IxR Speed Feedback Estimator 29 8 4 Motor Temperature Sensor 30 8 4 1 Temperature Sensor Connections 31 8 4 2 Temperature Sensor Signal Input Circuit 31 9 Connecting I O 32 9 1 I O Functional Description 32 9 2 I O Connections 33 9 2 1 T...

Page 6: ...y of Operation 40 13 3 Selecting External Brake Resistor 41 13 3 1 Calculating resistance value of the braking resistor 41 13 3 2 Calculating power value of the braking resistor 41 13 4 Minimum external bulk capacitance 42 13 5 Connecting External Brake Resistor and Bulk Capacitor 43 13 6 ElectroCraft Braking Module Assembly 44 14 Troubleshooting 45 14 1 Status LED Red 45 14 2 Power LED Green 46 ...

Page 7: ...INGLE ENDED ENCODER CONNECTION TO THE DRIVE 28 FIGURE 18 ENCODER SIGNAL ENDED INPUT CIRCUIT 29 FIGURE 19 TEMPERATURE SENSOR CONNECTION TO THE DRIVE 31 FIGURE 20 TEMPERATURE SENSOR SIGNAL INPUT CIRCUIT 31 FIGURE 21 TYPICAL DRIVE I O CONNECTIONS NEEDED TO OPERATE BLDC AND PMDC MOTORS 33 FIGURE 22 TYPICAL DRIVE I O CONNECTION NEEDED TO OPERATE STEPPER MOTOR 33 FIGURE 23A DIGITAL INPUT CIRCUIT FOR CAP...

Page 8: ... trial operations on the servo drive alone with the motor shaft disconnected from the load to avoid any unexpected motion Motor shaft should be uncoupled and free to rotate without coming in contact with user or any stationary object during set up and preliminary operation 8 Under no circumstances should a phase output from the control be connected to anything other than a passive inductive resist...

Page 9: ...safety precautions and practices relevant to the specific application of this drive In particular the installer should consider the risks associated with erroneous or non operation of the servo drive in the application and mitigate them appropriately 1 2 Storage and Transportation 1 Do not store or install the product in the following places a Locations subject to temperature outside of the range ...

Page 10: ...ay cause internal elements to deteriorate resulting in malfunction or fire 6 Provide the specified clearance between the drive and other devices Provide sufficient space around the drive for cooling by natural convection or provide cooling fans to prevent excessive heat See section 5 for details Failure to observe this caution may result in fire or malfunction 1 5 Wiring 1 Verify ALL wiring BEFORE...

Page 11: ...written approval from ElectroCraft Incorporated 1 Life support devices or systems are intended for surgical implant into the body or support or sustain life and whose failure to perform when properly used in accordance with instructions for use provided in the Drive User Manual and in the labeling can be reasonably expected to result in a significant injury to the user 2 A critical component is an...

Page 12: ...oods that have been damaged outside of our factory because of improper packaging or handling All goods shipped to ElectroCraft must be shipped FREIGHT PREPAID 2 Introduction to ElectroCraft CompleteArchitect PC Software ElectroCraft CompleteArchitect is a Windows based software tool used for setup configuration system diagnostics and motion control management CompleteArchitectTM will lead the user...

Page 13: ... output configurable Encoder mode for low speed performance Digital input for Capture feature for encoder location Digital output signal to engage eBrake BLDC PMDC and Stepper motor control Halls only operation mode for BLDC motor IxR speed feedback estimator mode for PMDC motor Integrated circuit for brake regeneration Travel limit inputs Configurable ramp for current and speed 97 efficiency at f...

Page 14: ...using trapezoidal 6 step commutation with hall sensor feedback as shown in Figure 2 and sinusoidal commutation with hall sensor feedback as shown in Figure 3 Motor Phase A Motor Phase B Motor Phase C Hall Sensor 1 Hall Sensor 2 Hall Sensor 3 60 120 180 240 300 360 60 120 180 240 300 360 Figure 2 Trapezoidal Commutation with Hall sensor feedback ...

Page 15: ...CPP x06V48A SA CAN Drive User Manual Motor Phase A Motor Phase B Motor Phase C Hall Sensor 1 Hall Sensor 2 Hall Sensor 3 60 120 180 240 300 360 60 120 180 240 300 360 Figure 3 Sinusoidal commutation with Hall sensor feedback ...

Page 16: ... microsteps per step at a maximum step rate of 1MHz 50 10 The phase current wave forms for full step quarter step and 256 microsteps per step is shown in Figure 4 30 60 90 120 150 180 210 240 270 300 330 360 0 Full Step 1 Microstep per Step Quarter Step 4 Microsteps per Step 256 Microsteps per Step Motor Phase A Motor Phase B Motor Phase A Motor Phase B Motor Phase A Motor Phase B Figure 4 Stepper...

Page 17: ...PMDC Motor Stepper Motor Hall Sensors Yes No No Encoder Halls Yes No No Encoder Only No Yes Yes IxR Estimator No Yes No None No Yes Yes 3 7 Identification Labels See figure 6 which shows label location for product serial number next to connector J5 Figure 6 Drive with identifying label 3 8 Status Indicator Lights In normal operation the drive is either in an Enabled state or in a Disabled state Wh...

Page 18: ... ambient temperatures 0 to 40 C and PWM frequency of 20 kHz unless otherwise noted 4 3 1 DC Supply Input Parameter Conditions Min Typical Max Units Supply Voltage Operating Range 12 48 VDC Absolute maximum 10 5 54 Supply Current Operating at maximum load and speed CPP A06V48A SA CAN 6 15 A CPP B06V48A SA CAN 6 Idle condition No external connections 12VDC 63 mA 48VDC 24 4 3 2 5VDC Supply Output Par...

Page 19: ...Frequency Single ended 4 MHz Differential 4 Minimum Pulse Width Single ended 125 ns Differential 125 ns Input Impedance Differential 120 Ω 4 3 6 Digital Input Parameter Conditions Min Typical Max Units Input Voltage Capture Enable Brake Limit Limit Logic High 2 3 24 V Logic Low 0 1 Absolute maximum 26 Step Direction Logic High 1 5 V Logic Low 0 5 Absolute maximum 12 12 Sinking and Sourcing Current...

Page 20: ...d up to max operational voltage externally 4 3 8 Analog Input Parameter Conditions Min Typical Max Units Input Voltage Operational range 10 10 V Absolute maximum 12 12 Input Impedance 100 kΩ 4 3 9 Analog Output Parameter Conditions Min Typical Max Units Output Voltage Operational range 10 10 V Output Load Impedance Connected to ground 10 kΩ 4 3 10 USB Parameter Connector Type USB Interface USB mic...

Page 21: ...ed in this manual However thermal performance of the drive is dependent on the specifics of the application and the environmental conditions The drive does not have any temperature or output PWM frequency derating in the ambient temperature range of 0 to 40 C when mounted according to ElectroCraft recommendations as specified in section 5 1 Operating the drive outside ElectroCraft recommendations ...

Page 22: ...When the I2t algorithm limit is reached the output current is reduced and limited to the continuous I2t current limit value The I2t time limit allowed by the software is computed using the equation given below I2 t algorithm limit IP 2 IR 2 x TP IP Peak phase current set by user maximum of 15A IR Rated phase current of 6A TP I2t time in mS I2t algorithm limit 378000 preset The I2t time limit that ...

Page 23: ...d which can accommodate up to M4 or 8 screw 5 2 Dimensions Units mm in Figure 8 Drive dimensions 5 3 Mating Connectors Connector Connector Name Manufacturer Mating Connectors P N Crimp Pin P N J1 Supply Molex 39014030 39 00 0039 J2 Motor Molex 39014050 J3 Hall Molex 430250800 43030 0007 Adam Tech DMT 2 08 DMT B C F T R J4 Encoder Molex 43025 1000 43030 0007 Adam Tech DMT 2 10 DMT B C F T R J5 I O ...

Page 24: ...DC 2 B A Output BLDC Phase B Stepper Phase A PMDC 3 C B Output BLDC Phase C Stepper Phase B 4 Brake B Output Braking Resistor Stepper Phase B 5 Frame Connected to drive chassis 5 4 4 J3 Hall Connector Pinout Pin Name I O Description 1 Hall 1 Input Hall Signal A Internal pull up to 5Vdc 2 Hall 2 Input Hall Signal B Internal pull up to 5Vdc 3 Hall 3 Input Hall Signal C Internal pull up to 5Vdc 4 Tem...

Page 25: ...al analog input 3 1 Step Input Step Digital input A In2 Input Analog Input2 Differential analog input 4 Limit Input Limit Switch Positive Direction Digital input 5 Enable Input Enable Digital input 6 eBrake Output Digital output 7 Fault Output Fault Digital output 8 5VOUT Output 5 Volts DC Power Internally generated 9 A Out Output Analog Output 10 A In1 Input Analog Input1 Differential analog inpu...

Page 26: ...Isolated digital input high side for CAN enable 5 EN In Input Isolated return for Enable In 6 Shield CAN Shield pass thru to J8 pin 6 5 4 9 J8 CAN Communications Output Pinout Pin Name I O Description 1 CAN H In Out CAN high differential signal 2 CAN L In Out CAN low differential signal 3 GND CAN GND digital GND 4 5VOUT Output 5 Volts DC Power Internally generated 5 EN Out Output Digital output fo...

Page 27: ...onnection to the drive 7 Connecting Motors 7 1 Brushless DC BLDC Motor Drive J2 Brushless DC Motor Motor Phase A Motor Phase B Motor Phase C Motor Shield Figure 11 Brushless DC motor connection to the drive 7 2 Permanent Magnet DC PMDC Motor Drive J2 PMDC Motor Motor Positive Motor Negative Motor Shield Figure 12 Permanent Magnet DC motor connection to the drive ...

Page 28: ...necting Motor Feedback Devices 8 1 Hall Sensors 8 1 1 Hall Sensor Connections Hall 2 Hall 3 5V Drive Ground J3 Hall 1 Motor Hall Sensors Figure 14 Hall sensor connection to the drive 8 1 2 Hall Sensor Signal Input Circuit The Hall sensor inputs are limited to 5V logic levels Use the drive supplied 5V to supply power to the motor s hall sensors 5V Hall Signal Input 1K 4700pF 2 2K Figure 15 Hall sen...

Page 29: ...oder Drive J4 Use twisted wire pairs for and signal pairs of A B and Z B B Z Z A A Motor Encoder 5V GND Figure 16 Differential encoder connection to the drive 8 2 2 Single Ended Encoder Encoder A Encoder B Encoder Index Drive Ground 5V J4 Motor Encoder Figure 17 Single ended encoder connection to the drive ...

Page 30: ...te For single ended encoder feedback use signals A B Z and leave signals A B Z unconnected as shown in section 8 2 2 Select Single Ended Encoder in the drive configuration software 8 3 IxR Speed Feedback Estimator The IxR Speed Feedback Estimator is used to estimate motor speed when an actual speed feedback device an encoder or other sensor is unavailable The drive estimates the speed of the motor...

Page 31: ...s can be enabled in CompleteArchitectTM and doesn t require to set any thresholds Threshold Level Temperature Sensing A custom configurable threshold set in CompleteArchitectTM Consult factory Negative Temperature Coefficient NTC Temperature Sensing An NTC sensor is a resistive element whose resistance decreases with temperature The values of R25 and B25 Tref are inherent to the NTC sensor being a...

Page 32: ...mperature Sensor Connections Temp Sensor Temp Sensor Motor J3 Drive J3 Figure 19 Temperature sensor connection to the drive 8 4 2 Temperature Sensor Signal Input Circuit _ 3 3V 1K J3Pin 4 BAV99 3 3V 1mF Motor Temp Input Figure 20 Temperature sensor signal input circuit ...

Page 33: ...on this pin should be connected to ground eBrake Digital Output Open drain output that can be used to engage electromechanical brake See section 12 for more details Capture Digital Input When the capture input pin has been triggered it provides an instantaneous encoder count location The trigger occurs on a falling edge input The count location is stored in memory and can be accessed via USB or CA...

Page 34: ...and set a fixed speed or torque setting See the CompleteArchitectTM manual for more details 9 2 1 Typical I O Connections for BLDC and PMDC motors A basic example using a switch for the Enable signal a potentiometer for analog speed torque command and a switch to change motor direction is shown in Figure 21 Drive J5 Drive Enable Command Speed or Torque 10K Command Direction Figure 21 Typical drive...

Page 35: ...ke and Limit Switch Inputs For Enable Brake Limit Switch Pos Limit Switch Neg R 20KΩ and C 4700pF For Capture R 10KΩ and C 5pF Step Direction Inputs See section 9 1 for functional application regarding step direction inputs The states of these pins can be monitored in CompleteArchitect There is the option to set the steps per revolution in CompleteArchitect The software will divide the Desired Ste...

Page 36: ...peration connect single ended analog input signals to Analog and connect Analog to analog ground 9 4 2 Analog Output Circuit The scaling for the analog output is configurable using the drive CompleteArchitectTM Analog Output 100 _ 100pF 69 8K 10K PTC 10V 69 8K Figure 27 Analog output circuit Note The single ended analog output is referenced to ground on J5 pin 16 The primary analog output circuit ...

Page 37: ...Input Return for Enable In 5V External Output Internally generated 5 volts for customer use Refer to section 4 3 2 Shield Pass through for CAN cable shield ground Ground Referenced to supply ground 10 1 2 CAN Physical Layer Circuit CAN TRx CAN_P CAN_N 24V 5pF Figure 28 CAN Physical Layer Circuit Important Note CAN bus termination of 120 Ohms between CAN high and low signals is not present inside t...

Page 38: ...s achieved by connecting the CAN enable output circuit of one drive to the CAN EN circuit to the next drive See Figure 30 below Note that the 5V external supply is provided from the first drive to the second drive for CAN enable high input The second drive and subsequent drives can also be pulled up by an external source See section 4 3 11 for electrical specifications Figure 31 Drive Daisy Chain ...

Page 39: ... available by this method See table below SW ID Name Description ID1 ADDR0 Hardware CAN Axis ID bit 0 ID2 ADDR1 Hardware CAN Axis ID bit 1 ID3 ADDR2 Hardware CAN Axis ID bit 2 ID4 ADDR3 Hardware CAN Axis ID bit 3 c CAN Axis ID configured in CompleteArchitectTM as a base address plus hardware switches d Dynamically assigned at power up over the CAN bus As shipped from the factory standard ElectroCr...

Page 40: ...settings If the drive does not function refer to Troubleshooting section 14 12 eBrake Control The drive includes an output circuit that can be used to control an external electromechanical brake There are two options for this as indicated below Option 1 For high current applications a relay or switch can be driven by the output Option 2 For low current applications the eBrake can be driven directl...

Page 41: ...the drive connects the braking resistor across the positive terminal of the supply input and ground This causes current to flow through the resistor and reduce the bus voltage When the bus voltage decreases to the brake resistor Off voltage the drive disconnects the brake resistor circuit This cycle repeats until the system dissipates enough energy beyond which the bus voltage doesn t rise up to b...

Page 42: ...ve continuous current deceleration current Deceleration Current A Power Supply Voltage Vdc Minimum Resistance value Ω 6 12 2 24 4 48 8 The resistance value for appropriate power supply voltage when brake resistor On and Off voltages are set according to section 13 3 2 in the above table is a good starting point Increase the resistance value for lower deceleration current Drive faults due to Shunt ...

Page 43: ...e in Braking is 4 minutes Duty Cycle 4 10 0 4 Average Power value 68 Watts A 68 watts resistor will not handle 168 watts of braking power for 4 minutes The brake resistor will get too hot and it will trip the user supplied temperature sensitive switch refer to section 13 5 in turn disconnecting the braking resistor from the drive The drive will then fault due to shunt overpower or bus over voltage...

Page 44: ...device should be mounted in contact with the surface of the brake resistor or very close to it for an effective operation Optional Diode connection Adding a diode between the positive terminal of the power supply and J1 pin 2 of the drive as shown in Figure 33 will protect the power supply from any back fed overvoltage while braking The diode is sized by the application s maximum reverse voltage a...

Page 45: ...rive A blocking diode in the Braking Module prevents the excess voltage from feeding back to the power supply As the drive regenerates the module will cycle On and Off to dispose of the excess energy through the brake resistor Care should be taken to ensure the brake resistor is not mounted next to any flammable material as it could get hot This braking module will also allow the user to attach a ...

Page 46: ... high Drive outputs are disabled Check motor wires for shorts Verify current loop tuning for stable operation 2 Voltage Fault or Shunt Overpower Drive power is above below operational limits Braking resistor is turned ON for more than 3 seconds No Braking resistor available in the circuit or the resistor is too small for the energy dissipated Braking resistor turn ON OFF limits are set too low Dri...

Page 47: ...N Power Indicator Drive is powered Required for drive to operate N A OFF Power Indicator Drive is not powered Drive will not operate Apply power to power input of drive Verify input power is within acceptable range Check wires for possible short circuit Verify internally generated 5Vdc power is not overloaded by I O or motor feedback devices ...

Page 48: ... ElectroCraft 2022 47 CPP x06V48A SA CAN Drive User Manual ...

Reviews: