background image


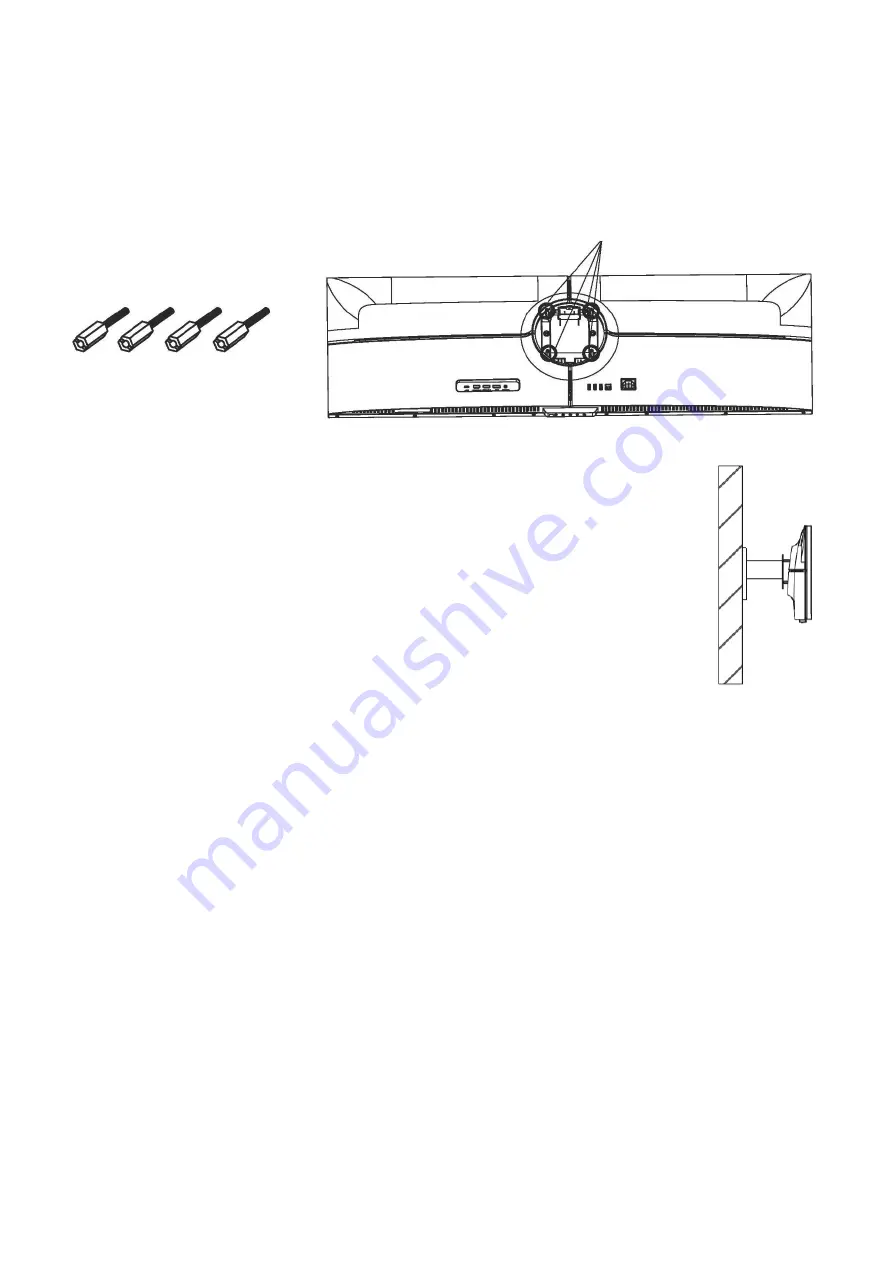
WALL MOUNT INSTALLATION  


The monitor is provided with mounting holes for a VESA approved wall mounting bracket (not 
supplied). 


M4 x12 bolts (not supplied) should be used to attach the bracket to the extension bolts.   


Do not use screws longer than specified or damage will occur to the internal components. 


1.


When wall mounting the 4 x Extension bolts should be fitted into the 
mounting holes on the rear of the monitor, ensuring that they are suitably 
tightened. It is advisable to do this while the unit is still within the foam to 
prevent damage to the screen. 

2.


Attach the stand to the extension bolts using M4 x 12 bolts. 


NOTES:   


Do not pinch the screen directly with your hand when hanging the product to prevent the screen 
from breaking. 


Due to the heavy weight and dimensions of LCD screens and their fragile nature, we recommend 
that they are unpacked and assembled by 2 people and professional installers are used to wall 
mount them (Wall mounting is optional).  


If you do not understand the instructions, or are unsure how to install this product, please contact a 
professional for assembly advice and assistance.   


Careful consideration should be made regarding the location the monitor is to be wall mounted as 
some walls are not suitable for installation. If the monitor is to be mounted on drywall, the mount 
must be anchored into a wooden stud, concrete block or brick behind the drywall. Installing on 
drywall alone may not support the weight of the display.   


When drilling holes, it is particularly important to take care of electrical cables, water or gas pipes in 
the wall. Please follow the instructions provided by the wall bracket manufacturer and ensure that 
all fixing screws supplied are used.    


electriQ and its distributors and dealers are not liable or responsible for damage or injury caused by 
improper installation, improper use or failure to observe these safety instructions. In such cases any 
guarantee will expire.   


Extension Bolts x 4 


Mounting Nuts 


Summary of Contents for eiQ-43SUWD120FSHDR600

Page 1: ...NITOR eiQ 43SUWD120FSHDR600 Thank you for choosing electriQ Please read the user manual before using this monitor and keep it safe for future reference Visit www electriQ co uk to view our entire rang...

Page 2: ...VAILABLE 8 GETTING STARTED 8 MONITOR CONTROLS 8 INITIAL SET UP 9 SHORTCUT BUTTONS 9 MENU OPTIONS 9 INPUT SOURCE 10 BRIGHTNESS CONTRAST 10 COLOUR SETTINGS 11 PICTURE QUALITY SETTINGS 12 DISPLAY 13 AUDI...

Page 3: ...where it exits from the appliance Only use attachments accessories specified by the manufacturer Use only with a cart stand tripod bracket or table specified by the manufacturer or sold with the appa...

Page 4: ...o reduce the risk of fire or electric shock do not expose this apparatus to rain or moisture The apparatus shall not be exposed to dripping or splashing and objects filled with liquids such as vases s...

Page 5: ...Bolts A x 3 For Stand Assembly Extension Bolts x 4 For Wall Mount Installation Bolts B x 4 For Attaching Stand DP Cable USB Cable Power Cable AC 100 240V 50 60Hz User Manual Remote Control Stand Uprig...

Page 6: ...mounting plate to the rear of the monitor 4 Use both hands to stand the assembled monitor on a flat desktop NOTES Due to the heavy weight and dimensions of the LCD screens and their fragile nature we...

Page 7: ...nd professional installers are used to wall mount them Wall mounting is optional If you do not understand the instructions or are unsure how to install this product please contact a professional for a...

Page 8: ...ain Menu or increase the value of the selected item Go Down within the Main Menu or decrease the value of the selected item Enter the Main OSD Menu and Select submenu Turn the monitor On or Off 1 Type...

Page 9: ...y detected SHORTCUT BUTTONS The monitor includes one touch options to access common settings MENU OPTIONS The menu for the monitor can be accessed by pressing the menu button on the control panel This...

Page 10: ...1 HDMI2 Type C BRIGHTNESS CONTRAST Brightness Adjust the brightness of the display between 0 and 100 Contrast Adjust the contrast of the display between 0 and 100 DCR Turn the Dynamic Contrast Ratio F...

Page 11: ...emperature Change the Colour Temperature of the display to Normal Warm Cool or User When the User Mode is selected the Red Green and Blue values can be adjusted independently between 0 and 100 Low Blu...

Page 12: ...se Over Drive feature between Off High Middle of low Noise Reduction Adjust the level of Noise Reduction between Low Medium High or Off Super Resolution Change the Super Resolution value from 0 to 5 D...

Page 13: ...atio Change the image aspect ratio to Wide Screen AUDIO Mute Turn On and off to mute and unmute the audio output Volume Adjust the output volume between 0 and 100 Audio Source Chose which source the a...

Page 14: ...Input Choose the source of the second window between HDMI 1 and HDMI 2 PIP Size Adjust the size of the secondary source in PIP and PBP modes between Small Medium and Large PIP Position Set the positi...

Page 15: ...Japanese and French OSD H Position Change the horizontal position of the OSD Menu OSD V Position Change the vertical position of the OSD Menu OSD Transparency Change the transparency value of the OSD...

Page 16: ...16 OTHER Free Sync Mode Turn Free Sync On or Off HDR Turn HDR On requires HDMI 2 0 input DP Version Change the DP version Reset Restore factory default setting HDR Turn the HDR on or off...

Page 17: ...Response Time 6ms Viewing Angle H V 178 178 Terminals USB Input USB B x 1 USB A x 3 USB 3 0 Compliant with USB 3 0 standards If used with USB 2 0 Cables some functions will be unavailable and or their...

Page 18: ...ilities are now available for all customers at which you can deposit your old electrical products Customers will be able to take any old electrical equipment to participating civic amenity sites run b...

Reviews: