background image


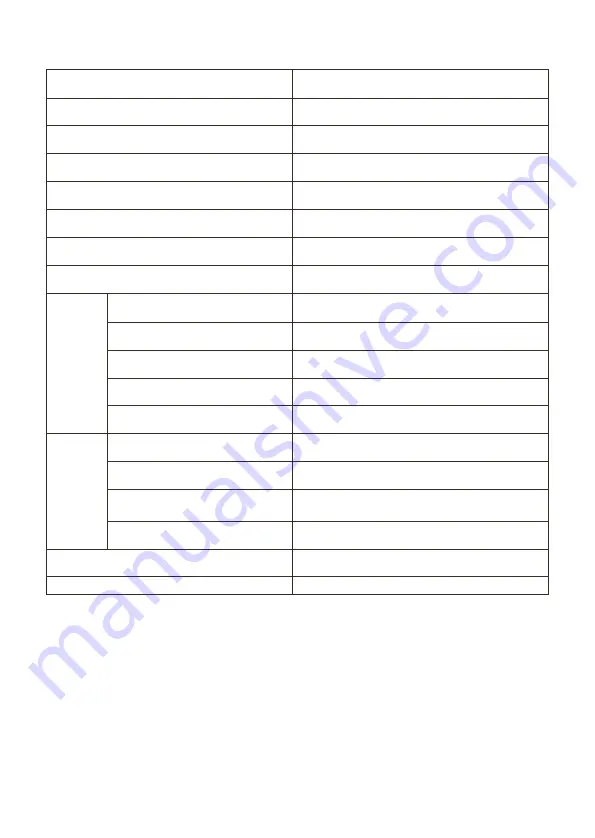
TECHNICAL SPECIFICATION 


Product Model


eiQ-34SUWD144FSHQ


Screen Size


34” Diagonal


Panel Type


VA Panel


Aspect Ratio


21:9


Power Supply


AC 100 240- V, 50/60Hz, 2.0A


Power Consumption


54W (Typical)


Dimensions


808*454 *225.5 mm


Net/Gross Weight


7.02kg / 8.96 kg


Maximum Resolution


3440*1440DFHD


Brightness


400 cd/m

2


Static Contrast


3000:1


Response time


MPRT 1MS


Viewing Angle (H/V)


178°/178°


USB Input


N/A


HDMI Input


HDMI 2.0 x 2


Display Port Input


DP 1.4 x 2


Audio Output


X1


Working Temperature


0°C ~40°C


Working Humidity


10% ~ 85% Non-condensing


19 

P

ict

ure 


T

er

m

ina

ls 


Summary of Contents for eiQ-34SUWD144FSHQ

Page 1: ...ED MONITOR eiQ 34SUWD144FSHQ Thank you for choosing electriQ Please read the user manual before using this monitor and keep it safe for future reference Visit www electriQ co uk to view our entire ran...

Page 2: ...LATION 7 CABLE MANAGEMENT 8 CONTROL PANEL 9 INPUT OUTPUT TERMINALS 9 INITIAL SET UP 10 MENU OPTIONS 11 INPUT 11 BRIGHTNESS 12 COLOUR SETTINGS 13 PICTURE QUALITY 14 DISPLAY 15 AUDIO 15 MULTI WINDOW 16...

Page 3: ...pool Clean only with a dry cloth Do not use solvents or petroleum based fluids Do not install near any heat sources such as radiators stoves or other apparatus including amplifiers that produce heat...

Page 4: ...tripped over Do not place heavy items on the cable as this may cause damage When removing from a socket hold by the plug and not the wires Disconnect the power immediately and seek professional help i...

Page 5: ...ernal components WARNING To reduce the risk of fire or electric shock do not expose this apparatus to rain or moisture The apparatus shall not be exposed to dripping or splashing and objects filled wi...

Page 6: ...emove the stand plate Fix the stand plate into the stand stem with the supplied bolts 5 Fix the whole assembled stand into the monitor and check carefully to make sure it is fastened 6 Hold onto the s...

Page 7: ...ded four screws onto the mounting holes on back of monitor WALL MOUNTING The monitor is provided with mounting holes for a VESA approved wall mounting bracket not supplied When wall mounting the suppl...

Page 8: ...bly advice and assistance Careful consideration should be made regarding the location the monitor is to be wall mounted as some walls are not suitable for installation If the monitor is to be mounted...

Page 9: ...ector Insert the power cable to supply power to the monitor 2 Audio Output Insert one and of the Audio cable into the computer s Audio output to receive the Audio signals from your monitor 3 DP Connec...

Page 10: ...Connect the relevant cable to the corresponding input on the monitor The source will be automatically detected QUICK MENU Press any button when the on screen display is not visible to display the Quic...

Page 11: ...ing sections Within the Menu UP 3 and DOWN 2 Press to go up and down the current menu or to adjust the selected value MENU 1 Press to select the currently highlighted item enter the submenu Once chang...

Page 12: ...BRIGHTNESS CONTRAST Brightness Adjust the brightness of the display between 0 and 100 Contrast Adjust the contrast of the display between 0 and 100 DCR Turn the Dynamic Contrast Ratio Feature On or O...

Page 13: ...olour Temperature Change the Colour Temperature of the display to Warm Cool or User When the User Mode is selected the Red Green and Blue values can be adjusted independently between 0 and 100 Low Blu...

Page 14: ...e Turn the Response Overdrive feature between Off High Middle of low Noise Reduction Adjust the level of Noise Reduction between Low Medium High or Off Dynamic Luminance Control Turn the Dynamic Lumin...

Page 15: ...reen Auto 4 3 or 1 1 LED Mode Turn on the LED back light There are three settings ON OFF FLASH AUDIO Mute Turn On and off to mute and unmute the audio output Volume Adjust the output volume between 0...

Page 16: ...Input Choose the source of the second window between HDMI 1 and HDMI 2 PIP Size Adjust the size of the secondary source in PIP and PBP modes between Small Medium and Large PIP Position Set the positi...

Page 17: ...ange the horizontal position of the OSD Menu OSD V Position Change the vertical position of the OSD Menu OSD Transparency Change the transparency value of the OSD Menu between 0 and 100 OSD Time Out C...

Page 18: ...OTHER DP Version Set the DP version between 1 1 and 1 2 Free Sync Adaptive Sync Turn Free Sync On or Off HDR HDR can be set to On Off or Autodetect Reset Restore factory default setting 18...

Page 19: ...on 54W Typical Dimensions 808 454 225 5 mm Net Gross Weight 7 02kg 8 96 kg Maximum Resolution 3440 1440DFHD Brightness 400 cd m2 Static Contrast 3000 1 Response time MPRT 1MS Viewing Angle H V 178 178...

Page 20: ...Relocate the unit or move the equipment ENVIRONMENTAL PROTECTION Waste electrical products should not be disposed of with household waste Please recycle where facilities exist Check with your Local Au...

Reviews: