background image

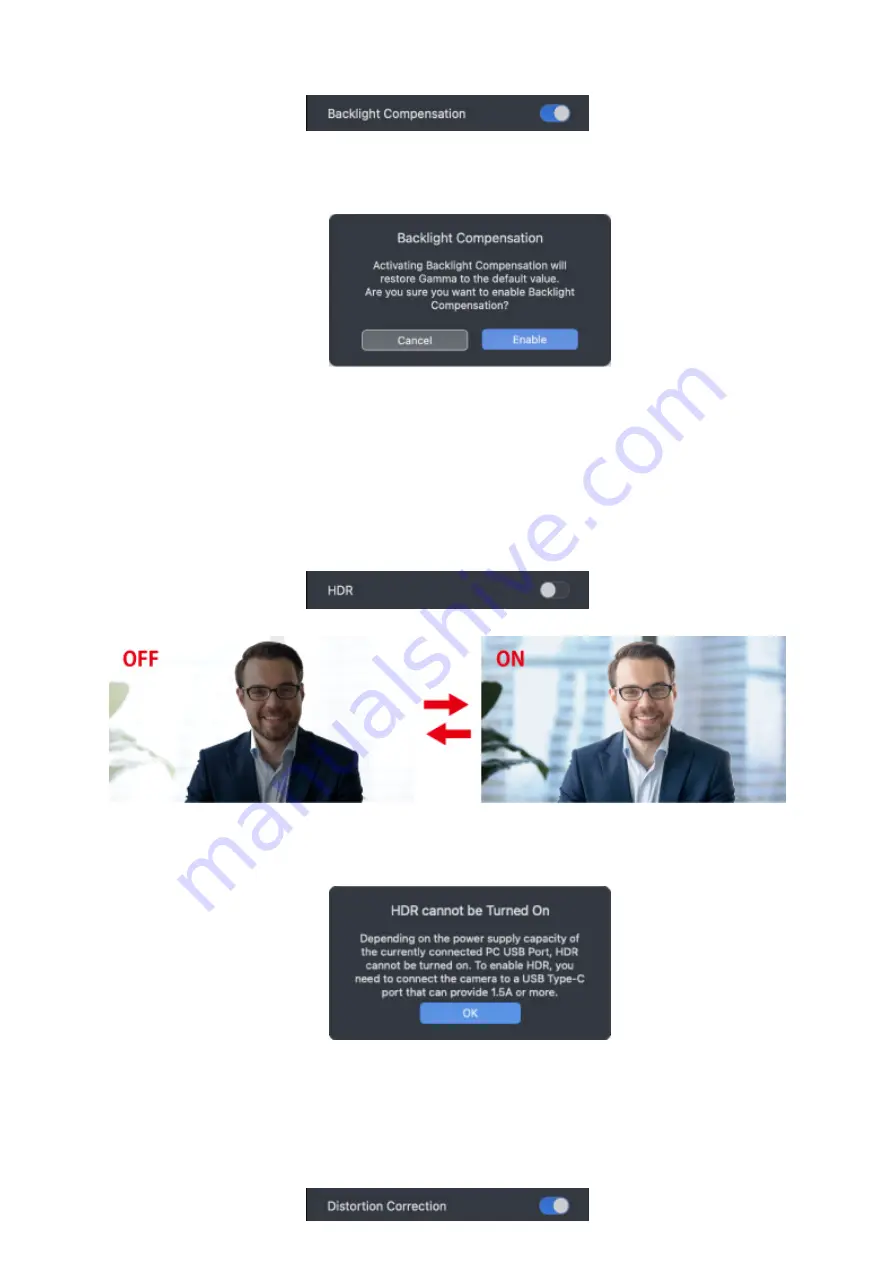
Enabling this allows the camera to automatically adjust for natural color when the backlight is
strong.

HDR

Enable or disable HDR. 
Multiple images with different exposure time are taken and composited in real time to create
one video frame. 
Enabling this reduces overexposure or underexposure even in large venues with high lighting
contrast and allows you to take images of people in natural color.

Distortion Correction

Enable or disable lens angle correction. 
Enabling this will reduce lens distortions at the edges of the image. 
Distortion can be observed, but the field of view is wider when this is disabled.

Gamma settings will be reset to default if backlight compensation is enabled. 
To enable, click “Enable” on the confirmation page.

To enable HDR, this product must be connected to your PCʼs USB Type-C port. The
following message will be displayed if it is connected via a USB-A port.

Summary of Contents for UCAM-CX80FBBK

Page 1: ...fe operation of this product Observe these precautions carefully to avoid personal injury damage fire and other problems Warning Failure to observe precautions carries the possibility of serious personal injury or death due to fire electric shock or other causes Caution Failure to observe precautions may result in personal injury due to electric shock or other causes and may damage other equipment...

Page 2: ...shock Please do not drop or hit this product If this product is damaged stop using immediately and remove it from your PC Then contact the retailer where this product was purchased Fires or electric shocks may occur if this product is used when damaged Do not attempt to disassemble modify or repair this product Doing so may cause a fire electric shock or product damage Malfunctioning is not covere...

Page 3: ...ction of the camera please ensure that you hold down the stand portion while moving it Moving it forcibly may cause this product to fall from where it is placed This may cause damage to the product and surrounding devices Please do not place the camera on an uneven or slanted place This product may fall off the unstable surface This may cause damage to the product and surrounding devices Please do...

Page 4: ...e included in this package Verify the package to ensure all items are accounted for prior to using this product Every effort has been made to ensure proper packaging However in the event that any part is missing or damaged please contact the retailer where this product was purchased software Depending on your hardware s processing capabilities sound quality and video processing may not perform wel...

Page 5: ...arately sold tripods USB Type C port To insert the included USB Type C connector cable Privacy shutter Physically block the lens when not in use Also serves to protect the lens One web camera One USB Type C to Type C cable for connection One USB Type C to Type A cable for connection One privacy shutter Name and function of each part The LED will turn red when the camera is connected to your PC The...

Page 6: ...er the operations are the same with or without one 2 Connect the camera using a cable Connect the USB Type C connector from the back of this product to the USB Type C port on your PC Connecting and setting up the camera You can use this product without removing the privacy shutter Both USB Type C to Type C and USB Type C to Type A cables are included with this product ...

Page 7: ...is used to connect to your PC s USB A port You are recommended to use USB Type C connection if your PC has a USB Type C port The image resolution is restricted to 1920 1080 pixels The maximum frame rate is restricted to 30FPS HDR function is unavailable When attaching to the display of a laptop When placing it on a flat surface or the table When using a separately sold tripod ...

Page 8: ...ector included with this product into the USB port on your PC Using with USB Type C port 5mm 0 2 and below Tripods with 1 4 inch M6 1 screws can be used with this product Tripods with screws more than 5mm 0 2 long cannot be attached to this product Please take note that forcing the screw in may damage the tripod socket ...

Page 9: ...camera Ensure that the connector is correctly oriented to the port USB Type C connector can be inserted regardless of orientation If there is strong resistance when inserting check the shape and orientation of the connector Forcibly inserting the connector may damage the connector and there is a risk of injury Do not touch the terminal portion of the USB connector ...

Page 10: ...ent depending on the version to your desktop Depending on your operating environment clicking on Open file after download may cause it to unzip 2 Double click the unzipped UCAM CX80FB_setup_vx xx xx zip x xx xx is different depending on the version file 3 The installer will start up Set up your camera using the settings software Windows Attach this product first For details please refer to 4 Conne...

Page 11: ...4 Select English from the drop down menu and click on OK 5 Click on Next ...

Page 12: ...6 Click on Next Tick Don t create a Start Menu folder so that the software is not registered to your Start Menu 7 Click on Next ...

Page 13: ... An icon will be created on your desktop if Create a desktop shortcut is ticked 8 Click on Install 9 Click on Finish ...

Page 14: ...k ELECOM then UCAM CX80FB in order from the start menu The UCAM CX80FB settings software will start running 2 Click the frame operations icon to set up camera range during shooting and image quality Description of software window Frame operations icon Control the operations of frames Switch between showing and hiding frames Show the Settings frame The following message will appear if the camera is...

Page 15: ...tting ePTZ Drag the digital zoom bar to adjust the camera range 100 to 500 The shooting range is displayed in a green box on the page during setting You can change where this green box is on your display during zoom by dragging with your mouse Click the reset button to return to zoom off 100 Exposure Changing the shooting range manually while the Auto Frame is enabled will disable it To enable cli...

Page 16: ...sliders will appear if this is disabled Custom Adjust the white balance manually 2000K to 7500K Image Adjustment Drag each slider to adjust the image quality Brightness Adjust the brightness of the image 0 to 200 Contrast Adjust the contrast of the image 0 to 200 Hue Adjust the hue of the image 0 to 180 Saturation Adjust the saturation of the image 0 to 200 Sharpness Adjust the sharpness contour e...

Page 17: ... strong HDR Enable or disable HDR Multiple images with different exposure time are taken and composited in real time to create Enabling gamma settings will disable backlight compensation To enable click Enable on the confirmation page Gamma settings will be reset to default if backlight compensationn is enabled To enable click Enable on the confirmation page ...

Page 18: ...ill reduce lens distortions at the edges of the image Distortion can be observed but the field of view is wider when this is disabled Anti flicker To reduce flicker caused when shooting under fluorescent lighting select 50Hz or 60Hz to match the regional electrical frequency where this product is used To enable HDR this product must be connected to your PC s USB Type C port The following message w...

Page 19: ... the number of people are detected Low sensitivity means that the time to zoom in and out after movement and changes in the number of people are detected is long and there are less frequent adjustments 2 to 2 Zoom Level Adjusts such that the detected person is at the focus of the shooting range 0 to 4 The larger the value the wider the shooting range Tracking Active Speakers Enable or disable Trac...

Page 20: ...B settings software Before installing 1 Double click the downloaded UCAM CX80FB_setup_v0 XX XX dmg XX XX is different depending on the version file A disk image will be mounted on your desktop and a window will open up 2 Drag the UCAM CX80FB icon from the unzipped folder to the Applications folder Mac Attach this product first For details please refer to 4 Connecting to a PC Please logon using a u...

Page 21: ...icon in the Applications folder The UCAM CX80FB settings software will start running 2 Click the frame operations icon to set up camera range during shooting and image quality Description of software window The following message will appear if the camera is not connected to your PC Please connect the camera to your PC Click OK when the UCAM CX80FB would like to access the camera message appears ...

Page 22: ...tings software You can scroll down in the settings frame Preview Preview camera images Description of each type of setting ePTZ Drag the digital zoom bar to adjust the camera range 100 to 500 The shooting range is displayed in a green box on the page during setting You can change where this green box is on your display during zoom by dragging with your mouse Click the reset button to return to tur...

Page 23: ... to 6dB Exposure Time Adjust the camera exposure time 1 to 8 White Balance Enable or disable automatic white balance The following sliders will appear if this is disabled Custom Adjust the white balance manually 2000K to 7500K Image Adjustment Changing the shooting range manually while the auto frame is enabled will disable it To enable click Enable on the confirmation page ...

Page 24: ...uration of the image 0 to 200 Sharpness Adjust the sharpness contour enhancement of the image 0 to 200 Gamma Drag the gamma slider to adjust gamma correction 100 to 220 Backlight Compensation Enable or disable backlight compensation Enabling this allows the camera to automatically adjust for natural color when the backlight is Enabling gamma settings will disable backlight compensation To enable c...

Page 25: ...nd allows you to take images of people in natural color Distortion Correction Enable or disable lens angle correction Enabling this will reduce lens distortions at the edges of the image Distortion can be observed but the field of view is wider when this is disabled Gamma settings will be reset to default if backlight compensation is enabled To enable click Enable on the confirmation page To enabl...

Page 26: ...before the camera range is adjusted following detection of movement of people or changes in the number of people within the field of view High sensitivity allows the zoom in and out to begin quickly as movement and changes in the number of people are detected Low sensitivity means that the time to zoom in and out after movement and changes in the number of people are detected is long and there are...

Page 27: ...his product The screen and operation may change with each software version In such circumstances please refer to the software s help or the manual The following images are the instructions for Skype for Desktop v 8 75 0 140 The display for the Microsoft Store application is different but the steps are the same 1 Check that the camera is connected to your PC before starting up Skype 2 Click on User...

Page 28: ...3 Click on Settings 4 Click on Audio Video 5 Select the camera from Camera under VIDEO ...

Page 29: ...If the camera preview appears it is operating correctly 6 Select the audio device from Microphone under AUDIO If multiple cameras are connected select ELECOM 4K Webcam ...

Page 30: ...tion below uses images from Microsoft Teams v 1 4 00 22472 1 Check that the camera is connected to your PC before starting up Microsoft Teams 2 Click on Settings etc Select Microphone Webcam Internal Mic if using the built in microphone Microsoft Teams ...

Page 31: ...3 Click on Settings 4 Click on Devices 5 Select the camera from Camera ...

Page 32: ...perating correctly 6 Select the audio device from Microphone You can now use this product with Microsoft Teams If multiple cameras are connected select ELECOM 4K Webcam Select Microphone Webcam Internal Mic if using the built in microphone ...

Page 33: ...elow uses images from Zoom v 5 7 7 1 Check that the camera is connected to your PC before starting up Zoom 2 Click on the Settings icon The Settings page will appear 3 Click on Video 4 Select the camera from Camera Zoom ...

Page 34: ...If the camera preview appears it is operating correctly 5 Click on Audio 6 Select the audio device from Microphone If multiple cameras are connected select ELECOM 4K Webcam ...

Page 35: ...sco Webex Meetings v 41 9 3 16 1 Check that the camera is connected to your PC before starting up Cisco Webex Meetings 2 Click on Start a Meeting 3 Click on the on the right of Video Option Select Microphone Webcam Internal Mic if using the built in microphone Cisco Webex Meetings ...

Page 36: ...4 Select the camera to be used If the camera preview appears it is operating correctly 5 Click on the on the right of Audio Option If multiple cameras are connected select ELECOM 4K Webcam ...

Page 37: ...ct with Cisco Webex Meetings 1 Check that the camera is connected to your PC Access Google Meet on your web browser and log in 2 Click on the Settings button at the top right of the page Select Microphone Webcam Internal Mic if using the built in microphone Google Meet ...

Page 38: ...and select the camera to be used from Camera If the camera footage appears it is operating correctly 4 Click on audio and select the audio device from Microphone If multiple cameras are connected select ELECOM 4K Webcam ...

Page 39: ...please refer to the software s help or the manual The description below uses images from Skype v 8 75 0 140 1 Check that the camera is connected to your PC before starting up Skype 2 Click on User profile Select Microphone Webcam Internal Mic if using the built in microphone Using chat software and online meeting services Mac Skype ...

Page 40: ...3 Click on Settings 4 Click on Audio Video 5 Select the camera from Camera under VIDEO ...

Page 41: ...If the camera preview appears it is operating correctly 6 Select the audio device from Microphone under AUDIO If multiple cameras are connected select UCAM CX80FB ...

Page 42: ...he description below uses images from Microsoft Teams v 1 4 00 22265 1 Check that the camera is connected to your PC before starting up Microsoft Teams 2 Click on Settings etc Select Webcam Internal Mic if using the built in microphone Microsoft Teams ...

Page 43: ...3 Click on Settings 4 Click on Devices 5 Select the camera from Camera ...

Page 44: ...If the camera preview appears it is operating correctly 6 Select the audio device from Microphone If multiple cameras are connected select UCAM CX80FB ...

Page 45: ... Microsoft Teams The description below uses images from Zoom v 5 7 5 1 Check that the camera is connected to your PC before starting up Zoom 2 Click on the Settings icon Select Webcam Internal Mic if using the built in microphone Zoom ...

Page 46: ...The Settings page will appear 3 Click on Video 4 Select the camera from Camera If the camera preview appears it is operating correctly If multiple cameras are connected select UCAM CX80FB ...

Page 47: ...ct with Zoom The following explanation uses images from Cisco Webex Meetings v 41 9 0 19961 1 Check that the camera is connected to your PC before starting up Cisco Webex Meetings 2 Click on Start a meeting Select Webcam Internal Mic if using the built in microphone Cisco Webex Meetings ...

Page 48: ...3 Click on the on the right of Video Option 4 Select the camera to be used If the camera preview appears it is operating correctly If multiple cameras are connected select UCAM CX80FB ...

Page 49: ...e You can now use this product with Cisco Webex Meetings 1 Check that the camera is connected to your PC Access Google Meet on your web browser and log in 2 Click on the Settings button at the top right of the page Select Webcam Internal Mic if using the built in microphone Google Meet ...

Page 50: ...o and select the camera to be used from Camera If the camera footage appears it is operating correctly 4 Click on Audio and select the audio device from Microphone If multiple cameras are connected select UCAM CX80FB ...

Page 51: ... retrieved during operation confirmation in our verification environment There is no guarantee of full compatibility with all devices OS versions and applications Operating environment CPU equivalent and above of Intel R Core TM i3 1 2GHz main memory 1Gb and above HDD free space 1Gb and above In addition to the above environment requirements should be met for each software used in conjunction Imag...

Page 52: ...enses Lens F stop value F2 8 Focus type Fixed focus Shooting distance 30cm to unlimited range from the surface of the lens Stand angle adjustment Vertical Status indicator light Yes Lights up during shooting Camera Interface USB3 0 A or USB3 1 USB Type C Camera Length of cable Approx 2 2m 6 6ft Built in microphone format Digital silicon MEMS Stereo Built in microphone direction Omnidirectional Cam...

Page 53: ...ditions 1 this device may not cause harmful interference and 2 this device must accept any interference received including interference that may cause undesired operation In order to make improvements to this product the design and specifications are subject to change without prior notice Responsible party For FCC matters only Around The World Trading Inc 7636 Miramar Rd 1300 San Diego CA 92126 ele...

Page 54: ...ows Skype and Microsoft Teams are trademarks belonging to Microsoft Corporation in the USA and other countries macOS is a trademark of Apple Inc registered in the U S and other countries and regions Zoom is a trademark of Zoom Video Communications Inc Cisco Webex is trademarks or registered trademarks of Cisco Systems Inc Google Meet and Youtube are trademarks of Google LLC USB Type C and USB C ar...

Page 55: ...s caused by using this product A customer who purchases outside Japan should contact the local retailer in the country of purchase for enquiries In ELECOM CO LTD Japan no customer support is available for enquiries about purchases or usage in from any countries other than Japan Also no language other than Japanese is available Replacements will be made under stipulation of the Elecom warranty but ...

Reviews: