background image

25

en

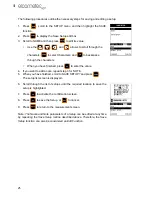
The following procedures outline the necessary steps for saving and editing a setup:

1.

Press 

, scroll to the SETUP menu and then highlight the SAVE

function.

2.

Press 

 to display the Save Setup edit box.

3.

Scroll to NAME and then press 

 to edit its value:

Use the 

, and 

 arrows to scroll through the 

characters, 

 to select characters, and 

 to backspace 

through the characters.

When you have finished, press 

 to enter the value.

4.

If you want to add a note, repeat step 3 for NOTE.

5.

When you have finished, scroll to SAVE SETUP? and press 

.

The setup list screen is displayed.

6.

Scroll through the list of setups until the required location to save the

setup is highlighted.

7.

Press 

 to activate the confirmation screen.

8.

Press 

 to save the Setup, or 

 to cancel.

9.

Press 

 to return to the measurement screen.

Note: The Name and Note parameters of a Setup can be edited at any time
by repeating the Save Setup routine described above. Therefore, the Save
Setup function can also be considered an Edit Function.

0(18

(17(5

(17(5

(17(5

&/5

2.

(17(5

2.

2.

(6&

0($6

Summary of Contents for SG80BDL

Page 1: ...0 en Model SG80BDL Sonic Gauge Operating Instructions...

Page 2: ...e Manchester M43 6BU United Kingdom All other trademarks acknowledged Elcometer Limited 2011 All rights reserved No part of this document may be reproduced transmitted transcribed stored in a retrieva...

Page 3: ...0 Gain Adjusting 17 11 ThruPaint Measurement Technique 17 12 Measurement Options 18 13 Measurement Recording your Readings 19 14 Gauge Setups 24 15 Data Transfer Software 26 16 Storage 27 17 Maintenan...

Page 4: ...d The Model SG80BDL includes a data logging memory facility which allows readings to be stored in batches before being downloaded to a computer 1 1 Standards Your gauge can be used in accordance with...

Page 5: ...firm a change or selection If your gauge is displaying a grid log this key toggles an advance to row number option In the MENU MEAS and EDIT functions this key acts as a back or escape function If you...

Page 6: ...l help you identify the correct transducer type Alternatively contact Elcometer NDT your local Elcometer NDT supplier or visit www elcometerndt com 3 3 Fitting the transducer The transducer transmits...

Page 7: ...select unselect Press once to access the measurement screen The hot menu functions are displayed at the bottom of the reading screen Press to scroll right along the hot menu functions and to scroll l...

Page 8: ...GITS or B SCAN or adjust the VIEW function in the hot menu A Battery Icon Indicates the battery life remaining B Repeatability Stability Indicator When taking readings this indicator is used in conjun...

Page 9: ...an bar adjust B START and B DEPTH G Measurement Labels The measurement labels are calculated and displayed based on where the left side of the display has been set Delay and the overall viewable area...

Page 10: ...ings and pulse echo mode for tubing without coating This combination of using both modes is ideal for very detailed inspections 7 SETTING UP THE GAUGE 7 1 Transducer Setting Type Of The first step in...

Page 11: ...gauge must be in pulse echo mode The following steps describe the zero probe procedure 1 Press to display the measurement screen 2 Ensure the gauge is in pulse echo mode P E 3 Remove all couplant from...

Page 12: ...all ranges Known material calibration The material you are measuring is selected from a list of materials stored in the gauge To achieve the most accurate measurements possible it is generally advisab...

Page 13: ...is fully lit and stable 3 Press scroll to the CAL menu and then highlight the ONE POINT function 4 Press to display the Digits Edit Box 5 Use the and arrows to scroll the highlighted value 6 Use the a...

Page 14: ...ows to scroll the highlighted value 7 Use the and arrows to scroll the digit locations 8 Repeat steps 6 and 7 until the known thickness value is correctly displayed 9 Press to calculate the velocity a...

Page 15: ...cho from the back surface of the material being measured This may result in a thickness reading that is TWICE what it should be Responsibility for proper use of the instrument and recognition of this...

Page 16: ...removed When this happens the gauge may perform a measurement through this couplant film resulting in a measurement that is larger or smaller than it should be This phenomenon can be seen when one thi...

Page 17: ...is set to 0 000 you might consider setting your BSCAN DEPTH value to 0 400 to cover the entire thickness range being tested BSCAN DEPTH can be thought of as a zoom feature for both the B Scan and the...

Page 18: ...e the low or high gain settings 10 1 Low setting The low setting might be necessary for noisy or granular cast materials If the reading becomes sporadic and will not settle down or resolve on a thickn...

Page 19: ...MEASUREMENT OPTIONS 12 1 High Speed Scan Although your gauge excels at making single point measurements it is sometimes desirable to examine a larger region searching for the thinnest point The gauge...

Page 20: ...L menu and then highlight the ALARM LO LIMIT or ALARM HI LIMIT function 2 Use the and arrows to scroll the value When the correct value is being displayed proceed to step 7 3 Alternatively press to di...

Page 21: ...eric characters 0 9 Alpha Characters A Z Special Characters _ space What measurement data is saved When a measurement is taken the following information is saved The reading value A screenshot of the...

Page 22: ...iles represent the range of the grid analogous to the top left and bottom right cells of a range in a spreadsheet An individual GRID file can have a maximum of 999 rows and 52 columns 12 rows and 12 c...

Page 23: ...in 2 Press to display the measurement screen then use and to highlight either COL or ROW and then press The grid view box displays the readings in the data file 3 If you want to save the reading to a...

Page 24: ...u want to edit press and then adjust the contents of the field using the techniques previously described to create a data file see page 21 4 When finished scroll to SAVE CHANGES press and then or to c...

Page 25: ...to be modified for custom applications The PC interface software includes a default setup file that can be uploaded to the gauge at any time to restore factory settings However you should consider sa...

Page 26: ...value 4 If you want to add a note repeat step 3 for NOTE 5 When you have finished scroll to SAVE SETUP and press The setup list screen is displayed 6 Scroll through the list of setups until the requir...

Page 27: ...parameters Data Bits 8 Parity None Stop Bits 1 Baud Rate 1200 to print a report or 9600 to transfer data file Note A report can be printed to a communications program i e HyperTerminal or printed to a...

Page 28: ...menu is highlighted and displaying the submenu items 2 Use the and arrow keys to scroll through the sub menu items until the desired option is highlighted 3 Press the key to activate the option select...

Page 29: ...mm to 102 mm 0 05 to 4 0 Range will vary depending on the coating Measurement Resolution Sound Velocity 1 m s 0 0001 in s Thickness 0 01 mm 0 001 Velocity Calibration Range 1250 m s to 10000 m s 0 04...

Page 30: ...ility or fitness for a particular purpose Some states or provinces do not allow limitations on the duration of an implied warranty so the above limitation or exclusion may not apply to you However any...

Page 31: ...rties The following paragraphs highlight the important properties of transducers which should be considered when assessing a particular measurement task The best measurement condition is one where suf...

Page 32: ...ixed to the transducer head Microdot transducers transducer cable is fixed to the transducer head by a connector allows transducer heads to be replaced quickly and easily High temperature transducers...

Page 33: ...xtra resolution The higher frequencies provide greater resolution and a lower minimum thickness rating overall High temperature PULSE ECHO and ECHO ECHO Special 2 25MHz and 5 MHz High temperature tran...

Page 34: ...or small defects Dual element delay line transducers are especially useful in searching for small defects In the pulse echo mode with high amplifier gain very small defects can be measured This is ver...

Page 35: ...ly this sample material should be a part of the same piece being measured or at least from the same lamination batch By calibrating to each test piece individually the effects of variation of sound ve...

Page 36: ...ium 6096 0 240 Magnesium 5791 0 228 Tungsten 5334 0 210 Mercury 1448 0 057 Water 1473 0 058 Nickel 5639 0 222 Zinc 4216 0 166 Nylon 2591 0 102 Approx Menu Function Description PROBE ZERO TRANSDUCER Ze...

Page 37: ...BSCAN START B SCAN view mode only Set the start position of the B SCAN view BSCAN DEPTH B SCAN view mode only Set the overall depth of the viewable measurement area It functions a lot like a zoom on...

Page 38: ...l illuminate and the alarm will sound XFER TRANSFER BACKUP SETUPS Allows you to backup the setups currently stored in your gauge to a computer via the RS232 port RESTORE SETUPS Allows you to restore s...

Reviews: