background image

Ÿ

Review the batch’s calibration information, including the calibration 
offset value (if set)

Ÿ

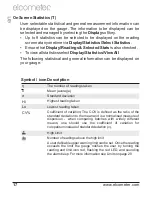
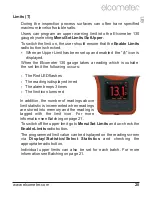
Review the individual readings. The Elcometer 130 displays:

Ÿ

the readings in numerical order, the first reading is at the top

Ÿ

icon indicating when a reading is above “    ” the upper limit

Ÿ

deleted readings icon “ ” is displayed if “Delete With Tag” is   

selected

Ÿ

pressing the 

è

 softkey displays the date and time the reading 

was taken

Ÿ

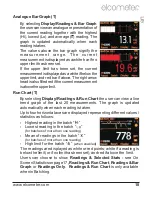
Review  a  graph  of  all  individual  readings  within  a  batch  (Batch 

Reading Graph), see page 27.

Delete an existing batch

By Selecting 

Batch/Edit Batch/Delete Batch

 the user will find a list of 

all the batches that have been created, together with the number of 
readings stored in each batch.
To delete a particular batch use the up and down arrow softkeys and 
select the appropriate batch. 
After  a  request  for  confirmation,  the  gauge  will  delete  the  selected 
batch and return the gauge to the list of batches. 
To delete another batch, repeat the procedure, to return the gauge 
back to the previous menu, press the 

Back

 softkey.

The  user  can  delete  all  batches  from  the  gauge  by  selecting 

Batch/Edit Batch/Delete Batch/All Batches.

Fixed Batch Size

When  creating  a  new  batch,  by  selecting 

Batch/New  Batch

  and 

checking the 

Fixed Batch Size

 radio button, users can pre-define the 

number of readings that are to be stored into the batch using the up 
and down arrow softkeys.

Once the batch has been opened and readings are being taken, the 
Elcometer  130  will  notify  the  user  when  the  fixed  batch  size  is 
complete and ask if another batch is to be opened.
If  the  user  selects  No,  then  the  gauge  closes  the  batch  and  exits 
batching  -  returning  the  gauge  to  the  Immediate  mode.  If  the  user 
selects Yes, then the gauge automatically:

www.elcometer.com

25

en

R

Summary of Contents for E130-S

Page 1: ...Operating Instructions The New Elcometer 130 Salt Contamination Meter...

Page 2: ...r in a particular installation If this equipment does cause harmful interference to radio or television reception which can be determined by turning the equipment off andon theuserisencouragedtotrytoc...

Page 3: ...CHING T 21 9 DOWNLOADING DATA USING ELCOMASTER 2 0 28 10 ELCOMASTER MOBILE 48 11 CLOUD COMPUTING WITH ELCOMASTER T 50 12 GETTING THE MOST OUT OF ELCOMASTER 2 0 51 13 CHANGING THE WELCOME SCREEN 53 14...

Page 4: ...Contamination Meter quickly and accurately measures the level of soluble salts on surfaces The gauge is available in two models Model S andT This manual describes the operation of both Elcometer 130...

Page 5: ...c Feet 12 Battery Door 13 Tripod Mount Point 4 x AA Batteries USB Cable ElcoMaster 2 0 Software Model T Test Certificate Calibration Certificate dependent on version ordered User Guide Elcometer 130 S...

Page 6: ...ol orange batteries at full capacity Empty symbol red flashing batteries at lowest sustainable level To maximise battery life ensure that Auto Screen Brightness is selected or the screen brightness is...

Page 7: ...reading screen Selecting Auto will enable the gauge to automatically select the appropriate brightness for the surrounding light conditions using the gauge s internal light sensor Screen brightness c...

Page 8: ...ter paper size detected or selected assuming that the paper is positioned on the measurement electrodes correctly and if manually set up the correct papersizeisused Nomanualcalculationsarerequiredbyth...

Page 9: ...equivalent to 2 2 g cm or 119 ppm can be offset using the Calibration Offset feature T see page 7 6 Using tweezers remove a filter paper from the pack 4 For half size paper fold the standard paper in...

Page 10: ...e measurement electrodes correctly and if manually set up the correct paper size is used No manual calculations arerequiredbytheuser 12 Lift the lid and remove the filter paper 13 Place the filter pap...

Page 11: ...ose the lid ensuring that the magnetic catch is fully engaged 9 The reading will automatically be displayed on screen and stored into memory 10 Lift the lid and remove the filter paper 11 Place the fi...

Page 12: ...auge at 0 4 5 and 20 g cm nominal values If the gauge tile readings are outside the stated accuracy of the gauge re calibration is recommended contact Elcometer or your local supplier for further info...

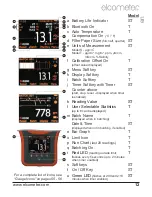
Page 13: ...when timer is enabled ST k Reading Value ST l User Selectable Statistics up to 8 can be displayed T m Batch Name displayed when in batching T Date Time displayed when not in batching if enabled ST n...

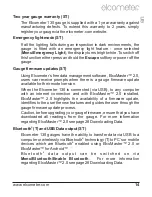
Page 14: ...ed on via Menu Setup Screen Settings Screen Brightness Auto Gauge Welcome Screen ST Users can adjust the start up screen on their Elcometer 130 gauges via the ElcoMaster 2 0 software see page 53 for m...

Page 15: ...ter 130 is connected via USB to any computer with an internet connection and with ElcoMaster 2 0 installed ElcoMaster 2 0 highlights the availability of a firmware update identifies to the user the ne...

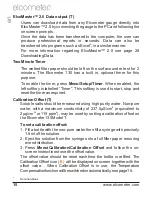
Page 16: ...start stop and reset the timer as required Calibration Offset T Soluble salts should be measured using high purity water Non pure water with a maximum conductivity of 237 5 S cm equivalent to 2 2 g cm...

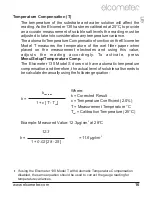
Page 17: ...djusts the reading accordingly To activate press Menu Setup Temperature Comp The Elcometer 130 Model S does not have automatic temperature compensation and therefore the actual level of soluble salts...

Page 18: ...eeds the limit the gauge notifies the user by turning the reading and limit icon red flashing the red LED and sounding the alarm beep For more information see Limits on page 20 On Screen Statistics T...

Page 19: ...y selecting Display Readings Run Chart the user can view a line trend graph of the last 20 measurements The graph is updated automatically when each reading is taken Up to four horizontal axes are dis...

Page 20: ...the batch name when the gauge is in Batch mode T When a batch is created re opened or when the gauge is switched on whilst in batch mode and when each reading is taken the time and date details are st...

Page 21: ...The Red LED flashes The reading is displayed in red The alarm beeps 3 times The limit icon turns red In addition the number of readings above limit statistic is incremented when readings are stored i...

Page 22: ...readings statistics batch information and a graph of the readings Batch Review Batch Delete a Batch or all batches entirely from the gauge Batch Edit Batch Delete Batch Delete the last reading entirel...

Page 23: ...ress Batch Edit Batch Rename Batch and select the Batch to be renamed from the list of existing batches The current name of the batch is in white in the middle of the display with a yellow cursor icon...

Page 24: ...me name Copying an existing batch By selecting Batch Copy Batch the user will find a list of all the batches that have been created together with the number of readings stored in each batch To copy a...

Page 25: ...use the up and down arrow softkeys and select the appropriate batch After a request for confirmation the gauge will clear the readings from the selected batch and return the gauge to the list of batc...

Page 26: ...he appropriate batch After a request for confirmation the gauge will delete the selected batch and return the gauge to the list of batches To delete another batch repeat the procedure to return the ga...

Page 27: ...h Open Existing Batch and select the last batch in the link If the batch is full the gauge will prompt the user to open a new batch before continuing If the batch is partially complete theusercancompl...

Page 28: ...inthebatchthancan be displayed clearly on a single screen multiple readings will be combined into one bar Should a single reading within the combined bar be above the upper limit the wholebarwillbered...

Page 29: ...truction book explains how users can download data using ElcoMaster 2 0 Installing ElcoMaster 2 0 To install ElcoMaster 2 0 insert the supplied mini CD into your CD ROM drive The software will automat...

Page 30: ...button and click Next ElcoMaster 2 0 will automatically select a default destination location for the software to be installed Click the Browse button to select an alternate file location Click Next...

Page 31: ...ow provides a list of the settings that have been selected Click Install to undertake the installation or Back to review or alter any settings ElcoMaster 2 0 will now install Press Finish to exit Setu...

Page 32: ...and an expand arrow Pressing the Menu button opens up a drop down list of options Help Provides Elcometer contact details and information about ElcoMaster 2 0 Update Provides users with the ability to...

Page 33: ...ram chart Alter the colour settings of the user interface The text file separator used when exporting files Select an alternate location to store the database Enable or disable the auto update option...

Page 34: ...xcel Link and Standard Mode plus Design custom reports View data in standard forms predefined within the Design Report action tab or by Elcometer Design a collection template to guide inspectors where...

Page 35: ...d and reported using the ElcoMaster 2 0 software These instructions will inform the user how to download data from an Elcometer 130 Salt Contamination Meter All appropriate Elcometer gauges can be dow...

Page 36: ...ElcoMaster 2 0 is installed onto a computer without Bluetooth capability however the Bluetooth tab is greyed out as displayed in top image Select the appropriate connection method Switch on the Elcom...

Page 37: ...he Bluetooth PIN Code and press Next ElcoMaster 2 0 will now validate the connection press Finish when complete The gauge is now connected and ElcoMaster 2 0 will return the user to the Download actio...

Page 38: ...ect a single or multiple spreadsheet option Single all batches selected will be downloaded into a single spreadsheet Multiple each batch will be downloaded into a separate spreadsheet tab Select one o...

Page 39: ...s Next Select or create a new folder to save the gauge s data to In some cases users may have re used an existing batch name in the gauge The user should now chose either to select Rename Duplicate Fi...

Page 40: ...also allows users to manually input data as required This instruction book provides a brief summary of some of the features of ElcoMaster 2 0 however users should read the ElcoMaster 2 0 help file for...

Page 41: ...g the computer mouse s right button over a file orfolderprovidestheuserwiththefollowingfunctions New Allows users to create a new Project create a new Folder import an Image import a PDF Document crea...

Page 42: ...txt Document create a new batch type Move to Moves the selected items to a different folder Print Prints a report of the selected items PDF Generates a PDF report of the selected items Email Generates...

Page 43: ...he following RH Relative Humidity Ts SurfaceTemperature Ta AirTemperature Td DewpointTemperature T DeltaT Ts Td Tdb Dry BulbTemperature Twb Wet bulbTemperature SH Specific Humidity Right mouse click o...

Page 44: ...ng a colour Measurements Displays all the individual readings Users can alter the display order Date Time Relative Time seconds Relative Time minutes and Reading Number by clicking on the column title...

Page 45: ...e Structure name Structure location Batch Label Examples Inspector name shift number area under consideration strutt number etc Photos Photographs of the area under inspection specific defects etc can...

Page 46: ...ction method has been set up see pages 34 36 ElcoMaster 2 0 will then link with the selected gauge and when ready display the gauge information within the Live Readings window At any time the user can...

Page 47: ...h to begin the design To design the collect image sequence simply click and hold each reading circle in turn drag onto the image where readings are to be taken and adjust the size accordingly Once com...

Page 48: ...Select a gauge from the list Select the relevant connection method ElcoMaster 2 0 will link the selected gauge and when ready display the gauge information within the Live Readings window Once connect...

Page 49: ...e Profile Gauge Elcometer 319 Dewpoint Meter Elcometer 456 CoatingThickness Gauge Store live readings directly on the phone and save them into batches Download batches straight to a mobile phone or ta...

Page 50: ...id com elcometer elcomaster and follow the on screen instructions Download collection images created using the Design Collect function in ElcoMaster 2 0 to indicate where and in which order readings...

Page 51: ...t will have instant access to all inspection data in real time Data can be accessed by authorised users via secure log in from any computer or mobile device anywhere in the world via Bluetooth USB WiF...

Page 52: ...secure log in on any computer or mobile device anywhere in the world 2 Gauge to PC data transfer into ElcoMaster 2 0 Using Bluetooth or USB ElcoMaster transfers inspection data in seconds archiving d...

Page 53: ...m sub assembly plants Combine all data from sub Your data your choice your control assembly and final assembly ElcoMaster 2 0 allows you to inspection to generate Project decide which Cloud service pr...

Page 54: ...er welcome screen Switch on your gauge Select the DownloadActionTab Click the Edit button on the right hand side of the appropriate gauge Select Change Welcome Screen from the drop down menu Select th...

Page 55: ...ction only Clicking the Update Gauge button will display a list of the Fixes in all the updates that have been released since the gauge s last upgrade Press Next to continue Press Next to commence dow...

Page 56: ...d icon T Filter Paper Size Auto Selected No Paper Detected ST Filter Paper Size Full ST Filter Paper Size Half ST Filter Paper Size Quarter ST Timer Enabled ST Temperature Compensation On T Calibratio...

Page 57: ...130 Model S About Gauge Information Contact Legal Menu Setup About Reset Emergency Light Legal Legal Notices Regulatory Filter Paper Size Auto Full Half Quarter Time and Date SetTime Set Date Set For...

Page 58: ...Edit Batch Copy Batch Review Batch Deleted Reading Display Clear Statistics Readings Only Readings Selected Stats Readings Run Chart Readings Bar Graph Batch Graph Statistics Review Batch Batch 1 Sta...

Page 59: ...ed or USB Battery Life Approximately 4 000 measurements Dimensions 250 x 145 x 50mm 9 8 x 5 7 x 1 9 Weight 780g 1 72lb 18 SPARES ACCESSORIES Description Part Number Calibration Verification Tiles Set...

Page 60: ...lcometer com website Consumable items have a 1 year warranty from the date of purchase against manufacturing defects only This gauge incorporates a Liquid Crystal Display LCD If the display reaches a...

Page 61: ...ification 59 Character Size 13 Conductivity Measuring 10 D Date and Time 19 Delete Readings 21 Dimensions 58 Display 11 Brightness 6 Reading Size 13 Downloading Data via Bluetooth 14 28 via ElcoMaster...

Page 62: ...ay 11 Run Chart 18 S Setting Limits 20 Soluble Salts Measuring 8 Software ElcoMaster 2 0 28 SSPC Guide 15 59 Standards 59 Statistics 17 Switching On Off 5 T Technical Specifications 58 Temperature Com...

Page 63: ...ingapore 589472 Tel 65 6462 2822 Fax 65 6462 2860 e mail asia elcometer com www elcometer com ENGLAND Elcometer Limited Edge Lane Manchester M43 6BU Tel 44 0 161 371 6000 Fax 44 0 161 371 6010 e mail...

Reviews: