background image

English 


4. 

ADJUSTMENT 

25


4-2. Displaying a Low Resolutions 

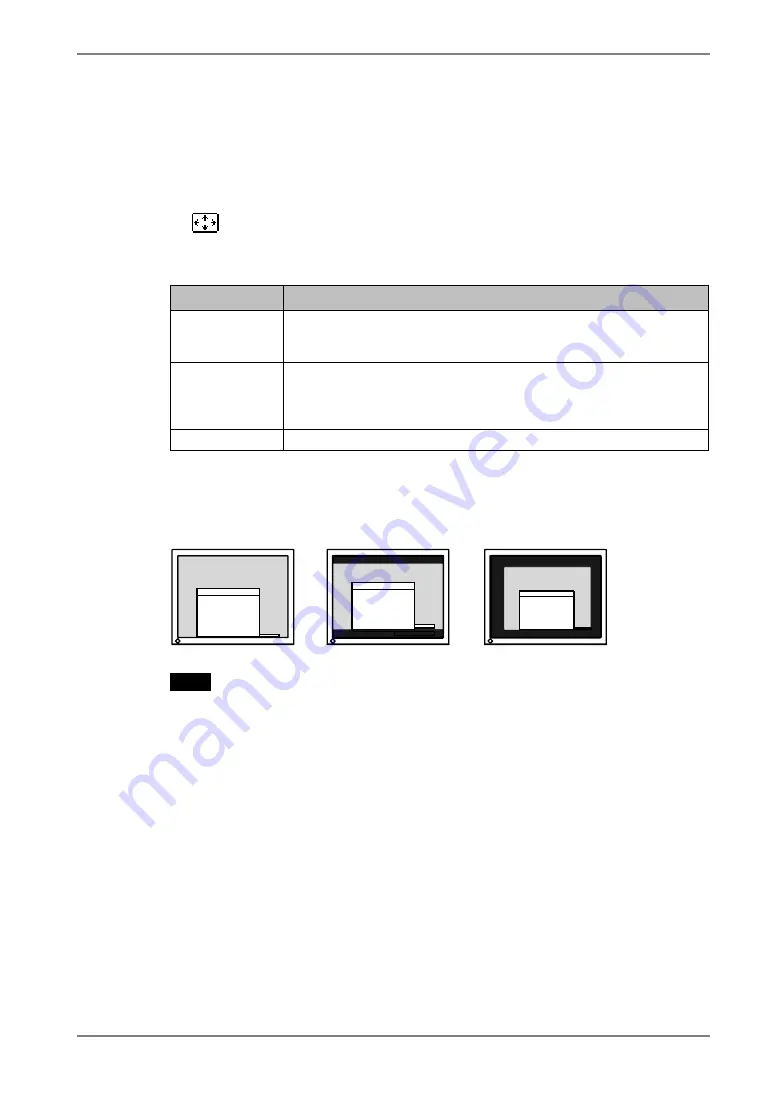
The lower resolutions are enlarged to full screen automatically.  Using the <Screen Size> 
function in the <Others> menu enables to change the screen size. 

1. 

Change the screen size when displaying a low resolution. 


 Select the <Screen Size>. 

Select the <Screen Size> in the <Others> menu and select the screen size by using 
the up and down buttons. 

Menu 

Function 

Full 

Displays the picture on the screen in full, irrespective of the picture’s 
resolution.  Since the vertical resolution and the horizontal resolution 
are enlarged at different rates, some images may appear distorted. 

Enlarged 

Displays the picture on the screen in full, irrespective of the picture’s 
resolution.  Since the vertical resolution and horizontal resolution are 
enlarged at same rates, some horizontal or vertical image may 
disappear. 

Normal 

Displays the picture at the actual Screen resolution. 

 
Example: Displaying1024 x 768 


NOTE


• 

When using the ActiveShot (p. 31) or ActiveRotation (p. 35) function, the 
screen size cannot be enlarged. 

• 

When displaying the Sub window of ActiveShot function after setting “Enlarged” 
or “Normal”, the screen image of the Main window is displayed in “Full“ mode. 

Full 

(Default)

Enlarged

Normal

(1280

×

1024)

(1280

×

960)

(1024

×

768) 

Summary of Contents for FlexScan L695

Page 1: ...User s Manual Color LCD Monitor...

Page 2: ...submitted material or information confidential unless prior arrangements are made pursuant to EIZO NANAO CORPORATION s receipt of said information Although every effort has been made to ensure that th...

Page 3: ...he ScreenManager 17 3 2 ScreenManager Adjustments and Settings 18 3 3 Useful Functions 19 4 ADJUSTMENT 21 4 1 Screen Adjustment 21 4 2 Displaying a Low Resolutions 25 4 3 Color Adjustment 27 4 4 Power...

Page 4: ...ation of the Caution Statements WARNING If the unit begins to emit smoke smells like something is burning or makes strange noises disconnect all power connections immediately and contact your dealer f...

Page 5: ...ng a damaged unit may result in fire or electric shock OK Set the unit in an appropriate location Not doing so may result in fire electric shock or equipment damage Do not place outdoors Do not place...

Page 6: ...ching them may result in electric shock When attaching an arm stand please refer to the user s manual of the arm stand and install the unit securely with the enclosed screws Not doing so may cause the...

Page 7: ...the unit laid down or upside down Blocking the ventilation slots prevents proper airflow and may result in fire electric shock or equipment damage Do not touch the plug with wet hands Doing so may res...

Page 8: ...xed life span When the screen becomes dark or begins to flicker please contact your dealer Do not press on the panel or edge of the frame strongly as this may result in damage to the screen There will...

Page 9: ...rged image p 26 Auto Adjustment compliant and original Picture Adjustment Program software included ColorManagement function incorporated p 27 Support to sRGB p 49 standard The height adjustable stand...

Page 10: ...Control Buttons Left Down Up Right 1 8 Power Button 9 Power Indicator 2 Blue Operation Yellow Power saving Flashing yellow 2 times for each Power save mode Digital only Flashing yellow slowly Power is...

Page 11: ...el pivots in the clockwise direction 90 see p 35 The LCD monitor can be used with an optional arm by removing the stand see p 38 4 Allows for connection of a security cable This lock supports Kensingt...

Page 12: ...Resolution Frequency Dot Clock Remarks 640 480 85 Hz VGA VESA 640 480 67 Hz Apple Macintosh 720 400 70 Hz VGA TEXT 800 600 85 Hz VESA 832 624 75 Hz Apple Macintosh 1024 768 85 Hz VESA 1152 864 75 Hz...

Page 13: ...ble Connector of PC PC FD C16 or MD C100 enclosed Video Output Connector D Sub mini 15 pin Standard graphics card Macintosh G3 Blue White Power Mac G4 VGA FD C16 or MD C100 enclosed Adapter Video Outp...

Page 14: ...he smooth motion of the stand and the Portrait Landscape display 4 Plug the other end of the power cord into a power outlet WARNING Use the enclosed power cord and connect to the standard power outlet...

Page 15: ...alog or Digital is displayed for a few seconds on the right top corner of the screen Adjust brightness of the screen depending on the brightness of your environment Be sure to take adequate rests A 10...

Page 16: ...a change of signal is detected at the selected input the monitor will switch the input to that signal In the case of only one signal being present at either input the monitor automatically detects an...

Page 17: ...the desired setting icon and press the Enter button The setting menu appears 3 Use the Control buttons to make all required adjustments and press the Enter button to save the settings 3 Exiting the S...

Page 18: ...nsity 4 2 Displaying a Low Resolutions p 25 Input Priority Select the priority input signal p 16 Off Timer Set the monitor s off timer to on or off p 19 Beep Set the monitor s beeper to on or off p 46...

Page 19: ...ed This function was created to reduce afterimage p 48 characteristics that are particular to LCD monitors when the monitor screen is left on for a long period without use Procedure 1 Select Off Timer...

Page 20: ...display or undisplay this logo use this function Default is logo appearing To undisplay 1 Switch off the monitor s power by the Power button on the control panel 2 Hold down the Enter button once aga...

Page 21: ...now appears and remains on the screen for 5 seconds While the message is on the screen press the Auto adjustment button again to automatically adjust the clock phase screen position and resolution If...

Page 22: ...not continuously press the control buttons as the adjustment value will change quickly and make it difficult to locate the most suitable adjustment point If the horizontal flickering blur or bars app...

Page 23: ...lock adjustment and repeat the previously explained adjustment procedure Clock Phase Position 4 Screen image is smaller or larger than the actual screen images Use the Resolution adjustment Adjustment...

Page 24: ...Procedure 2 Pressing Auto adjustment button while displaying the contrast brightness adjustment screen appeared by pressing the control buttons directly adjusts the range automatically Contrast and Br...

Page 25: ...n and the horizontal resolution are enlarged at different rates some images may appear distorted Enlarged Displays the picture on the screen in full irrespective of the picture s resolution Since the...

Page 26: ...played in the following resolutions 1280 x 1024 The image size is doubled both in horizontally and vertically to i e 1280 x 960 enlarged from 640 x 480 provide clear focus which does not require this...

Page 27: ...ific adjustment They are available only as a reference tool To create a uniform white or black screen the percentages for each will probably not be the same Custom mode To adjust the color settings ac...

Page 28: ...Saturation adjustment may cause undisplayable color tone To change the flesh color etc Use the Hue adjustment The Hue can be selected from 20 to 20 NOTE The Hue adjustment may cause undisplayable colo...

Page 29: ...his monitor complies with the VESA DPMS p 49 standard and adopts a power saving method EIZO MPMS p 48 which works with a blank screen totally black screen like Blank Screen ScreenSaver software To use...

Page 30: ...reen NOTE EIZO MPMS should be used with Macintosh EnergySaver Digital Input This monitor complies with the DVI DMPM p 48 Procedure 1 Set the PC s power saving settings 2 Select VESA DPMS in the PowerM...

Page 31: ...Cs to a monitor see p 15 5 1 Operation To display close the Sub window ON Press PinP button on the control panel OFF Press the PinP button again To switch the image of main and Sub window Pressing the...

Page 32: ...playing the screen image in full screen with reducing the image size in the Sub window Select Standard mode on Picture in Picture menu of ScreenManager To select the size Select Window Size This sets...

Page 33: ...the Sub window will be displayed in full screen and pink frame will appear on it 2 Select the Clip Position icon By using the up down right and left buttons position the upper left corner of the disp...

Page 34: ...set the Contrast Select Window Contrast This controls the brightness for the each color red blue and green at the same time Select Window Contrast and adjust by using the right and left buttons 5 3 S...

Page 35: ...http www eizo com NOTE When using the ActiveShot function p 31 the ActiveRotation function cannot be used When connecting two PCs another screen image is not displayed in appropriate portrait style Op...

Page 36: ...to set the resolution NOTE When changing the display orientation to landscape again select Landscape in the Orientation menu of the ScreenManager and then restart the PC When using the ActiveRotation...

Page 37: ...reen the clock phase position and resolution automatically 4 1 Screen Adjustment p 21 Set the monitor s off timer to on or off Off Timer p 19 Lock the adjusted settings Adjustment Lock p 19 Change the...

Page 38: ...manufacturers before selecting Hole spacing on the arm mounting 100 mm x 100 mm VESA compliant Supportable Weight Total weight of the monitor without stand and attaching equipment such as a cable T V...

Page 39: ...English 8 ATTACHING AN ARM 39 4 Attach an arm stand to the LCD monitor securely M4 Mounting Screws M4 x 15 mm BZn Fe Arm stand...

Page 40: ...selection button on the front control panel Try pressing a key on the keyboard or clicking the mouse p 29 Try pressing the power button Try turning the PC on 2 Error messages shown below will remain o...

Page 41: ...se p 22 7 Letters and lines appear blurred Adjust the blurred lines using Smoothing p 26 8 Distortion appears like the figure below This happens when both composite X OR input signal and separate vert...

Page 42: ...the ActiveShot p 31 or ActiveRotation p 35 function is not used 15 The Enter button does not operate The adjustment lock is probably on To unlock switch the LCD monitor off Then while pressing the Aut...

Page 43: ...on file in the attached utility disk on Windows 98 2000 XP Use the graphics board s utility software to change the input signal frequency 18 The ActiveShot function cannot be operated Check that the A...

Page 44: ...s as these may cause damage to the cabinet or LCD panel Cabinet To remove stains wipe the cabinet with a soft lightly moistened cloth using a mild detergent Do not spray wax or cleaner directly into t...

Page 45: ...or D Sub mini 15 pin DVI I a Separate TTL Positive Negative b Composite TTL Positive Negative Analog Input Signal Sync c Sync on Green 0 3 Vp p Negative except in portrait style Analog Input Signal Vi...

Page 46: ...minimum or maximum limit Input signal selection button pressed Long beep Auto Adjustment button pressed ScreenManager data save executed 4 short beeps Monitor not connected correctly PC turned off Mon...

Page 47: ...MDS Data1 3 Shield 21 NC 2 TMDS Data2 12 NC 22 TMDS Clock shield 3 TMDS Data2 4 Shield 13 NC 23 TMDS Clock 4 NC 14 5V Power 24 TMDS Clock 5 NC 15 Ground return for 5V Hsync and Vsync C1 Analog Red 6 D...

Page 48: ...ignal inputs DVI DMPM DVI Digital Monitor Power Management The Power management system for the digital interface The Monitor ON status operation mode and the Active Off status power saving mode are in...

Page 49: ...lows Internet users to closely match colors Temperature Color temperature is a method to measure the white color tone generally indicated in degrees Kelvin At high temperatures the white tone appears...

Page 50: ...Nega Macintosh 1280 960 75 Hz 126 200 74 763 74 763 Posi Posi VESA 640 480 72 Hz 31 500 37 861 72 809 Nega Nega VESA 640 480 75 Hz 31 500 37 500 75 000 Nega Nega VESA 640 480 85 Hz 36 000 43 269 85 00...

Page 51: ...rence to radio communications However there is no guarantee that interference will not occur in a particular installation If this equipment does cause harmful interference to radio or television recep...

Page 52: ...des SWICO http www swico ch Renseignements de recyclage pour les clients en Suisse Vous trouvez tous les renseignements pour le sujet de recyclage sur la page WEB de I UNION DE BRAN CHE SWICO http www...

Reviews: