background image

In Use of RDP Protocol 

1. 

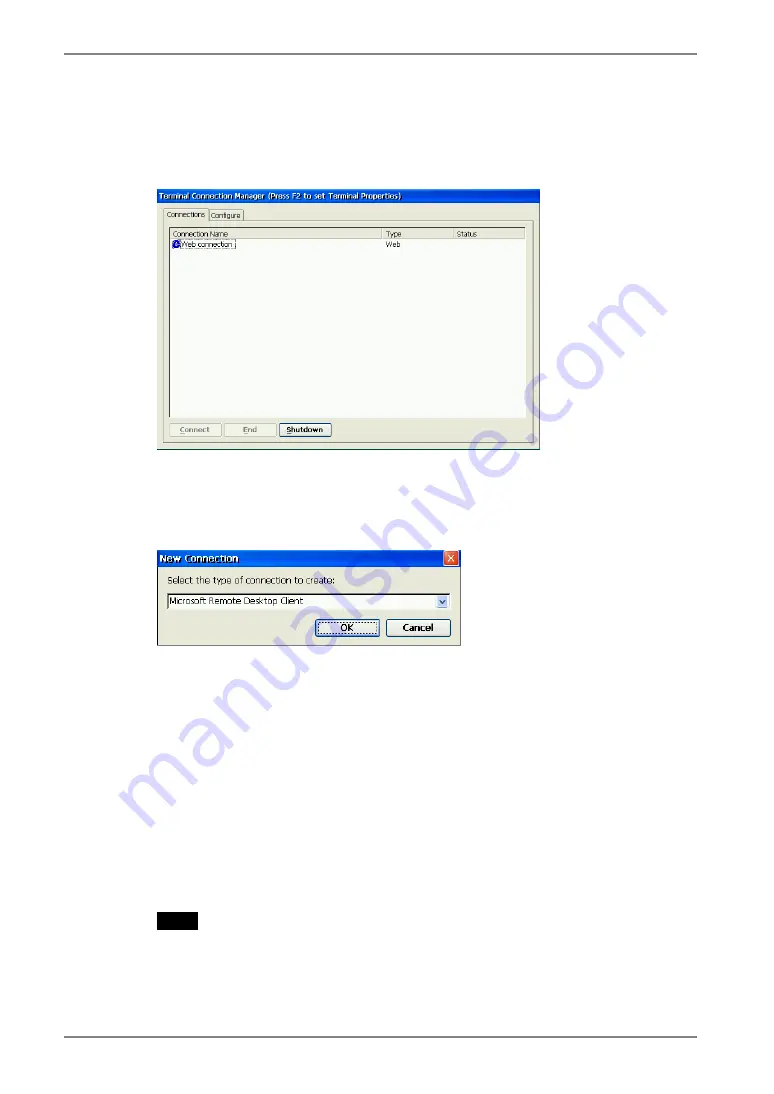
Display [Terminal Connection Manager].   


Click the [Configure] tab and [Add...] to set the connection information of the 
WTS. 

2. 

Protocol selection dialog box is displayed. 


Select the “Microsoft Remote Desktop Client” (RDP). 

3. 

“WTS Connection Wizard” is displayed. 
(Setup as following the wizard.) 

(1)  Type the connection name and the name of the Server. 
(2)  Setup to enable an Automatic Logon to the WTS after connecting if you want. 
(3)  Select whether to display the Windows desktop screen or start up an 

application. 


Clicking [Finish] to return to the “Terminal Connection Manager” dialog box, the 
registered connection name is displayed in the [Connection Name]. 

NOTE 

• 

Please repeat step 2 to 3 to entry more than two kinds of connections. 

22


4.

 ADDING & CHANGING A CONNETION NAME 

Summary of Contents for eClient 630LT-GR

Page 1: ...Windows CE 4 10 Rev 2 7 1 or later Microsoft Terminal Server Client Ver 7 2 0 or later ICA Client Ver 7 23 or later Please confirm the version of the software built in eClient and refer to the suited User s Manual Refer to the User s Manual Version List on next page For Microsoft Windows CE NET Version E For Administrator ...

Page 2: ...ter C 4 10 Rev 2 5 3 or later Version 7 0 1 Build0020 or later Version 6 30 Build1063B or later B 4 10 Rev 2 5 1 or later Version 7 0 1 Build0020 or later Version 6 30 Build1063B or later A 4 10 Rev 2 5 1 or later Version 7 0 1 Build0019 or later Version 6 30 Build1063 or later NOTE OS Microsoft Windows CE 2 12 Software Manual Microsoft Windows CE Microsoft Windows Terminal Server ICA Client Softw...

Page 3: ...ess prior arrangements are made pursuant to EIZO NANAO CORPORATION s receipt of said information Although every effort has been made to ensure that this manual provides up to date information please note that EIZO monitor specifications are subject to change without notice ENERGY STAR is a U S registered mark Apple and Macintosh are registered trademarks of Apple Computer Inc BSQUARE is a register...

Page 4: ...fying a Connection Name 24 5 LOGON LOGOFF 25 5 1 Logon to a WTS Logoff from a WTS 25 5 2 Opening Closing a Local Web Browser 29 6 USING THE TERMINAL PROPERTIES 31 6 1 General 33 6 2 Local Resources RDP protocol only 34 6 3 Display 35 6 4 Experience RDP protocol only 37 6 5 Control Panel 38 6 6 ICA Settings ICA Protocol only 47 6 7 Server 48 6 8 Security 49 6 9 System 51 7 SOFTWARE UPDATING INSTALL...

Page 5: ...r expresses WTS hereafter 1 2 Features Lower TCO Total Cost of Ownership Saves Space and Power Consumption Less Heat Less Noise Speakers equipped Serial Port for Modem PDA Local Web Browser added as a default connection 630LT GR 630LT GR N PC card slot for modem card LAN card and wireless LAN card Wake on LAN supported A Touch Panel and a Stylus Provided eClient 630LT GR 630LT GR N Windows Termina...

Page 6: ...ghtness Control Guide Stylus NOTE A keyboard is not included Please purchase it separately Please use the enclosed mouse EIZO NANAO CORPORATION will not be held responsible for accident or damage caused by the use of a mouse manufactured by other companies Please retain the packing materials for future transference Brightness can be adjusted by using key combinations on the keyboard see page 36 Ke...

Page 7: ...or Color 630LT GR 630LT GR N status Green Operation Screen saver mode Yellow Power save mode Off Power off Wake on LAN standby 3 Speakers 4 Volume Control NOTE When turning off on the unit leave the unit off for a few seconds before turning it on again 1 INTRODUCTION 7 ...

Page 8: ... Security Lock 1 16 Holes for Mounting an Arm Stand 2 17 Stand Detachable 1 This allows for connection of a security cable This lock supports Kensington s MicroSaver security system For further information please consult Kensington Technology Group 2855 Campus Drive San Mateo CA 94403 USA Tel 800 650 4242 x3348 Intl 650 572 2700 Fax 650 572 9675 http www kensington com 2 The LCD monitor can be use...

Page 9: ... after it has been dropped may result in fire or electric shock OK Set the unit in an appropriate location Not doing so may result in fire electric shock or equipment damage Do not place outdoors Do not place in the transportation system ship aircraft trains automobiles etc Do not place in a dusty or humid environment Do not place in a location where the steam comes directly on the screen Do not p...

Page 10: ...evices please connect them to the appropriate connectors In use of a stylus or a finger as an input device it is not necessary to connect a mouse 3 If using other devices please connect them to the appropriate connectors 4 Plug the power cord into the power connector WARNING Use the enclosed power cord and connect to the standard power outlet of your country Be sure to remain within the rated volt...

Page 11: ...yboard connected No mouse connected is shown on the screen please refer to 8 Troubleshooting on page 61 In use of a stylus or a finger as an input device No Mouse Connected caution does not effect our operation 2 Touch panel calibration is displayed Five targets are displayed on the screen Press the targets with a stylus or a fingertip to locate the center of the touch panel If you accidentally to...

Page 12: ...isplayed when you finished Click the Enter key to accept the settings 4 eClient Setup Wizard is displayed Set up the 630LT GR 630LT GR N according to directions of the displayed dialog box 12 3 SETTING UP the eClient 630LT GR 630LT GR N ...

Page 13: ...5 End User License Agreement page is displayed Read the content and click Accept to continue 3 SETTING UP the eClient 630LT GR 630LT GR N 13 ...

Page 14: ... Built in LAN p 15 In case of connecting with a NE2000 compatible LAN card p 15 In case of connecting with a Cisco wireless LAN card Agere wireless LAN card p 16 In case of a dial up connection p 17 In case of the dial in connection ICA protocol only to log on to WTS Go to step 7 Skip the Network Properties settings NOTE Dial Up Connection Dial In Connection Telephone Lines Telephone Lines RAS Ser...

Page 15: ... WINS is used Advanced Type the transmission speed and MAC Address of a network In case of connecting with a NE2000 compatible LAN card 1 Double click NE 20001 icon IP Address Type the IP address of the unit Name Servers Type the IP address of each server when DNS or WINS is used Example In case of connecting with a NE2000 compatible LAN card 3 SETTING UP the eClient 630LT GR 630LT GR N 15 ...

Page 16: ... of each server when DNS or WINS is used Wireless Networks Set the connection setting with a wireless LAN card NOTE In case of selecting Obtain an IP address via DHCP deactivate the built in LAN by the procedure below 1 Double click Built in LAN icon 2 Select Specify an IP address of IP Address tab type 255 255 255 255 in the IP Address box 16 3 SETTING UP the eClient 630LT GR 630LT GR N ...

Page 17: ...e a name for the connection and select PPP over Ethernet PPPoE 3 Type PPPoE service name or blank for any service and set up the TCP IP settings and Security settings Set up a Remote Connection By setting up a Remote Connection the WTS Web server can be connected easily 1 Double click Make New Connection icon 2 Type a name for the connection and select Remote Connection Setup 3 Select the desired ...

Page 18: ...olor 256 Colors High color of the following Windows CE desktop before WTS connection Windows desktop after a WTS connection with RDP protocol NOTE High Color setting after WTS connection can be available only when connecting with WTS which version is 5 1 or later After WTS connection the WTS setting may control the desktop color 18 3 SETTING UP the eClient 630LT GR 630LT GR N ...

Page 19: ...stall a local printer A printer is connected to the serial connector the parallel connector or a USB port An RDP protocol is used for connection to a WTS Microsoft Windows 2000 Server Advanced Server Datacenter Server is installed in a WTS 1 Select Printer icon and click Open icon 2 Select Add printer icon and click Open icon 3 WTB Printer Wizard is displayed Follow the direction of the dialog box...

Page 20: ... the local settings 11 The last page of the eClient Setup Wizard is displayed Click Finish Click Yes if a Terminal Settings change dialog box is displayed The Terminal Connection Manager dialog box will be displayed after restarting NOTE Click No to finish the eClient Setup Wizard and display Terminal Connection Manager on the screen The setting is not activated until the 630LT GR 630LT GR N is re...

Page 21: ...1 Adding a Connection Name These are settings for the server connection Each protocol has different settings Please install the appropriate settings In use of the Microsoft Remote Desktop Client RDP page 22 In use of the Citrix ICA Client ICA page 23 NOTE Please install Citrix MetaFrame server into the Server when using the ICA protocol 4 ADDING CHANGING A CONNETION NAME 21 ...

Page 22: ...owing the wizard 1 Type the connection name and the name of the Server 2 Setup to enable an Automatic Logon to the WTS after connecting if you want 3 Select whether to display the Windows desktop screen or start up an application Clicking Finish to return to the Terminal Connection Manager dialog box the registered connection name is displayed in the Connection Name NOTE Please repeat step 2 to 3 ...

Page 23: ...tion 2 Setup a server or modem according to a connection type 3 Type a connection name of the WTS 4 Select whether to display the Windows desktop screen or start up an application 5 Setup to enable an Automatic Logon to the WTS after connecting if you want 6 Set the desktop color of the Windows desktop after WTS connection 7 Setup the compression encryption and sound 8 Setup the firewalls settings...

Page 24: ...tically start the selected connection at startup This makes the selected connection to start automatically each time the eClient 630LT GR 630LT GR N is turned on The setting is effective from the next startup NOTE To connect to the default WTS connection set in the Terminal Connection Manager dialog box press Ctrl Alt Home keys 4 3 Modifying a Connection Name Deleting a Connection Select the conne...

Page 25: ...the screen Clicking the button makes a dial up connection Check the clock s running and go to step 2 3 To connect and log on to a WTS with dial in connection Go to step 2 2 Select the desired connection name from the Connection tab of Terminal Connection Manager click the Connect or simply double click the connection name 3 The eClient 630LT GR 630LT GR N connects to the WTS and the Log On to Wind...

Page 26: ... logon 3 Terminal Connection Manager is displayed Select another Connection Name to log on to and click Connect Or double click the connection name Repeat the step 2 to 3 to log on to another connection name Switching the Active Session of the WTS Press Ctrl Alt UP ARROW key DOWN ARROW key to switch the active session NOTE The multi session is not available on a dial in connection 26 5 LOGON LOGOF...

Page 27: ...the WTS The Terminal Connection Manager dialog box is displayed If a dial up connection is running click the active button of the window on the right of the screen Clicking the button disconnects the dial up connection 2 Shut down the eClient 630LT GR 630LT GR N There are three ways to shut down the unit Click Shutdown in the Terminal Properties dialog box or press the power button eClient Shut do...

Page 28: ... of the window on the right bottom of the screen Clicking the button disconnects the dial up connection 2 Shut down the eClient 630LT GR 630LT GR N Please refer to the previous page for shutting down the eClient 630LT GR 630LT GR N NOTE It is possible to disconnect from a WTS without closing applications in use or without logging off The last view of the application is displayed when the next conn...

Page 29: ... Internet Click an active button of a small window on the right bottom of the screen Clicking the button makes a dial up connection Check the clock s running and go to step 2 2 Select the Web connection from the Connections tab and click Connect or simply double click the Web connection 3 The local web browser opens It is possible to browse web pages on the Internet NOTE It is possible to switch b...

Page 30: ... 2 Shut down the eClient 630LT GR 630LT GR N There are three ways to shut down the unit Click Shutdown in the Terminal Properties dialog box or press the power button eClient Shut down dialog box is displayed select Shutdown and click OK Press the power button Shut down the eClient dialog box is displayed Press the power button again Press the power button and leave the unit for 20 seconds The uni...

Page 31: ...r presents how to modify all settings of the eClient 630LT GR 630LT GR N using the Terminal Properties To display the Terminal Properties during logging on press F2 in the Terminal Connection Manager dialog box 6 USING THE TERMINAL PROPERTIES 31 ...

Page 32: ... Settings p 39 Mouse Mouse Settings p 40 Stylus Touch Panel Properties p 40 Volume Sounds Volume settings Sounds selection p 40 Date Time Date Time Time Zone p 42 Certificates Certification list and import p 43 DHCP Settings DHCP Server settings p 43 Add on List and remove Installed software p 44 Internet Options Internet Settings p 44 Printers 1 Local printer settings p 45 Control Panel Network D...

Page 33: ...ect the Reset the terminal to factory default property settings check box 2 The System Settings Change dialog box is displayed click Yes 3 Terminal Properties is displayed Click OK Confirmation window is displayed click Yes to restart the terminal eClient Setup Wizard will be displayed after restarting the terminal 6 USING THE TERMINAL PROPERTIES 33 ...

Page 34: ...er means WTS Device settings Local devices Select the applicable device check box when using the device connected from the WTS after WTS connection NOTE Sound settings and Disk drives Serial ports of Local devices can be available only when connecting with WTS which version is 5 1 or later 34 6 USING THE TERMINAL PROPERTIES ...

Page 35: ...desktop color 256 Colors High color of the following Windows CE desktop before WTS connection Windows desktop after a WTS connection with RDP protocol NOTE High Color setting after WTS connection can be available only when connecting with WTS which version is 5 1 or later After WTS connection the WTS setting may control the desktop color 6 USING THE TERMINAL PROPERTIES 35 ...

Page 36: ...y turn off the unit when you are finished using it Complete energy use can only be accomplished by disconnecting the unit s power supply cord from the plug receptacle Brightness Contrast Brightness Settings Enables to adjust the brightness of the screen Selecting the Enable Contrast Brightness control from Keyboard check box enables to adjust the brightness contrast from a Keyboard Alt key and key...

Page 37: ...fy your connection speed to WTS connection Choose your connection speed from the pull down menu or select the setting check box NOTE This setting can be available only when connecting with WTS which version is 5 1 or later 6 USING THE TERMINAL PROPERTIES 37 ...

Page 38: ...6 5 Control Panel Dialing Location name Choose the sender s location click New to add a new sender s location Local Settings are Setup the local settings 38 6 USING THE TERMINAL PROPERTIES ...

Page 39: ...nd or mouse are not connected on start up the error message is displayed When you use neither a mouse nor a keyboard intentionally and you do not display an error message on start up uncheck this function Character Repeat Allows adjusting the speed at which a character repeats when hold down a key Password Password This enables password settings on FTP service p 48 and Security functions p 49 6 US...

Page 40: ...s Tap Settings Set the mouse right click emulation and adjust right click emulation Holding time means the holding stylus Holding sensitivity means the sensitivity to recognize the stylus holding status For example when setting the Holding sensitivity to LESS stylus is recognized to be stable even the stylus holding position slides a little Calibration This enables to recalibrate the touch panel 4...

Page 41: ...nd click OK 3 Registry Editor is displayed Select HKEY_CURRENT_USER Control Panel Mouse 4 Double click DoubleClickHeight and DoubleClickWidth and change the settings on Value Data Height and width will be increase as the value increase 5 Close Registry Editor 6 Logoff from the Server and re logon to confirm the settings are effective If you do not logon to the Server after changing the settings th...

Page 42: ...ize button NOTE Synchronizing time at startup is effective when the 630LT GR 630LT GR N is connecting WTS Web Server using a Built in LAN connection or connection with a LAN card Getting the NTP Server information from the DHCP Server needs to satisfy the following Connect the WTS Web Server by using a Built in LAN connection or connection with a LAN card Use the DHCP Server to get information suc...

Page 43: ...ck Add By clicking the button the certificate can be used The certificate s icon changes from to DHCP Settings General This allows the user to receive IP information from a DHCP server DHCP Options Select the Enable DHCP Options check box to receive essential information about the 630LT GR 630LT GR N from the DHCP server every time the 630LT GR 630LT GR N is turned on Refer to Practical Setup on p...

Page 44: ...her Microsoft Terminal Server Client nor Citrix ICA Client Software is removed Internet Options General Setup the browser Connection Setup the connection method to the browser Security Setup the security for the connection to the browser Advanced Setup the display method for the browser 44 6 USING THE TERMINAL PROPERTIES ...

Page 45: ...etaFrame Adding another printer settings Select Add Printer icon and click Open Printer Properties dialog box is displayed Setup as following the wizard See page 19 for the details Deleting a printer settings Select the printer icon and click Delete Modifying the settings Select the printer icon and click Properties Printer Properties dialog box is displayed change the settings as needed 6 USING T...

Page 46: ...Network and Dial up Connections Set up connection information according to the connection method to WTS Web server See page 15 for the details 46 6 USING THE TERMINAL PROPERTIES ...

Page 47: ...nt Configurations ICA Client Configurations You can set the configuration for the ICA Connection ICA Client Feature Settings Configure ICA Client Feature Settings You can configure ICA Client Feature Settings NOTE Do not select the Client smartcard reader redirection check box in the Enable ICA Client Features This setting may not function properly 6 USING THE TERMINAL PROPERTIES 47 ...

Page 48: ...he Password in the Control Panel tab surely FTP Service If using this eClient as a FTP server select the FTP Server ON OFF check box and set the user name which is used for accessing the product from the other eClient in the user list 48 6 USING THE TERMINAL PROPERTIES ...

Page 49: ...al Local Resources Experience Control Panel except Mouse Keyboard and Stylus ICA Server Security Update in the System Canceling Settings 1 Display Terminal Connection Manager 2 Press Shift and F2 keys at the same time 3 Enter Security Password dialog box is displayed Enter the password set in the Password of the Control Panel 4 All settings in the Terminal Properties will be active remove the Term...

Page 50: ...Connection Manager is not displayed Canceling Settings 1 Display the Single Button Connect dialog box 2 Press Alt and F4 keys at the same time 3 Enter Security Password dialog box is displayed Enter the password set in the Password of the Control Panel 4 Terminal Connection Manager is displayed NOTE Terminal Security cannot be canceled by this setting Administration Console Administration Console ...

Page 51: ...ation Software Microsoft Windows CE Version Revision Window Terminal Server Client Revision Please refer to the page 52 on Update Hardware Serial Number of the unit Network Network information 6 USING THE TERMINAL PROPERTIES 51 ...

Page 52: ...install file to the accessible file folder of the FTP Server If the WTS is connected with LAN close all the connection to the WTS Make a dial up connection if it is adopted to connect the WTS Software Updating is not available if a dial in is adopted to connect the WTS When two or more 630LT GR 630LT GR N exists on the same network the firmware file OS file only can be updated by making any 630LT ...

Page 53: ... box will automatically consult the update file in the location indicated in the Software Update dialog box each time turning on the unit If the update file consulted is newer the software will be updated automatically while displaying the following dialog box This function is not available for a modem connection Please do not click the check box When updating the software please set the following...

Page 54: ... in program s returning to the Software Update dialog box In case of returning to the Software Update dialog box confirm such as network settings and redo the Settings before clicking Download In case of retry dialog box is displayed confirm connection or network settings by following the message and click Retry If the setting still fails click Cancel to automatically restore the original software...

Page 55: ...GR N firmware Refer to the previous section for the updating procedure 2 Set the FTP Server setting of the 630LT GR 630LT GR N updated on Step 1 Refer to page 48 for the FTP service settings 3 Update the other 630LT GR 630LT GR N Specify the 630LT GR 630LT GR N for FTP server in the Settings Refer to below Server Type IP address or full domain name of the 630LT GR 630LT GR N User Name Password Typ...

Page 56: ...ase change them before using the DHCP option function DHCP Server Settings Please open DHCP settings to configure each DHCP Option as follows Items Contents Key Set the value as EIZO The eClient 630LT GR 630LT GR N will not accept any value but EIZO Server Type an IP address of the Server installing an update file and a registry file of the eClient 630LT GR 630LT GR N User Name Password Type the u...

Page 57: ...d Command executable file to connect to a WTS Description ConnectionName Name displayed on the Connection Manager HKEY_CURRENT_USER Software Microsoft Terminal Server Client ConnectionName Full Address TerminalServerAddress IP address or full domain name of the WTS for ICA Connection HKEY_LOCAL_MACHINE SOFTWARE Microsoft WBT Clients Registration ICA Global WFClient Version 2 Event for use of ICA p...

Page 58: ...URL Specifies the URL including http to access HKEY_LOCAL_MACHINE SOFTWARE Microsoft WBT Shell EnableAutoConnect dword 1 Specifies whether to enable disable automatic connection 0 disable 1 enable ConnectionDefaultKey ConnectionName Specify connection information name of the automatic connection ConnectionDefaultType RDP Specify the type of the automatic connection The type is RDP ICA or Web 1 One...

Page 59: ... card DHCP Options tab DHCP Options tab Selecting Enable DHCP Options and typing each option number settings NOTE If the DHCP Option is used to setup the eClient 630LT GR 630LT GR N for the first time Terminal Connection Manager will appear because the unit automatically receives information from the DHCP Server eClient Setup Wizard will not be displayed If the DHCP Option is set once and needs to...

Page 60: ...n Manager dialog box after WTS Web connection Press Ctrl Alt End Display Terminal Properties dialog box Press F2 in the Terminal Connection Manager dialog box Canceling the security settings Press Shift F2 in the Terminal Connection Manager dialog box Switching the Active Session of the WTS for the multi session Press Ctrl Alt 60 8 PRACTICAL SETUP ...

Page 61: ...e Connected caution does not effect your operation Turn off the power and turn it on a few seconds later NOTE When using neither a mouse nor a keyboard intentionally it is made to a setup on which an error is not displayed See P 39 3 Input devices such as a keyboard or a mouse do not work properly Solution on a mouse or a keyboard Check if the cable of the keyboard or the mouse is securely connect...

Page 62: ...ons 5 The screen has defective pixels e g slightly light or dark This is due to the characteristics of the panel itself and not the failure 6 Finger prints appear on the screen Leaving the white screen on may solve the problem 62 9 TROUBLESHOOTING ...

Page 63: ...ents as these may cause damage to the cabinet or LCD panel Cabinet To remove stains wipe the cabinet with a soft lightly moistened cloth using a mild detergent Do not spray wax or cleaner directly onto the cabinet LCD Panel The LCD surface can be cleaned with a soft cloth such as cotton or lens paper If necessary stubborn stains can be removed by moistening part of a cloth with water to enhance it...

Page 64: ...ess the cover towards Open while pulling the other side of the cover Press 3 Remove the trackball 4 Wipe the trackball with a soft cloth with neutral detergent 5 Clean all the rollers getting all the lint off of them You can use a wet cotton swab to clean the rollers Turn them to clean the entire roller Rollers 6 Remove the dust inside of the mouse 7 Put the trackball back into the mouse 8 Close t...

Page 65: ... Windows Terminal Server Microsoft Windows NT Server 4 0 Terminal Server Edition Microsoft Windows 2000 Server Advanced Server DataCenter Server Citrix MetaFrame 1 8 1 8 FR1 XP XP FR1 Mouse PS 2 2 button Mouse Power Supply 100 120 200 240 VAC 10 50 60 Hz 0 8 0 5 A Power Consumption Min 31 W Min Max 45 W with keyboard Mouse USB LAN PC card Power saving mode less than 10 W LAN 10BASE T 100BASE TX RJ...

Page 66: ... Rheinland GS TÜV Rheinland Ergonomic Approved EPA ENERGY STAR program TCO 99 2 1 Monaural microphone connector is not available now 2 Applicable to only gray standard color version Dimensions mm inches 306 12 0 375 14 8 395 15 6 230 9 1 160 6 3 151 5 6 0 390 15 4 238 5 9 4 123 5 4 9 78 5 3 1 135 5 3 59 2 3 3 0 1 25 164 6 5 34 1 3 75 3 0 3 0 1 75 3 0 66 11 SPECIFICATIONS ...

Page 67: ...upport an object weighing 8 0 kg A GS approved arm stand Use an arm stand with sufficient stability mechanical firmness to support the weight of the monitor Use an arm stand remaining that position where it is manually moved Use an arm stand with the ability to tilt the monitor forward and backward Please connect cables after attaching an arm stand Setup Procedure 1 Lay the eClient 630LT GR 630LT ...

Page 68: ...n name 20 38 Logon Logoff 25 M Making a Registry File 57 Mouse 6 40 Mouse Right Click Emulation 40 Multi Session 26 N Network and Dial up Connections 46 O Opening Closing a Local Web Browser 29 P Password 39 Power save 36 PRACTICAL SETUP 56 printer 19 45 Product Information 33 51 Protocol 22 23 R RDP 21 22 Reference 66 refresh rate 18 35 Resetting to Default 33 resolution 18 35 S Security 49 Serve...

Reviews: