background image

14

Edlund Company TITAN Max-Cut, Models FDW/FDWW-014, -038, -012

CHAPTER 5 – TROUBLESHOOTING

Consult the Troubleshooting Table below for common problems and their solutions.  If you continue to experience
problems, call our Technical Support Representatives at 1-800-772-2126.

Troubleshooting Table

USE CAUTION WHEN HANDLING THE BLADE CARTRIDGE, THE BLADES ARE VERY SHARP.  ALWAYS
HAVE THE WASH GUARD ATTACHED TO THE BLADE CARTRIDGE WHEN HANDLING.

S

YMPTOM

P

OSSIBLE

C

AUSE

The Cartridge
Retainer will not
close.

Þ 

Make sure the Blade Cartridge is fully inserted into the Max-Cut Frame and the
Alignment Pins are engaged.

Þ 

Make sure the Blade Cartridge is inserted in the correct orientation (with the
Alignment Holes inward) and the Front Flange on the Blade Cartridge down.

Þ 

Debris may be jammed in the Latch area.  Remove any debris and clean the Latch
area.

Þ 

The End Cap is bent is damaged; replace the End Cap.

The Pusher
Assembly Tips
hit the Blades.

Þ 

The Blade Cartridge is not fully inserted into the Frame; see Chapter 3 "Using the
Edlund TITAN Max-Cut".

Þ 

The Plastic Pusher is not fully inserted into the Pusher Plate.  Check to ensure the
Pusher Alignment Pins are aligned with the corresponding holes in the Pusher Plate.

Þ 

The Pusher Assembly and the Blade Cartridge do not match.  Insert the correct
matching Blade Cartridge.  See page 9.

Þ 

Make sure the Blade Cartridge Assembly hardware is tight.

Þ 

The Blades are bent out of shape; replace the Blade Cartridge.

Þ 

The Pusher Assembly Tips are bent out of shape; replace the Pusher Assembly.
See page 9.

Þ 

The Guidance Plate hardware is loose.  Contact Edlund Customer Service for further
assistance.

Þ 

If the clearance between the Pusher Assembly Tips and the Blades cannot be
achieved, contact Edlund Customer Service for further instruction.

Summary of Contents for FDW

Page 1: ...ATING INSTRUCTIONS EDLUND TITAN Max Cut Models FDW FDWW 014 038 012 READ AND UNDERSTAND THIS MANUAL AND ALL INSTRUCTIONSBEFOREOPERATINGTHETITAN MAX CUT 159 Industrial Parkway Burlington VT 05401 USA 8...

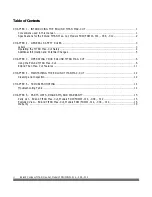
Page 2: ...Max Cut Safely 4 Additional Information and Potential Changes 5 CHAPTER 3 OPERATING YOUR EDLUND TITAN MAX CUT 6 Using the Edlund TITAN Max Cut 6 Edlund Titan Max Cut Features 11 CHAPTER 4 MAINTAINING...

Page 3: ...ou may have To expedite your call please have your serial number and or order number handy For technical assistance please call Toll Free 1 800 772 2126 and one of our Customer Service Representatives...

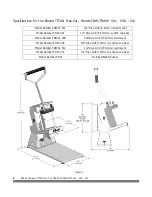
Page 4: ...ce Grid 6 4mm w wall mount Model Number FDW 014 1 4 Dice Grid 6 4mm w suction cup base Model Number FDWW 038 3 8 Dice Grid 10mm w wall mount Model Number FDW 038 3 8 Dice Grid 10mm w suction cup base...

Page 5: ...PERFORMANCE FROM YOUR MAX CUT Labels Your Edlund TITAN Max Cut carries prominent labels as reminders for its proper and safe use Shown below are copies of all the labels that appear on the equipment T...

Page 6: ...S AREA USE EXTREME CAUTION WHEN DISLODGING DO NOT ATTEMPT TO REMOVE JAMMED PRODUCE WITH BARE HAND REMOVE THE BLADE CARTRIDGE AND SPRAY AND RINSE IN THE SINK WE RECOMMEND WEARING PROTECTIVE GOGGLES OR...

Page 7: ...perate this machine in a safe manner Additional Information and Potential Changes The Edlund Company reserves the right to discontinue change and improve its products at any time without notice or obl...

Page 8: ...l Mount Bracket is securely fastened to a wall before use If you are unsure of how to fasten the Wall Mount Bracket please consult a professional contractor for installation 1 Your Max Cut has been co...

Page 9: ...roduct 8 Place the product to be cut on the Blades against the V Bed 9 With both hands on the Handle pull the Handle Arm all the way down The cut produce will fall into the container 10 Place more pro...

Page 10: ...er Tips should be spaced evenly between the Blades Refer to the Troubleshooting section Chapter 5 for information on how to diagnosis misalignment of the Pusher and blades Using the Extra Blade Cartri...

Page 11: ...the Base of the Max Cut 6 Turn the Base Locking Knob Figure 2 page 11 clockwise until it is tight against the Base of the Max Cut Removing the Max Cut from the Suction cup Stand 1 Remove any Produce...

Page 12: ...1 clockwise to engage with the Wall Mount Bracket Removing the Max Cut from the Wall Mount Bracket 1 Remove any Blade Cartridges from the Extra Cartridge Storage slot Figure 2 page 11 See Using the Ex...

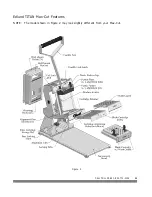
Page 13: ...CALL TOLL FREE 1 800 772 2126 11 Edlund TITAN Max Cut Features NOTE The model shown in Figure 2 may look slightly different from your Max Cut Figure 2...

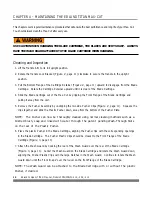
Page 14: ...it 5 Remove the Pusher Assembly by unclipping the two side Pusher Clips Figure 2 page 11 Squeeze the clips together and slide the Plastic Pusher down away from the bottom of the Pusher Plate NOTE The...

Page 15: ...eposits are unsanitary and may affect the operation of the Max Cut Blade and Pusher Maintenance 1 Examine the Pusher Tips and Clips The Pusher Tips should not be damaged or missing If they are damaged...

Page 16: ...d in the Latch area Remove any debris and clean the Latch area The End Cap is bent is damaged replace the End Cap The Pusher Assembly Tips hit the Blades The Blade Cartridge is not fully inserted into...

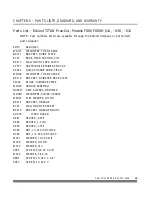
Page 17: ...ER END CAP AS042 QUICK CHANGE KNOB TITAN WD128 WELDMENT TITAN PUSHER BK115 BRACKET GUIDANCE BACK PLATE SL005 BLOCK GUIDANCE PIECE WD129 HANDLE ASSEMBLY G082M GRIP SLICERS MODIFIED WD090 WELDMENT SLICE...

Page 18: ...16 Edlund Company TITAN Max Cut Models FDW FDWW 014 038 012 Exploded View TITAN Max Cut Models FDW FDWW 014 038 012...

Page 19: ...CALL TOLL FREE 1 800 772 2126 17 THIS PAGE INTENTIONALLY LEFT BLANK...

Page 20: ...und Company 1 5 9 I N D U S T R I A L P A R K W A Y B U R L I N G T O N V E R M O N T 0 5 4 0 1 1 800 772 2126 www edlundco com 2014 Edlund Co LLC M179 Warranty TITAN Max Cut Models FDW FDWW 014 038 0...

Reviews: