CALL TOLL FREE 1-800-772-2126
9
Changing Between Table and Wall Mount
The Edlund TITAN Max-Cut can be used in several different locations, maximizing through-put and yield quantity.
Select from one of the options below which outline the procedures for removing and changing between the various
mounting options.
Installing the Max-Cut on the Suction-cup Stand
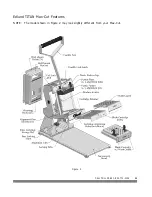
1. Remove any Blade Cartridges from the Extra Cartridge Storage Slot (
Figure 2
, page 11). See "Using the
Extra Blade Cartridge Storage Slot" for instructions.
2. Lift the Handle to its full upright position.
3. Rotate the Handle Lock Latch (
Figure 2
, page 11) clockwise to secure the Handle in the upright position.
4. Place the Max-Cut on the Suction-Cup Stand, positioning the Locking Tabs (
Figure 2
, page 11) on the Stand
within the corresponding notches in the Max-Cut Base.
5. Slide the Max-Cut to the left until the Alignment Tabs (
Figure 2
, page 11) fully engage with the notches in the
Base of the Max-Cut.
6. Turn the Base Locking Knob (
Figure 2
, page 11) clockwise until it is tight against the Base of the Max-Cut.
Removing the Max-Cut from the Suction-cup Stand
1. Remove any Produce Pans from the Discharge Area below the Blades.
2. Remove any Blade Cartridges from the Extra Cartridge Storage Slot (
Figure 2
, page 11). See "Using the
Extra Blade Cartridge Storage Slot" for instructions.
3. Lift the Handle to its full upright position.
4. Rotate the Handle Lock Latch (
Figure 2
, page 11) clockwise to secure the Handle in the upright position.
5. Unscrew the Base Locking Knob (
Figure 2
, page 11) until it disengages from the Suction-Cup Stand.
6. Slide the Max-Cut to the right, disengaging the Locking Tabs in the Stand from the unit.
7. Lift the Max-Cut away from the Stand.
Installing the Max-Cut on the Wall Mount Bracket
1. Remove any Blade Cartridges from the Extra Cartridge Storage Slot (
Figure 2
, page 11). See "Using the
Extra Blade Cartridge Storage Slot" for instructions.
2. Lift the Handle to its full upright position.
3. Rotate the Handle Lock Latch (
Figure 2
, page 11) clockwise to secure the handle in the upright position.

