10
Edlund Company TITAN Max-Cut, Models FDW/FDWW-014, -038, -012
4. Ensure the Wall Lock Latch (
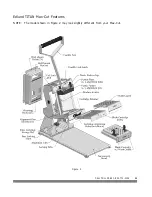
Figure 2
, page 11) is not engaged by rotating counterclockwise, to the unlock
position.
5. Align the Mounting Hooks (
Figure 2
, page 11) with the Notches on the Rear of the Max-Cut.
6. Lower the Max-Cut until it is fully seated within the Mounting Hooks, ensure both Mounting Hooks are
engaged.
7. Rotate the Wall Lock Latch (
Figure 2
, page 11) clockwise to engage with the Wall Mount Bracket.
Removing the Max-Cut from the Wall Mount Bracket
1. Remove any Blade Cartridges from the Extra Cartridge Storage slot (
Figure 2
, page 11). See "Using the
Extra Blade Cartridge Storage Slot" for instructions.
2. Lift the Handle to its full upright position.
3. Rotate the Handle Lock Latch (
Figure 2
, page 11) clockwise to secure the Handle in the upright position.
4. Rotate the Wall Lock Latch (
Figure 2
, page 11) counterclockwise to disengage from the Wall Mount Bracket.
5. Lift the Max-Cut straight up until the Locking Tabs on the Wall Mount Bracket are disengaged from the Max-
Cut.


