background image

Version of 26 April 2016

9

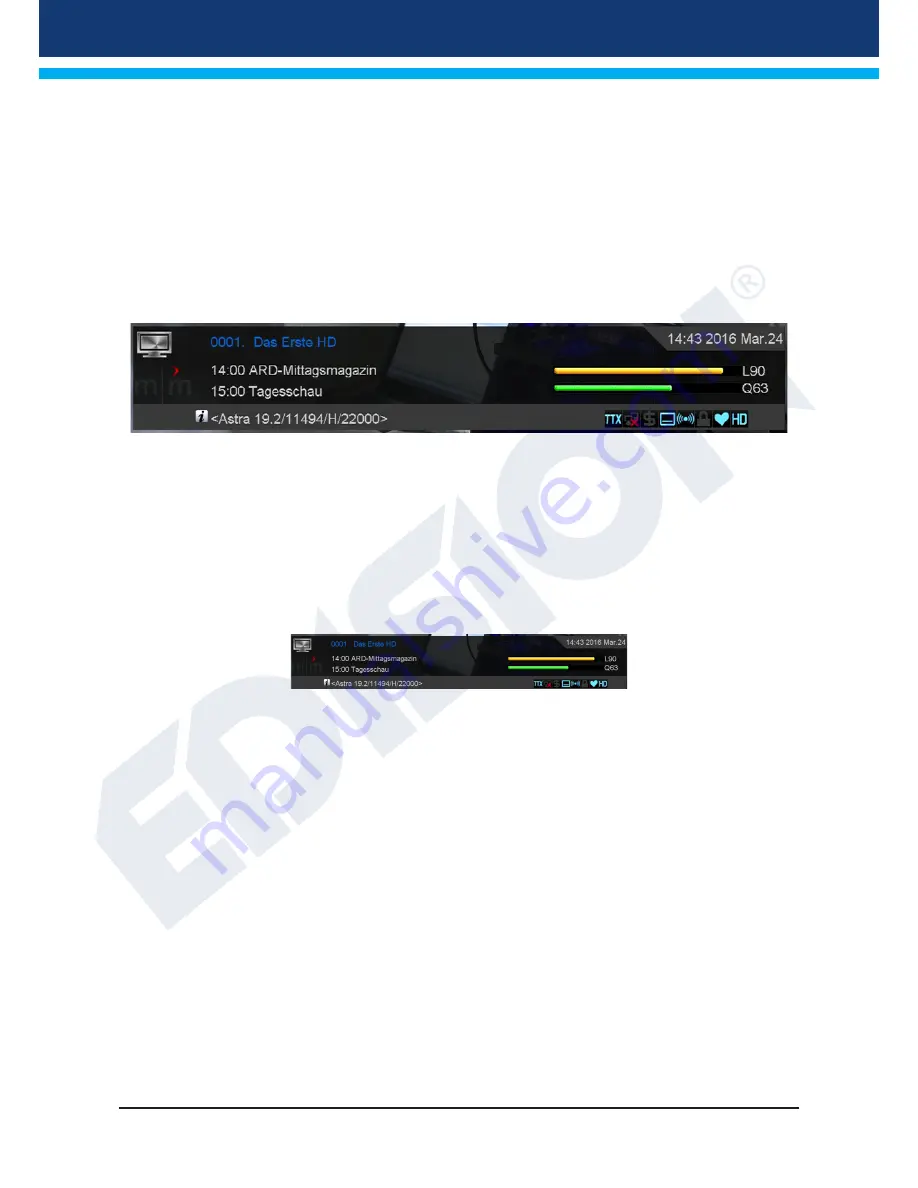
► Information bar (InfoBar) 

When in the TV/Radio mode, the

 'INFO' button

 displays an information bar (InfoBar) at the lower edge of the 

screen. This bar is faded-in up to 10 seconds.

How to change the duration of fading of the information bar:

1.  Press the

 'MENU' button

 to open the main menu.

2.  Use the 

left/right

 arrow buttons to navigate to the ‘System’ item.

3.  Use the 

up/down

 arrow buttons to navigate to the ‘Other settings’ menu item and press the 

OK button

.

4.  Use the

 left/right

 arrow buttons to select the value in seconds you want to set (max. 10s) in the 'OSD 

time exceeded' item.

5.  Press the 

EXIT button

 to exit the menu.


The InfoBar in TV or Radio mode shows the following information about the current program and selected 

station:

- the place in the program list

- the name of the station

- the current program (as far as information is available) including start time

- the following program (as far as information is available) including start time

- the name of the favourite list

- the time

- indicates the availability of Teletext for the current program

- indicates if the transmitted program is encrypted

- indicates if subtitles are available

- indicates if the sound broadcasted is in stereo or mono format, left or right balance

- indicates if the program is blocked (parental lock)

- indicates that the station is present in a favourite list

- indicates if the program is transmitted in HD

- indicates if Wi-Fi network connection exists

Functions and settings:

If the InfoBar is displayed, detailed information about the current program can be displayed (if available) by 

(repeated) pressing the 

‘INFO’ button.

 If multiple information pages are available, scroll through these pages 

by using the 

‘PAGE+’/’PAGE-’ buttons. 

Use the 

left/right

 arrow buttons to switch between the information 

of the current and next program. Use the

 red button

 to display further (technical) information. Use the 

EXIT 

button

 to exit the menu with the detailed information.

Use the 

EXIT button

 again to switch off the InfoBar.


Summary of Contents for Piccollino

Page 1: ...piccollino LED Full HD Sat Receiver User s Guide piccollino piccollino ...

Page 2: ...ing Services 12 Organizing Favourites 14 Installation 16 Satellite installation 16 FastScan Satellite 18 Auto Installation 18 Satellite Guide 19 Settings 20 Software update 20 Language 21 A V Control 21 Ethernet Setting 22 Time Settings 23 Timer 24 Parental Control 24 Miscellaneous settings 25 Default Setting 25 Information 26 Conditional Access 26 Card info 26 ...

Page 3: ... Software 27 PVR Setting 30 Disk management 30 Remove USB Device Safely 30 Applications 31 YouTube 31 RSS Reader 31 Weather forecast 31 Google Maps 31 Ftp 31 Web TV 31 DLNA 31 Big2Small 31 Web server 31 Games 31 Tetris 31 Snake 31 Othello 31 Edivision 31 Edivision 31 More 31 Schedule 31 ...

Page 4: ...e mains cable from damage 10 Only use auxiliary devices accessories specified by the manufacturer 11 Unplug the device during thunderstorms or extended periods of non use 12 All maintenance work should be carried out by qualified service personnel Maintenance is required if the device was damaged in some way including the damage to the mains cable or mains plug if the device was exposed to liquids...

Page 5: ...nstructions This symbol indicates that there is a double insulation between voltage and user accessible parts between the product This symbol on the product or in the operating instructions indicates that the electrical or electronic device must be disposed of separately from household waste at the end of the service life Separate collection systems exist for recycling For further information plea...

Page 6: ...r autom switches to standby mode Calls up the Audio menu Changes the display TV standard Calls up the Subtitle Teletext menu Switching between TV and Receiver Displays the main menu Displays the information bar With the arrow keys you can scroll in the lists up and down left and right or regulate the volume With the OK key you confirm your menu entry or activate the channel list Exits a Menu Dialo...

Page 7: ...ialist technician must calibrate your satellite TV system with a digital TV level meter Connect the receiver using HDMI cable via the HDMI output port to your TV s HDMI input port Now connect the receiver to the satellite antenna cable via the LNB IN input Insert the batteries into the remote control Notes on the remote control can be found on the back of these instructions Connect the receiver to...

Page 8: ...ogram eguide Picture In Grafik PIG support Channel modification program and favourites lists Automatic and manual channel scanning Automated On Off timer Wifi Connection with USB Dongle 3G Connection via USB 3G Modem PVR via USB Time Shift option Subtitles support Teletext support Auto save on last channel Software channel list Upgrade Backup using USB FAT 16 32 NTFS formats support Parental Lock ...

Page 9: ...ng program as far as information is available including start time the name of the favourite list the time indicates the availability of Teletext for the current program indicates if the transmitted program is encrypted indicates if subtitles are available indicates if the sound broadcasted is in stereo or mono format left or right balance indicates if the program is blocked parental lock indicate...

Page 10: ...f bars program title Press the OK button to display detailed information about the program if available Use the left right arrow buttons to switch between Now and Next EDIVISION modes The More mode displays program information in chart form and chronological order Use the left right arrow buttons to navigate between a channel s temporal program information and use the up down arrow buttons to move...

Page 11: ...Timer number Calling up the timer menu automatically switches to the next available programmable timer Use the left right arrow buttons the OK button and the up down arrow buttons to switch between timers Up to 8 different events can be programmed Timer mode Set the recording mode here Choose whether the recording is carried out once daily weekly or monthly Timer service Set the service entry Reco...

Page 12: ...g from one mode to another Tip In the left column of the menu window you can find the list of channels in the current channel list and on the right side the symbols for Move Lock Delete Rename and Skip Menu functions and settings Use the left right arrow buttons to move from one column to another in the menu and the up down arrow buttons to move the cursor up or down in the relevant column You can...

Page 13: ...ted Note You can move multiple channels simultaneously selecting initially the respective channels in the channels list left side of the menu with the OK button and then following steps 2 5 above How to lock a channel 1 Place the cursor yellow bar in the channel list on the channel which you wish to lock 2 Then navigate to the right side of the menu using the right arrow button and move the cursor...

Page 14: ... the channel list You can exit the input window at any time using the EXIT button and thus stop the process Exit the Edit Channel menu pressing the EXIT button If you have made any changes a dialog box appears prompting you to confirm the changes If you select Yes the changes in the settings will be stored Note Channels are deleted moved and or locked only if you confirm the action with Yes If you...

Page 15: ...side of the menu the channel will be marked with a symbol Note You can add multiple channels to favourite lists simultaneously by means of selecting first the respective channels from the channel list left side of the menu using the OK button and then following steps 2 3 above How to remove a channel from the favourite list 1 Place the cursor yellow bar in the favourite list on the right window of...

Page 16: ...re deleted moved or and added only if the action is confirmed by means of pressing Yes If you select No NONE of the changes will be saved Installation Satellite installation FastScan Satellite Auto Installation Satellite Guide Satellite installation Please consider the following notes before configuring menu settings For an HDTV SAT TV you need a satellite dish with minimum diagonal size of 80 cm ...

Page 17: ... specify if necessary the following settings again Scan mode Select between All channels or Free channels Programme Type Define the scan for television or radio or television and radio channels Select scan mode Choose between Manual Scan or Blind Scan NIT scan Decide whether the NIT Network Information Table is going to be used for scanning Use the OK button to start the scanning process You can e...

Page 18: ...f TV and radio channels using the preset frequencies of the service providers Select the type DiseqC LCN press Start Scan Auto Installation Here you can automatically set the value for DiSEqC Select DiSEqC 1 0 4port DiSEqC 1 1 8port or DiSEqC 1 1 16port and press OK ...

Page 19: ...ut in the Scan mode menu Then enter the frequency here LCN Here you can choose whether the channel names are to be included in the scan Use the red button to switch to the scan menu In the Scan Mode item you can select between All and Free If you select Manual Scan at the next item and press the OK button the scan process begins according to the settings made At this point if you select Blind Scan...

Page 20: ...is for the corresponding software file to be located in the USB memory unit This file with abs file extension can be downloaded from the website www edision gr through a computer with internet connection http www edision gr Save the downloaded file to the USB memory unit and plug this unit into the USB port of piccollino Note The update speed via USB might depend on the data format in the USB memo...

Page 21: ...age Select the audio language for the first channel Second audio language Select the audio language for the second channel EDIVISION Define the language in which the EDIVISION electronic program guide EDV will be displayed The language must be supported by the provider of the program Subtitle Language Set the display language of the subtitle information The language must be supported by the provid...

Page 22: ...ay DNS Preferred Here you can enter the IP address of a DNS server DNS Alternate Enter here the IP address of an alternate DNS server Tip Use the numbered buttons on the remote control to enter the numbers Exit the Network Local Settings menu pressing the EXIT button http Update Manual update Menu functions and settings URL Enter the file address that includes the new software of the receiver Navi...

Page 23: ...ss you can exit the menu Auto Update pressing the EXIT button Time Setting GMT User Select On and the receiver will automatically acquire the current time and date via satellite signal If you select Off you can set your own date and time at the following item GMT customisation This item is available only if the GMT User item is set to On Here you can determine the time difference between your loca...

Page 24: ... Start time Select the recording start time Duration Set the duration of the recording here recording length Standby mode in the end Here you can specify whether the receiver will switch to Standby mode after the recording has ended Parental Control This menu is available only after entering a PIN code The default password PIN is 0000 Menu functions and settings Menu lock You can choose whether to...

Page 25: ...rmation display Location You can define the location where the information will be displayed Default Setting Select one of the following menu items with theup down arrow buttons and press the OK button Factory default This item resets the receiver in terms of software to its factory defaults After pressing the OK button you are asked to enter your PIN Then a window appears with a warning message D...

Page 26: ...Smart Card readers equipped with CONAX system If you insert providers cards of various subscription programs you can watch many programs that have been encrypted using this system In this menu you will find information on the Smart Card inserted in any of the ports Menu functions and settings Port 1 Shows information on an existing card in port 1 Port 2 Shows information on an existing card in por...

Page 27: ...e In order to delete the last character move to the item with the arrow buttons and press the OK button Confirm the entry navigating to the OK field and pressing the OK button on the remote control Use the EXIT button to exit the input window Backup to USB HDD Use the up down arrow buttons to navigate to this menu item and press the OK button to start the backup process You can exit the Backup to ...

Page 28: ...y to start a recording the yellow button to select a file from the Playlist to be deleted and the blue button to select all recordings to be deleted If you press the blue button again all files are deselected Exit the Playlist Editor mode pressing the EXIT button If you have made any changes a dialog box appears through which you can confirm these changes Yes If you start playing an MP3 file or a ...

Page 29: ... motion forward playback at a frame rate 2 8 times lower than normal rate Use the PLAY button to return to normal playback mode Exit the Recorded files menu pressing the EXIT button If you have selected recordings to delete a dialog box appears Confirm with Yes if you really want to delete the recordings Memory device Information This menu displays information about the connected USB memory device...

Page 30: ...d USB storage device Use the yellow button to display the USB HDD information on Volume Displays the name Total size Displays the total memory capacity Free Size Displays free space Rec Size Displays the space available for recording TMS Size Displays the space available for TimeShift File System Displays the file system used You can configure the USB memory by pressing the green button HDD Format...

Page 31: ...be RSS Reader Weather forecast Google Maps Ftp Web TV DLNA Big2Small Web Server Games Tetris Snake Othello Edivision Edivision Electronic program schedule see pages 10 11 More see pages 10 11 Schedule Viewing or recording settings see pages 10 11 ...

Page 32: ...www edision gr SCART DC 12V 1 5 A S PDIF HDMI LNB IN 13 18V 400mA MAX ETHERNET SCART DC 12V 1 5 A S PDIF HDMI LNB IN 13 18V 400mA MAX ETHERNET ...

Reviews: