


Video Conference Camera User Manual
9
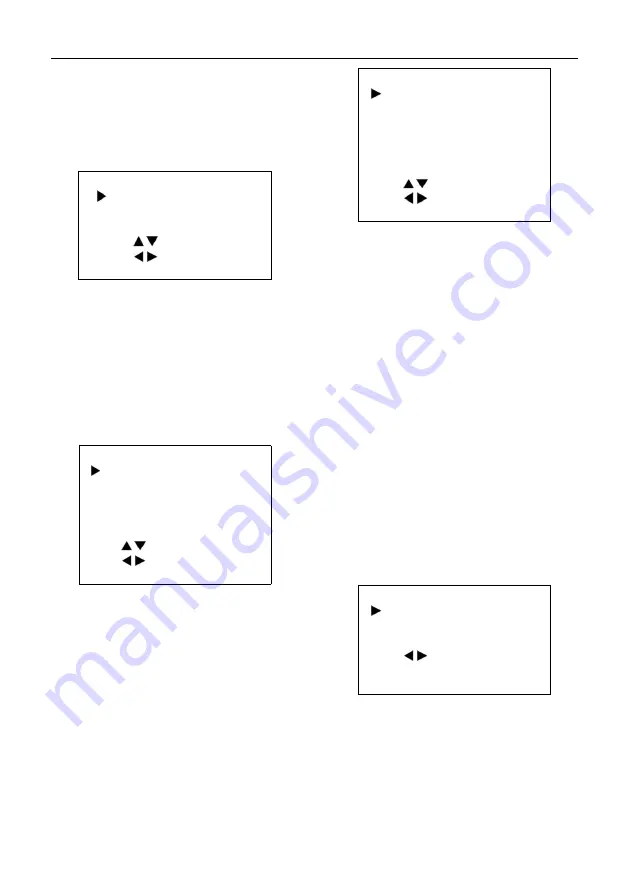
5.6 NOISE REDUCTION
Move the main menu cursor to [NOISE
REDUCTION], and press [HOME] key enter
the noise reduction page, as shown in the
following figure.
NOISE REDUCTION
NR2D-Level
1
NR3D-Level
3
Select Item
Change Value
[Menu] Back
NR2DLevel: 2D noise reduction, optional items:
Off, Auto, 1 ~ 5.
NR3DLevel: 3D noise reduction, optional items:
Off, 1 ~ 8.
5.7 SETUP
Move the main menu cursor to [SETUP], and
press [HOME] key enter the setup page, as
shown in the following figure.
SETUP
Language
EN
DVI Mode
DVI
Lens
Type 2
Auto Scan Shoot Off
Select Item
Change Value
[Menu] Back
Language: Optional items: EN, Chinese,
Russian.
DVI Mode: Optional items: DVI, HDMI.
Lens: Optional items: Type1, Type2.
Auto Scan Shoot: Optional items: On, Off.
5.8 COMMUNICATION SETUP
Move the main menu cursor to
[COMMUNICATION SETUP], and press
[HOME] key enter the communication setup
page, as shown in the following figure.
COMMUNICATION SETUP
Protocol
VISCA
V_Address
1
V_AddrFix
Off
Net Mode
Serial
Baudrate
9600
Select Item
Change Value
[Menu] Back
Protocol: Control protocol type, optional items:
Auto, VISCA, PELCO-D, PELCO-P.
V_Address: Optional items: 1 ~ 7.
(Effective only in Auto, VISCAprotocol).
V_AddrFix: Optional items: On, Off (When set
to On, useless in 88 30 01 FF Command).
P_D_Address: Optional items: 0 ~ 254.
(Effective only in PELCO-D protocol).
P_P_Address: Optional items: 0 ~ 31.
(Effective only in PELCO-P protocol).
Net Mode: Set the serial port network control,
optional items: Serial, Paral.
Baudrate: Serial port baud rate, optional items:
2400, 4800, 9600, 38400.
5.9 RESTORE DEFAULT
Move the main menu cursor to [RESTORE
DEFAULT], and press [HOME] key enter the
restore default page, as shown in the following
figure.
RESTORE DEFAULT
Restore?
No
Change Value
[Home] OK
[Menu] Back
Restore: Confirm restore factory settings,
optional items: Yes, No.
Note: Press [HOME] button to confirm, all
parameter restore default, include IR Remote
address and VISICA address.


