background image


71


Manipulating songs and folders


1.


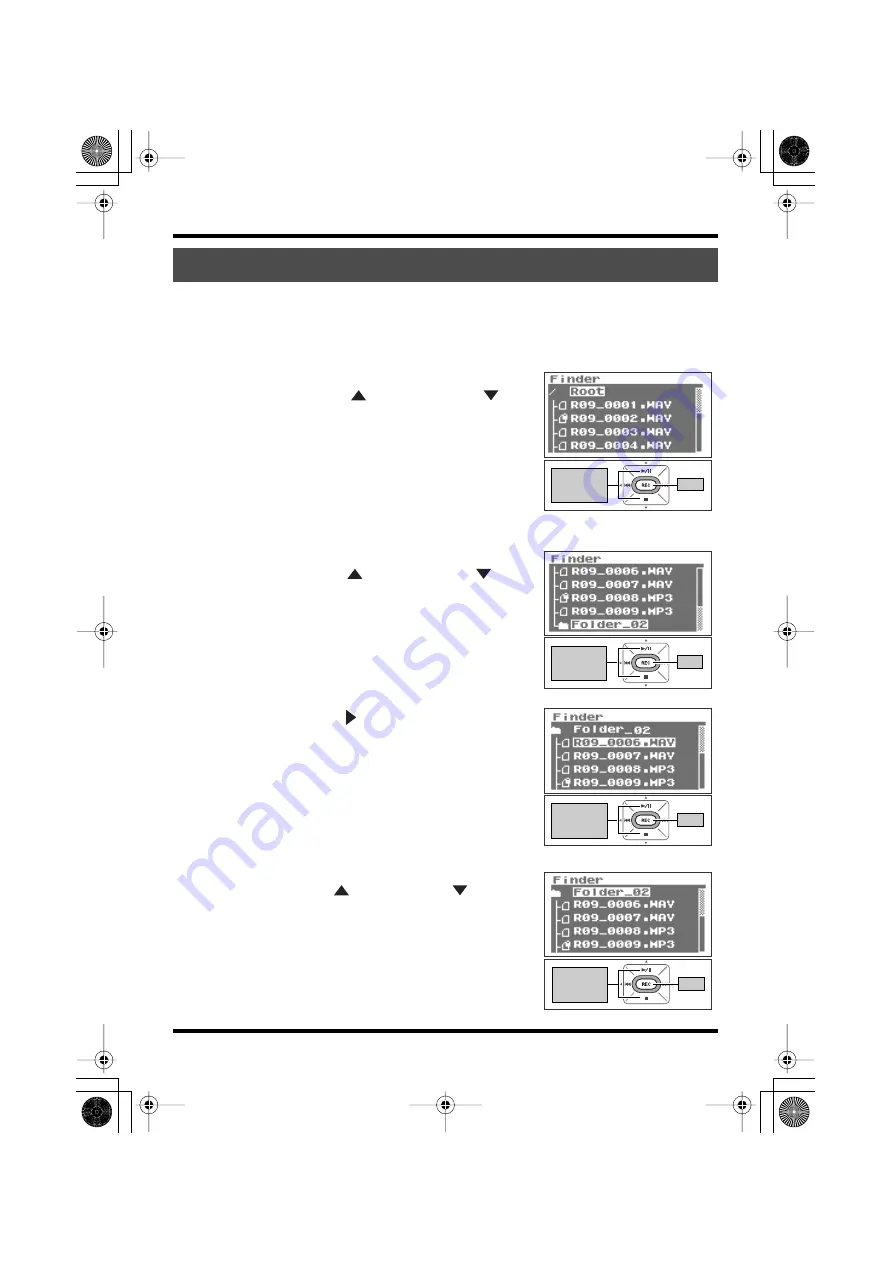
Select where to create a folder from the <Finder Screen>.


fig.root-select-e.eps_80


Selecting Root


1. Use the [PLAY Button


] and [STOP Button


] to 

select Root, then press the [REC Button].


fig.folder-select-e.eps_80


Selecting a folder


1. Use the [PLAY Button

] and [STOP Button

] to 

select the folder where the new folder is to be 
created.


fig.folder-select2-e.eps_80


2. Use the [FWD Button ] to enter a folder.


ffig.folder-select5-e.eps_80


3. Select a folder.


Use the [PLAY Button

] and [STOP Button

] to select 

the name of the folder at the top and press the [REC 
Button].


Creating folders (Make Folder)

Move the 

cursor 

up or down

Enter

Move the 

cursor 

up or down

Enter

Move the 

cursor 

up or down

Enter

Move the 

cursor 

up or down

Enter

R-09_e.book 71 ページ 2007年2月13日 火曜日 午後3時27分

Summary of Contents for R09

Page 1: ... Principal de la Farmacia 5ta Avenida 1 Cuadra al Lago 503 Managua Nicaragua TEL 505 277 2557 PERU Audionet Distribuciones Musicales SAC Juan Fanning 530 Miraflores Lima Peru TEL 511 4461388 IRELAND Roland Ireland G2 Calmount Park Calmount Avenue Dublin 12 Republic of IRELAND TEL 01 4294444 ITALY Roland Italy S p A Viale delle Industrie 8 20020 Arese Milano ITALY TEL 02 937 78300 NORWAY Roland Sca...

Page 2: ...e complies with Part 15 of the FCC Rules Operation is subject to the following two conditions 1 This device may not cause harmful interference and 2 This device must accept any interference received including interference that may cause undesired operation Unauthorized changes or modification to this system can void the users authority to operate this equipment This equipment requires shielded int...

Page 3: ...playback mode 77 Setting whether to use repeat playback or not 78 Adjusting the display brightness 79 Setting Peak Hold for the Level Meter 80 Setting the time until the screen is darkened when no operations are performed for a set period of time 81 Turning off indicators when the display goes dark 82 Setting the time until the power turns off when no operations are performed for a set amount of t...

Page 4: ... is used to change screens or to EXIT cancel operations or return to previous screen Basic operations p 13 REVERB button The REVERB button turns the reverb feature on off and changes the reverb type Applying reverb effects during playback p 54 REVERB REVERB is an effect that can be used to for example make it seem as if the sound were being played in a large hall Four types of reverb are available...

Page 5: ...t song If it is held down the song fast forwards while the button is pressed It can be used during playback or while stopped It also functions as the right arrow for the cursor moves the cursor to the right and changes the value of a selected item Basic operations p 13 Current Screen Status Operation Main Screen Stopped Plays back Playing Pauses playback Recording standby REC button blinking Start...

Page 6: ... recording standby mode or to start recording It is also used to enter selected items Basic operations p 13 Current Screen Status Operation Main Screen Playing Stops playback Recording standby REC button blinks Releases from recording standby mode Recording REC button lights up Stops recording Finder Screen Menu Screen Moves cursor down Changes the value Current Screen Status Operation Main Screen...

Page 7: ...t the HOLD switch to the ON position so only the following buttons can be used and to help prevent accidental operations Buttons remaining operable when the HOLD switch is set to ON AUTO GAIN CONTROL Switch EXTERNAL MICROPHONE TYPE Switch LOW CUT Switch MIC GAIN Switch and HEADPHONE VOLUME buttons These buttons adjust the output sound level when headphones are connected to the HEADPHONE jack The v...

Page 8: ...gs It does not require a power supply Condenser microphone The sensitive condenser microphone is suitable for recording quiet sounds such as live instrumentals or meetings It requires a power supply from either batteries or plug in power LINE IN jack When inputting audio signals from audio equipment or digital instruments use a cable with a stereo mini plug to connect the R 09 to the device Record...

Page 9: ... the level of sounds that are weak while attenuating those that are loud Turn this switch on to record voices of people both near and far during meetings OFF Records input sounds without changing them MONO Monaural microphone is connected STEREO Stereo microphone is connected ON Records while cutting the lower range portion of the input signal Turn on when breath noise the sound of breathing while...

Page 10: ... 09 to be played Preparing the memory card p 17 Since USB 2 0 HI SPEED USB is supported songs can be transferred quickly Memory card slot This slot accepts SD memory cards SD Memory Card p 20 Bottom cover lock This lock protects against batteries falling out if the bottom cover is opened by mistake fig names7 eps_60 Battery compartment Batteries are inserted here when operating on battery power Th...

Page 11: ... This startup screen is shown after power is turned on Songs can be recorded or played This screen shows a song list and allows names to be edited and songs to be deleted or copied You can do things such as set the date and time adjust the recording sound quality adjust the brightness of the display and perform initializations This screen is displayed when a PC is connected via USB Songs can be co...

Page 12: ...E Song length Peak Song name Play Stop Record Playback time Output level Current time Record Recording standby status REC STANDBY Plug in power status ON OFF Remaining recording time on memory card Peak Song name Recording time Input level Power supply to the MIC input jack AC adaptor battery Power supply status AC adaptor battery Remaining battery power indication Batteries have full power Please...

Page 13: ...ording Standby Move cursor up Enter Change the value Move cursor to the right Change the value Move cursor to the left Move cursor down Normal Cancel operation Return to previous screen When editing the internal clock date and time or name only Cancel operation Return to previous screen Move cursor to the right Change character Change character Move cursor to the left Delete character Insert chara...

Page 14: ...e AC adaptor into an electrical power outlet fig power onoff e eps_80 4 Turn power on Pressing and holding down the POWER switch turns on the power and shows an R 09 image in the display To turn off power press and hold down the POWER switch Be sure to use the AC adaptor supplied with this product If the HOLD Switch is in the on position no operations can be performed Be sure to slide it to the of...

Page 15: ...erminal and Memory Slot can be seen Slide the Bottom Cover Lock to the right and while holding it there slide the Bottom Cover further up Forcing the cover open may damage the unit fig battery 2 2 eps_60 4 Fold the Bottom Cover down The Battery Compartment should be visible fig battery 2 2 eps_60 3 Insert the batteries Insert two AA batteries into the Battery Compartment Be sure the positive and n...

Page 16: ...t off according to the settings for the power saving feature Setting the power saving feature Setting the time until the screen is darkened when no operations are performed for a set period of time Display Timer p 81 Turning off indicators when the display goes dark Rec Peak LED p 82 Setting the time until the power turns off when no operations are performed for a set amount of time Auto Power Off...

Page 17: ... Terminal and Memory Slot can be seen Forcing the cover open may damage the unit fig sdin 3 e eps_60 3 Insert the memory card Insert the memory card When inserting the memory card make sure the reverse side of the card is facing up and insert the card slowly If the card is forcibly inserted incorrectly the R 09 or the memory card may be damaged Please exercise caution Carefully insert the memory c...

Page 18: ...y card after it pops out toward you Never insert or remove a memory card while this unit s power is on Doing so may corrupt the data on the memory card Hold down When using a memory card with the R 09 for the first time the memory card must be formatted Please format the memory card following the procedure in Formatting p 19 SD Unformatted is shown when an unformatted memory card is inserted into ...

Page 19: ...p 17 fig open set e eps_80 2 Show the Menu Screen Press and hold down the FINDER MENU Button to show the Menu Screen To cancel the operation press the FINDER MENU Button You re returned to the previous screen fig sdutl e eps_80 3 Select SD Card Use the PLAY Button and STOP Button to select SD Card then press the REC Button To cancel the operation press the FINDER MENU Button You re returned to the...

Page 20: ...rd The R 09 supports SD memory cards of 64 MB to 4 GB Some memory card types or memory cards from some manufacturers may not record or play back properly on the R 09 Never insert or remove a memory card while this unit s power is on Doing so may corrupt the data on the memory card Carefully insert the memory card all the way in until it is firmly in place Do not force the card into the slot fig sd...

Page 21: ...en press the REC Button When the power is on the internal clock draws power from the AC adaptor or the batteries When the power is off the internal clock will run temporarily on the power stored in the main unit However if the power is off for several days the internal clock settings return to the original settings initial status When power is turned on in initial status the message Clock Initiali...

Page 22: ...2 e eps_80 2 Edit the date and time Move the cursor over the character to change use the PLAY Button and STOP Button to change the date and time then press the REC Button to enter the changes fig open main e eps_80 4 Return to Main Screen Press the FINDER MENU Button Move cursor to the left or right Change the value Enter Show Main Screen R 09_e book 22 ページ 2007年2月13日 火曜日 午後3時27分 ...

Page 23: ...evel set eps_80 3 While the sound is being output press the Input Level Button to adjust the volume gradually Adjust so that the level meter moves as far to the right as possible without the PEAK Indicator turning on If the PEAK Indicator stays lit then the input level is too high and the recorded sound becomes distorted See Adjusting recording levels p 37 for details on adjusting the input level ...

Page 24: ...an play Manipulating songs and folders p 62 fig outputlevel e eps_80 3 Adjust the volume Use and HEADPHONE VOLUME buttons to set the volume to a comfortable level The volume cannot be adjusted for sound output via a digital cable connected to the HEADPHONE jack digital output See Playing back p 42 for details on playback Playing back Play Low Volume High Rewind Fast Forward If the RWD Button is he...

Page 25: ... STOP Button to select Delete then press the REC Button fig delete sure e eps_80 4 Press the REC Button to delete the song A confirmation screen is shown Press the REC Button to delete the song To cancel press the FINDER MENU Button before pressing the REC Button fig process del eps_80 Do not turn off power while deleting fig open main e eps_80 5 Return to Main Screen Press the FINDER MENU Button ...

Page 26: ...g time is to be given precedence and make the settings accordingly The larger value provides better sound quality When making a digital recording the sound level is measured periodically and that level is made into a digital signal The sampling frequency is a value that defines the time interval and is expressed in kHz A high sampling frequency is needed to faithfully reproduce high sounds Higher ...

Page 27: ...e unit bits per second The bit rate indicates data transfer rates in number of bits sent per second The WAV bit is used to represent the size of a sample The sample size indicates the amount of precision used in capturing subtle changes in the sound Larger sampling size values allow for more details of the sound to be expressed and result in sound that is smoother and more natural Higher bps and b...

Page 28: ...ng time is shorter when there are multiple files Estimated recording times Setting Memory card size 64 MB 128 MB 512 MB 1 GB 2 GB 4 GB WAV 16 bit 44 1 kHz 5 11 44 88 180 360 WAV 16 bit 48 kHz 5 10 40 81 166 330 WAV 24 bit 44 1 kHz 3 7 29 59 120 240 WAV 24 bit 48 kHz 3 7 27 54 110 220 MP3 128 kbps 62 126 490 980 1 993 3 800 MP3 224 kbps 35 70 280 560 1 139 2 700 MP3 320 kbps 25 50 196 392 797 1 590...

Page 29: ... a microphone or other device is connected to the LINE IN Jack or MIC Input Jack the Internal Mic cannot be used When using the Internal MIC do not connect anything to the MIC Jack or LINE IN Jack Set monitoring on when recording to monitor the sound while recording Setting whether to monitor sound while recording p 85 fig power onoff e eps_80 1 Turn on power to the R 09 Turn on power to the R 09 ...

Page 30: ...2 Select Recorder Setup Use the PLAY Button and STOP Button to select Recorder Setup then press the REC Button fig setsamplingrate e eps_80 3 Select the sampling frequency Sample Rate Use the RWD Button and FWD Button to change the Sample Rate value Sampling frequency values 44 1 kHz 48 kHz Hold down Show Menu Screen Move the cursor up or down Enter Changes the value R 09_e book 30 ページ 2007年2月13日 ...

Page 31: ...Mode value fig open basic2 e eps_80 4 Press the FINDER MENU Button twice to return to the Main Screen 5 Adjust the input level Adjust the volume for the recorded sound Follow the procedures in Adjusting recording levels p 37 to adjust the level Recording mode MP3 64 kbps MP3 96 kbps MP3 128 kbps MP3 160 kbps MP3 192 kbps MP3 224 kbps MP3 320 kbps WAV 16 bit WAV 24 bit Move the cursor up or down Ch...

Page 32: ...utton is used in recording standby mode or during recording the input level will change Be careful to not mistakenly use the Input Level Button Power cannot be turned off during recording First stop the recording then turn off the power fig rec stop e eps_80 7 Press the STOP Button to stop recording The REC Indicator goes out Press the PLAY PAUSE Button to pause Press the PLAY PAUSE Button again t...

Page 33: ... fig power onoff e eps_80 1 Turn on power to the R 09 Turn on power to the R 09 See Turning power on off p 14 2 Set the sampling frequency Configuring recording p 26 fig open set e eps_80 1 Show the Menu Screen Press and hold down the FINDER MENU Button to show the Menu Screen fig recoedersetting e eps_80 2 Select Recorder Setup Use the PLAY Button and STOP Button to select Recorder Setup then pre...

Page 34: ...e line fig setrecmode e eps_80 2 Select the recording mode Use the RWD Button and FWD Button to change the Rec Mode value fig open basic2 2 eps_80 4 Press the FINDER MENU Button twice to return to the Main Screen Sampling frequency values 44 1 kHz 48 kHz Recording mode MP3 64 kbps MP3 96 kbps MP3 128 kbps MP3 160 kbps MP3 192 kbps MP3 224 kbps MP3 320 kbps WAV 16 bit WAV 24 bit Changes the value M...

Page 35: ... monaural microphone is used with the external microphone type switch set to stereo microphone When monaural microphone settings are used the L and R channels record the same sound stereo 6 Connect the microphone Connect a microphone to the MIC Input Jack on the R 09 To monitor the sound while recording connect headphones to the HEADPHONE jack Feedback may occur when external speakers are connecte...

Page 36: ...the Input Level Button Power cannot be turned off during recording First stop the recording then turn off the power fig rec stop e eps_80 9 Press the STOP Button to stop recording The REC Indicator goes out Press the PLAY PAUSE Button to pause Press the PLAY PAUSE Button again to cancel the pause and restart recording fig song eps_80 The display shows the recorded song The song name is automatical...

Page 37: ...state fig inputlevel test e eps_80 3 Play the song to record into the microphone The level meter indicates the loudness of the input to R 09 fig inputlevel e eps_80 4 Adjust the volume Adjust the input volume gradually by pressing the Input Level Button while the sound is playing The level meter indicates when louder sounds are being recorded by growing toward the right Adjust by pressing Input Le...

Page 38: ...more to start recording Press the STOP Button to stop recording and return to the Main Menu Because the level settings are saved press the REC Button again to start recording with the same input level Some noise may be heard when the input level is being adjusted with the Input Level Buttons This is not a malfunction Beyond this level clipping occurs Waveforms are clipped and sound is distorted Le...

Page 39: ...R 09 fig power onoff e eps_80 1 Turn on power to the R 09 Turn on the R 09 s power See Turning power on off p 14 2 Set the sampling frequency Configuring recording p 26 fig open set e eps_80 1 Show the Menu Screen Press and hold down the FINDER MENU Button to show the Menu Screen fig recoedersetting e eps_80 2 Select Recorder Setup Use the PLAY Button and STOP Button to select Recorder Setup then ...

Page 40: ...tton twice to return to the Main Screen fig cdin e eps_60 4 Connect the CD player Use an audio cable to connect the line out jack on the CD player to the LINE IN Jack on the R 09 5 Adjust the input level Adjust the input level while playing the song to be recorded on the CD player After adjusting the input level rewind the song to be recorded to the start Adjusting recording levels p 37 Move the c...

Page 41: ...on the R 09 Waiting until the song finishes playing fig rec stop e eps_80 8 Press the STOP Button to stop recording The REC Indicator goes out Press the PLAY PAUSE Button to pause Press the PLAY PAUSE Button again to cancel the pause and restart recording fig song eps_80 The display shows the recorded song A song name such as R09_0001 WAV is automatically created The four digit number forming the ...

Page 42: ...r to the R 09 2 Turn the volume of the speakers all the way down and then turn off the power 3 Connect the speakers Only speakers with internal amps can be connected When using digital speakers use a digital cable to connect the PHONES OPTICAL on the R 09 to the digital input jack on the speakers When using analog speakers use an audio cable to connect the PHONES OPTICAL on the R 09 to the line in...

Page 43: ...ds to be pressed depends on the screen that is showing fig play 2 e eps_80 2 Use the RWD Button and FWD Button to select the song to play Press the RWD Button to move back one song at a time Press the FWD Button to move forward one song at a time When No Song is shown there is no song in the current folder that the R 09 can play When No Card is shown there is no memory card in place Manipulating s...

Page 44: ...own in the order described below They are not shown in the order in which they were recorded Space 0 1 2 3 4 5 6 7 8 9 A B C D E F G H I J K L M N O P Q R S T U V W X Y Z a b c d e f g h i j k l m n o p q r s t u v w x y z Song names beginning with a period are ignored and are not shown Any songs with an extension other than WAV or MP3 are ignored and are not shown The song names shown in the disp...

Page 45: ... rewind or fast forward speed increases fig rwdfwd e eps_80 Rewinding and Fast Forwarding Fast Forward Continue to press Continue to press Rewind Rewinding or fast forwarding during playback When rewinding or fast forwarding during playback of a 16 24 bit WAV song the rewind or fast forward operation on some memory cards may stop because the rate that the data can be read is too slow If this happe...

Page 46: ...at 1 e eps_80 2 Set the start position marker A Press the REPEAT Button once during playback That position becomes the start position marker A for the playback loop fig repeat 2 e eps_80 3 Set the end position marker B Press the REPEAT Button again That position becomes the end position marker B for the playback loop Repeated playback of a selected section 2 3 1 Play Setting marker A A Song A B So...

Page 47: ...the A and B markers are cancelled To stop playback as well press the STOP Button The repeat playback settings A and B markers are saved A B Song Cautions during setting If marker B is not set after setting marker A and playback continues to the end of the song the section between marker A and the end of the song is repeated The repeat settings are cancelled if the RWD Button or FWD Button are used...

Page 48: ...u Screen The Menu Screen is not shown during playback Press the STOP Button to stop playback fig plaersettings e eps_80 2 Select Player Setup Use the PLAY Button and STOP Button to select Player Setup then press the REC Button Repeating a song 1 6 4 7 5 2 3 Hold down Show Menu Screen Move the cursor up or down Enter R 09_e book 48 ページ 2007年2月13日 火曜日 午後3時27分 ...

Page 49: ... the Repeat line fig repeat set e eps_80 5 Select ON Use the RWD Button and FWD Button to change the Repeat value and select ON fig open basic2 e eps_80 6 Return to Main Screen Press the FINDER MENU Button twice to return to the Main Screen fig play start e eps_80 7 Play back Press the PLAY Button Change the value Move the cursor up or down Change the value Press twice Show Main Screen Play R 09_e...

Page 50: ...ct Player Setup Use the PLAY Button and STOP Button to select Player Setup then press the REC Button fig setshuffle e eps_80 3 Select SHUFFLE Use the RWD Button and FWD Button to change the Play Mode value and select SHUFFLE fig repeat shu e eps_80 4 Select Repeat Use the PLAY Button and STOP Button to move the cursor to the Repeat line Shuffle play Hold down Show Menu Screen Move the cursor up or...

Page 51: ... set to ON songs are repeated in the same order once all the songs in the selected folder have been played with the shuffle feature fig open basic2 e eps_80 6 Return to Main Screen Press the FINDER MENU Button twice to return to the Main Screen fig play start e eps_80 7 Play back Press the PLAY Button To reshuffle the songs press the Stop Button once then press the PLAY Button again Change the val...

Page 52: ..._80 2 Select Player Setup Use the PLAY Button and STOP Button to select Player Setup then press the REC Button fig setsequential e eps_80 3 Select SEQUENTIAL Use the RWD Button and FWD Button to change the Play Mode value and select SEQUENTIAL fig repeat seq e eps_80 4 Select Repeat Use the PLAY Button and STOP Button to move the cursor to the Repeat line Playing back in order Hold down Show Menu ...

Page 53: ...ve been played in song order If Repeat is set to ON songs are repeated in the same order once all the songs in the selected folder have been played in song order fig open basic2 e eps_80 6 Return to Main Screen Press the FINDER MENU Button twice to return to the Main Screen fig play start e eps_80 7 Play back Press the PLAY Button Change the value Press twice Show Main Screen Play R 09_e book 53 ペ...

Page 54: ...es you through the available settings for reverb Applying reverb effects during playback Reverb type Type Effect Hall1 This reverb effect simulates the reverberation in a concert hall A mild reverberation with a long spreading sound is obtained Hall 2 has shorter reverberation than Hall 1 Hall 2 Room This reverb effect simulates the reverberation in a room A short bright reverberation that simulat...

Page 55: ...und density situations Bit rates are increased for high sound density situations Song types that can be played Sampling frequency kHz Sample size bits WAV Playback 32 44 1 48 16 24 Sampling frequency kHz Bit rate kbps MP3 Playback 32 44 1 48 64 96 128 160 192 224 256 320 VBR R 09_e book 55 ページ 2007年2月13日 火曜日 午後3時27分 ...

Page 56: ...pends on the screen that is showing fig usbin e eps_80 4 Connect with the USB cable The R 09 connects to the PC with the included USB cable When connecting the USB cable to the PC avoid touching the metal portions Hold the base when inserting the plug If you connect to a PC without having a memory card in place the R 09 s display shows No Card The PC will not recognize the R 09 if connecting while...

Page 57: ... This section uses screens from Windows XP The actual display may differ depending on the environment Loading songs Windows Downloading songs from a PC To load songs from the PC into the R 09 select the songs on the PC and drag them to the removable disk icon Songs that can be played on the R 09 VBR Variable Bit Rate Bit rates are decreased for low sound density situations Bit rates are increased ...

Page 58: ...from Mac OS 10 4 The actual display may differ depending on the environment Macintosh Downloading songs from a PC To load songs from a Macintosh into the R 09 select the songs on the Macintosh and drag them to the NO NAME or untitled icon Songs that can be played on the R 09 VBR Variable Bit Rate Bit rates are decreased for low sound density situations Bit rates are increased for high sound densit...

Page 59: ...y fig winr 3 e eps_38 2 Select the memory card Select the R 09 from the displayed list of hardware devices 3 Click on Stop in the dialogue box fig winr 4 e eps_38 4 Click on OK When the safely remove hardware dialog box appears select the R 09 memory card and click on OK 5 Disconnect If The USB Mass Storage Device can now be safely removed from the system appears the USB cable connecting the R 09 ...

Page 60: ...ge can changes to and the connection can be terminated For Mac OS 9 drag the untitled icon to the garbage can This section uses screens from Mac OS 10 4 The actual display may differ depending on the environment 2 Disconnect Once the NO NAME or untitled icon has been deleted from the desktop the USB cable connected the R 09 and PC can be removed The power to the R 09 can also be turned off Macinto...

Page 61: ...61 Memo R 09_e book 61 ページ 2007年2月13日 火曜日 午後3時27分 ...

Page 62: ...and moves to the Main Screen p 63 Folder Selects a folder and moves to the Main Screen Information Song Shows information about the song Or protects it p 64 Folder Shows information about the folder Delete Song Deletes the song p 65 Folder Deletes the folder Rename Song Changes the song name p 66 Folder Changes the folder name Move Song Moves the song p 67 Copy Song Copies the song p 69 Repair Son...

Page 63: ...rom the Finder Screen Use the PLAY Button and STOP Button to select a song or folder then press the REC Button To select a subfolder select the folder then press the FWD Button To move up a level press the RWD Button fig select e eps_80 2 Choose Select Use the PLAY Button and STOP Button to select Select then press the REC Button The song or folder is selected and the Main Screen is shown Selectin...

Page 64: ...d to prevent being deleted accidentally or having its name changed fig setprotect e eps_80 1 Set protection on or off Use the RWD Button and FWD Button to switch it on or off When protection is on a lock is shown on the icon fig key eps_80 fig open basic3 e eps_80 3 Return to Main Screen Press the FINDER MENU Button three times to return to the Main Screen Displaying song or folder information Inf...

Page 65: ...nd STOP Button to select Delete then press the REC Button fig delete sure e eps_80 3 Press the REC Button to delete the song A confirmation screen is shown Press the REC Button to delete the song To cancel press the FINDER MENU Button before pressing the REC Button fig process del eps_80 Do not turn off power while the deletion takes place fig open main eps_80 4 Return to Main Screen Press the FIN...

Page 66: ...and FWD Button to move the cursor to the right or left fig rename 3 2 e eps_80 2 Edit Move the cursor to the character to change use the PLAY Button and STOP Button to change the character then press the REC Button to enter the changes Insert a character with the REVERB Button Delete a character with the REPEAT Button To cancel press the FINDER MENU Button before pressing the REC Button If the nam...

Page 67: ...e song to the top level When a folder is selected the song is moved into that folder R 09 memory card structure p 68 To cancel press the FINDER MENU Button before pressing the REC Button To select a subfolder select the folder then press the FWD Button To move up a level press the RWD Button fig process mov eps_80 Do not turn off power or remove the memory card while moving songs The Move operatio...

Page 68: ...ers can be made in any location Creating folders Make Folder p 71 Folder2 R09_0010 WAV R09_0009 MP3 Folder1 R09_0005 MP3 R09_0004 MP3 R09_0003 WAV R09_0002 WAV R09_0001 WAV Root R09_0008 WAV R09_0007 WAV R09_0006 WAV Folder Song R 09 top level Use the PLAY Button and STOP Button to change the selected file Use the FWD Button to enter a folder Use the RWD Button to exit a folder R 09_e book 68 ページ ...

Page 69: ...to copy the song then press the REC Button Select Root to copy the song to the top level When a folder is selected the song is copied into that folder R 09 memory card structure p 68 To cancel press the FINDER MENU Button before pressing the REC Button To select a subfolder select the folder then press the FWD Button To move up a level press the RWD Button fig process cop eps_80 Do not turn off po...

Page 70: ...on to select Repair then press the REC Button This menu is displayed only when the R 09 detects a damaged song fig copy3 e eps_80 3 Press the REC Button to repair the file A confirmation screen is shown Press the REC Button to repair the song To cancel press the FINDER MENU Button before pressing the REC Button Do not turn off power while repairing songs fig open main e eps_80 4 Return to Main Scr...

Page 71: ... Button to select the folder where the new folder is to be created fig folder select2 e eps_80 2 Use the FWD Button to enter a folder ffig folder select5 e eps_80 3 Select a folder Use the PLAY Button and STOP Button to select the name of the folder at the top and press the REC Button Creating folders Make Folder Move the cursor up or down Enter Move the cursor up or down Enter Move the cursor up ...

Page 72: ... confirmation screen is shown Press the REC Button to enter A New Folder is created To cancel press the FINDER MENU Button before pressing the REC Button fig process mak eps_80 Do not turn off power or remove the memory card while creating a folder fig open main e eps_80 4 Return to Main Screen Press the FINDER MENU Button Move the cursor up or down Enter Enter Show Main Screen R 09_e book 72 ページ ...

Page 73: ...time to wait for some input before darken ing the screen OFF 2 5 10 20 p 81 Rec Peak LED The REC Indicator and PEAK Indicator can be linked to the Display Timer settings When the dis play goes dark the REC Indicator and PEAK In dicator also turn off OFF ON p 82 Power Manage Auto Power Off Sets the time to wait for input before turning off the power OFF 3 5 10 15 30 45 60 p 83 Battery Sets the batt...

Page 74: ...ting e eps_80 1 Select Recorder Setup from the Menu Screen Use the PLAY Button and STOP Button to select Recorder Setup then press the REC Button fig setsamplingrate e eps_80 2 Set the sampling frequency Sample Rate Use the RWD Button and FWD Button to change the Sample Rate value When finished with the settings press the MENU button to return to previous screens Displaying the Menu screen Setting...

Page 75: ...Rec Mode Use the PLAY Button and STOP Button to move the cursor to the Rec Mode line fig setrecmode e eps_80 3 Set the recording mode Use the RWD Button and FWD Button to change the Rec Mode value When finished with the settings press the MENU button to return to previous screens Setting the recording mode Rec Mode Setting MP3 64 kbps MP3 96 kbps MP3 128 kbps MP3 160 kbps MP3 192 kbps MP3 224 kbps...

Page 76: ...p from the Menu Screen Use the PLAY Button and STOP Button to select Recorder Setup then press the REC Button fig recmode e eps_80 2 Select File Size Use the PLAY Button and STOP Button to move the cursor to the MaxFileSize line fig setrecmode e eps_80 3 Set the maximum file size Use the RWD Button and FWD Button to change the MaxFileSize value When finished with the settings press the MENU button...

Page 77: ... to select Player Setup then press the REC Button fig setsingle e eps_80 2 Set the playback mode Use the RWD Button and FWD Button to change the setting for Play Mode Repeating a song p 48 Shuffle play p 50 Playing back in order p 52 When finished with the settings press the MENU button to return to previous screens Setting the song playback mode Play Mode Setting SINGLE play one song SEQUENTIAL p...

Page 78: ... e eps_80 2 Select Repeat Use the PLAY Button and STOP Button to move the cursor to the Repeat line fig repeat set e eps_80 3 Set repeat playback Use the RWD Button and FWD Button to change the Repeat value When finished with the settings press the MENU button to return to previous screens Setting whether to use repeat playback or not Repeat Setting OFF no repeat ON repeat Move the cursor up or do...

Page 79: ...tton to select Display Setup then press the REC Button fig setdisplaybrightness e eps_80 2 Set the brightness using Brightness Use the RWD Button and FWD Button to adjust the brightness by changing the Brightness value When finished with the settings press the MENU button to return to previous screens Adjusting the display brightness Brightness Setting 1 dark 5 10 bright Move the cursor up or down...

Page 80: ...utton fig displaytimer e eps_80 2 Select Peak Hold Use the PLAY Button and STOP Button to move the cursor to the Peak Hold line fig setdisplaytimer e eps_80 3 Set Peak Hold Use the RWD Button and FWD Button to change the Peak Hold value When finished with the settings press the MENU button to return to previous screens Setting Peak Hold for the Level Meter Peak Hold Setting OFF no Peak Hold ON use...

Page 81: ... to the Display Timer line fig setdisplaytimer e eps_80 3 Set the time Use the RWD Button and FWD Button to change the Display Time value and set the time until the screen goes dark Set to OFF to keep the screen bright no matter how much time passes units seconds Power saving feature p 16 When finished with the settings press the MENU button to return to previous screens Setting the time until the...

Page 82: ...ton and STOP Button to move the cursor to the Rec Peak LED line fig setdisplaytimer e eps_80 3 Specify whether the indicators are to be on or off Use the RWD Button and FWD Button to change the PeakLED value units seconds Power saving feature p 16 When finished with the settings press the MENU button to return to previous screens Turning off indicators when the display goes dark Rec Peak LED Setti...

Page 83: ... to select Power Manage then press the REC Button fig setautopower e eps_80 2 Set the time with Auto Power Off Use the RWD Button and FWD Button to change the Auto Power Off value which specifies the time until the power turns off Set to OFF to keep power on Unit minutes Power saving feature p 16 When finished with the settings press the MENU button to return to previous screens Setting the time u...

Page 84: ...he PLAY Button and STOP Button to move the cursor to the Battery line fig setbatterytype e eps_80 3 Set the battery type Use the RWD Button and FWD Button to set the battery type by changing the setting for Battery Cautions when using batteries with the R 09 p 16 Power saving feature p 16 Remaining battery power indication p 16 When finished with the settings press the MENU button to return to pre...

Page 85: ...utton to set whether to monitor the input sound through the headphones during recording by changing the setting for Rec Monitor Sw When finished with the settings press the MENU button to return to previous screens If you monitor the sound through headphones while recording there will be a 6 ms delay compared to the actual sound but this is not a malfunction Setting whether to monitor sound while ...

Page 86: ...Button fig pluginpower e eps_80 2 Select Plug in Power Use the PLAY Button and STOP Button to move the cursor to the Plug in Power line fig setpluginpower e eps_80 3 Make the setting for plug in powered microphones Use the RWD Button and FWD Button to set whether to use a plug in powered microphone or not by changing the setting for Plug in Power When finished with the settings press the MENU butt...

Page 87: ..._80 1 Select Date Time from the Menu Screen Use the PLAY Button and STOP Button to select Date Time then press the REC Button 2 Edit the time and date fig edit datatime e eps_80 1 Move the cursor Use the RWD Button and FWD Button to move the cursor to the right or left fig edit datetime 2 e eps_80 2 Edit the date and time Move the cursor to the character to change use the PLAY Button and STOP Butt...

Page 88: ...t Information Use the PLAY Button and STOP Button to select Information then press the REC Button The information is displayed When finished with the settings press the MENU button to return to previous screens Displaying SD memory card information Information Displayed information Total total capacity Remain free space Write Protect protect on off Move the cursor up or down Enter Move the cursor ...

Page 89: ... fig initialize 2 e eps_80 2 Press the REC Button to initialize A confirmation screen is shown Press the REC Button to initialize fig initialize e eps_80 3 Select Yes A confirmation screen is shown Use the RWD Button and FWD Button to select Yes then press the REC Button See the table on p 73 for initial settings When not performing initialization press the FINDER MENU Button fig process reset eps...

Page 90: ...e song is in a file format that cannot be used with the R 09 Already Exists There is a song or folder of the same name Create the song or folder using a different name Song Protected The song is protected Turn Write protect OFF and then try again Name Too Long The name is too long File System Err The memory card has not been formatted Format the memory card on the R 09 SD Unformatted The memory ca...

Page 91: ... The memory card may be corrupted No Card No memory card has been inserted Insert a memory card into the R 09 HOLD is ON The hold switch is ON This message is shown when an operation is attempted while the hold switch is turned on Now Recording Recording is currently in progress This message is displayed when an operation is attempted during recording Cancel the recording to per form an operation ...

Page 92: ...er input jacks If a microphone cable or device is connected to the MIC Input Jack or LINE IN Jack the Internal MIC cannot be used MICROPHONE INPUT jack p 8 LINE IN jack p 8 Using the internal microphones p 29 When using an external microphone please connect to the MIC Input Jack only If a microphone cable or other device is connected to the Line In Jack then the input from the MIC Input Jack is ig...

Page 93: ...ted Format the memory card Formatting p 19 Recording is not possible if the write protect LOCK feature is turned on Unlock the write protect feature SD Memory Card p 20 Recording cannot be performed correctly if the input level set with the INPUT LEVEL buttons is too low Set a proper input level Adjusting recording levels p 37 When using an external microphone connect it properly to the MIC Input ...

Page 94: ... cannot be used on the R 09 The R 09 can only play songs with the MP3 or WAV extensions Also corrupted songs cannot be played Song types that can be played p 55 Changing the name Rename p 66 Message list p 90 The wrong song is played The song playback mode may be in shuffle play SHUFFLE In this mode the R 09 randomly selects the next song to be played Change the setting to normal play SEQUENTIAL S...

Page 95: ...cording or in recording standby pressing and holding down the FINDER MENU Button does not make the Menu Screen appear First stop playback or recording then press and hold down the FINDER MENU Button The display darkens When running on battery power the display may darken when there are no operations depending on the Display Timer settings Setting the time until the screen is darkened when no opera...

Page 96: ...AV extension that is taking time to verify on the R 09 as playable These conditions cause the display to be sluggish when selecting a song Song types that can be played p 55 Feedback occurs when monitoring with headphones If open air headphones are used to monitor recording feedback may occur if the headphones are too close to the R 09 The R 09 s internal microphones are capable of picking up even...

Page 97: ...90 Clock Initialized 90 Condenser microphone 8 35 Copy 62 D Date Setting 21 87 Date Time 73 Delete 25 62 Digital output connector 7 Disconnecting 59 Display 4 Adjusting the Brightness 79 Display Setup 73 Display Timer 73 Dynamic microphone 8 35 E EXIT 4 EXTERNAL MICROPHONE TYPE switch 9 F Factory Reset 73 File Size 76 File System Err 90 Finder screen 11 62 Copy 62 Delete 62 Information 62 Make Fol...

Page 98: ... 68 Write protect feature LOCK 20 Menu screen 11 74 Date Time 73 Display Setup 73 Displaying the Menu screen 74 Factory Reset 73 Input Setup 73 Player Setup 73 Power Manage 73 Recorder Setup 73 SD Card 73 Message 90 Microphone Condenser microphone 8 35 Dynamic microphone 8 35 External microphone 8 External microphone type switch 9 Internal MIC 4 MICROPHONE GAIN switch 9 MICROPHONE INPUT jack 8 Mic...

Page 99: ...EC 6 REC button 6 REC indicator 6 Rec Mode 73 Setting the Rec Mode 75 Rec Monitor Sw 73 REC PAUSE 6 Rec Peak LED 73 Recorder Setup 73 Recording 23 26 Adjusting recording levels 37 Estimated recording times 28 Recording from cassettes or CDs 39 Recording instruments and voice 29 Recording mode 27 Recording standby 6 Setting the Rec Mode 75 Setting the Rec Monitor Sw 85 Setting the Sample Rate 74 Us...

Page 100: ...1 SD Card Slow 91 SD memory card 10 SD Unformatted 90 Select 62 SEQUENTIAL 52 Settings 73 SHUFFLE 50 SINGLE 48 Size 76 Song Copy 69 Delete 65 Information 64 Move 67 Protect 64 Rename 66 Repair 70 Select 63 Song Protected 90 Stereo 8 9 STOP 6 STOP button 6 T Time Setting 21 87 U untitled 58 USB 2 0 HI SPEED USB 10 USB cable 56 USB screen 11 56 USB terminal 10 V VBR 55 W WAV 27 R 09_e book 100 ページ 2...

Page 101: ...t Rates 64 96 128 160 192 224 320 kbps Format WAV Sampling Rate 44 1 48 kHz Bit Depth 16 24 bits Format MP3 MPEG 1 audio layer 3 Sampling Rate 32 44 1 48 kHz Bit Rates 64 96 128 160 192 224 256 320 kbps or VBR Variable Bit Rate Format WAV Sampling Rate 32 44 1 48 kHz Bit Depth 16 24 bits Recording Time unit minutes Settings 64MB 128MB 512MB 1GB 2GB 4GB WAV 16 bits 44 1 kHz 5 11 44 88 180 360 WAV 1...

Page 102: ...ace Mini B type support USB 2 0 1 1 mass storage device class Effects Playback Reverb 4 types Hall 1 Hall 2 Room Plate Others Display 128 x 64 dot graphic display Power Supply AC Adaptor Alkaline dry battery LR6 AA type x 2 or Nickel Hydrogen battery HR15 51 x 2 Current Draw 360 mA Dimensions 62 6 W x 102 D x 29 1 H mm 2 1 2 W x 4 1 16 D x 1 3 16 H inches Weight 145 g 6 oz including batteries and ...

Page 103: ...pins or liquids of any kind water soft drinks etc to penetrate the unit 012b Immediately turn the power off remove the AC adaptor from the outlet and request servicing by your retailer the nearest Roland Service Center or an authorized Roland distributor as listed on the Information page when The AC adaptor the power supply cord or the plug has been damaged or If smoke or unusual odor occurs Objec...

Page 104: ... 106 Never climb on top of nor place heavy objects on the unit 107c Never handle the AC adaptor or its plugs with wet hands when plugging into or unplugging from an outlet or this unit 108b Before moving the unit disconnect the AC adaptor and all cords coming from external devices 109b Before cleaning the unit turn off the power and unplug the AC adaptor from the outlet 110b Whenever you suspect t...

Page 105: ...r while conversing Should you experience such problems you should relocate such wireless devices so they are at a greater distance from this unit or switch them off 354a Do not expose the unit to direct sunlight place it near devices that radiate heat leave it inside an enclosed vehicle or otherwise subject it to temperature extremes Excessive heat can deform or discolor the unit 355b When moved f...

Page 106: ...ay notice a slight sensation of discomfort or roughness when touching the R 09 itself or a metal part of a connected mic This is due to an extremely small electrical charge which poses absolutely no danger to the human body If this bothers you you can use the R 09 on battery power as desired Before Using Cards Using DATA Cards 704 Carefully insert the DATA card all the way in until it is firmly in...

Page 107: ...e complies with Part 15 of the FCC Rules Operation is subject to the following two conditions 1 This device may not cause harmful interference and 2 This device must accept any interference received including interference that may cause undesired operation Unauthorized changes or modification to this system can void the users authority to operate this equipment This equipment requires shielded int...

Page 108: ... Principal de la Farmacia 5ta Avenida 1 Cuadra al Lago 503 Managua Nicaragua TEL 505 277 2557 PERU Audionet Distribuciones Musicales SAC Juan Fanning 530 Miraflores Lima Peru TEL 511 4461388 IRELAND Roland Ireland G2 Calmount Park Calmount Avenue Dublin 12 Republic of IRELAND TEL 01 4294444 ITALY Roland Italy S p A Viale delle Industrie 8 20020 Arese Milano ITALY TEL 02 937 78300 NORWAY Roland Sca...

Reviews: