background image

23 


3.


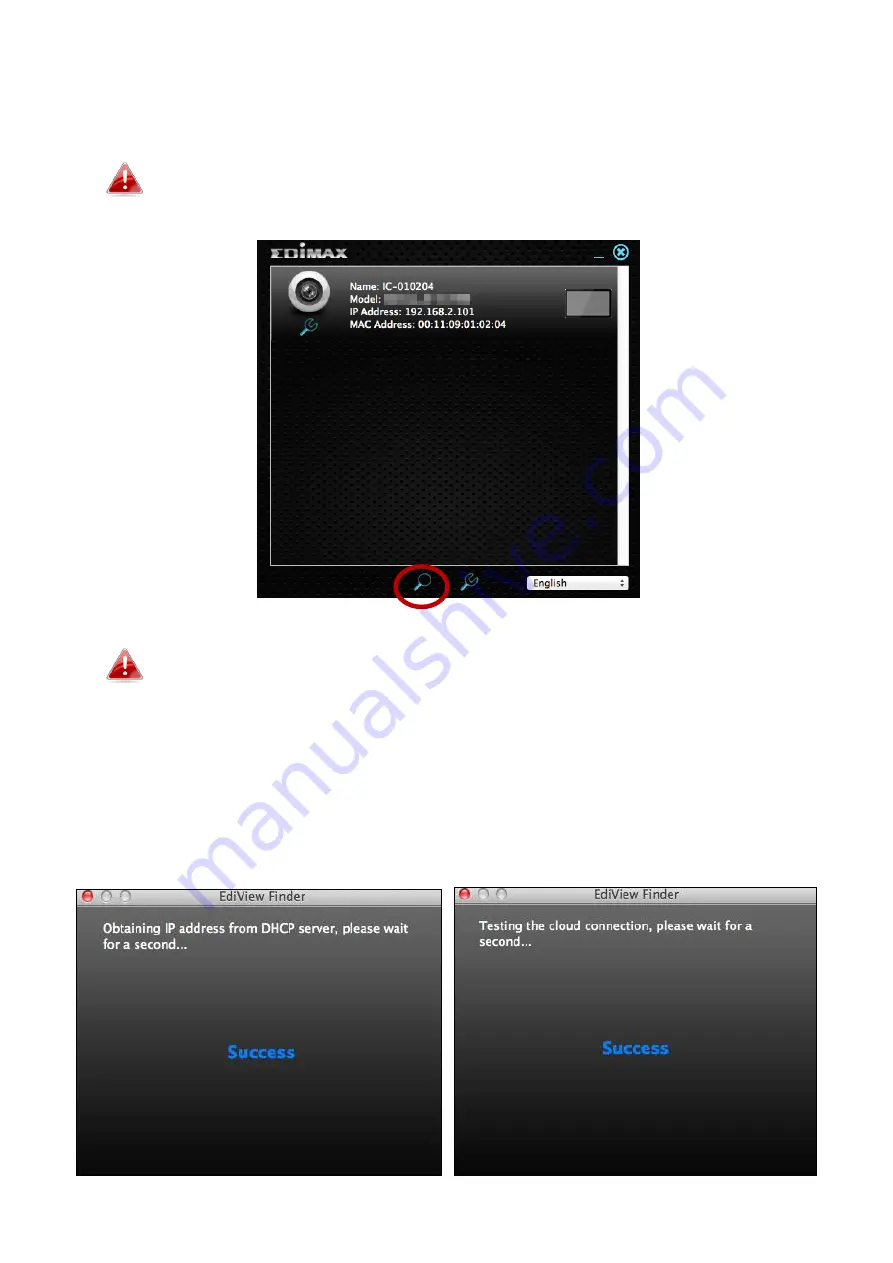
EdiView Finder will list all cameras on your local network, along with each 
camera’s name, model, IP address and MAC address. 


Click the search icon to refresh the list if your camera is not 
displayed. 


The network camera’s IP address is displayed on this screen. After 
setup, you can enter this IP address into the URL bar of a web 
browser on the same local network to access your network 
camera’s web-based configuration interface. 


4.


 Double click your network camera and wait a moment for the network 
camera to obtain an IP address and test the cloud connection. EdiView 
should display “Success” as shown below. 


Summary of Contents for IC-6220DC

Page 1: ...IC 6220DC User Manual 11 2020 v1 2 ...

Page 2: ...of without the obligation to notify any person of such revision or changes The product you have purchased and the setup screen may appear slightly different from those shown in this QIG For more information about this product please refer to the user manual on the CD ROM The software and specifications are subject to change without notice Please visit our website www edimax com for updates All bra...

Page 3: ...d Management Interface 28 IV 1 Basic 33 IV 1 1 Network 34 IV 1 2 Dynamic DNS 35 IV 1 3 RTSP 36 IV 1 4 Date Time 37 IV 1 5 Users 38 IV 1 6 UPnP 39 IV 1 7 Bonjour 40 IV 2 Video 41 IV 2 1 Privacy Protector 41 IV 3 Events 42 IV 3 1 Human Motion Detection 42 IV 3 1 1 Human Motion Detection 42 IV 3 1 2 Schedule Settings 44 IV 3 2 Notification 46 IV 3 2 1 Mail Settings 46 IV 3 2 2 Push 48 IV 3 2 3 HTTP 4...

Page 4: ...agement 53 IV 4 4 1 JPEG 53 IV 4 5 Cloud Setting 54 IV 5 System 55 IV 5 1 Basic 55 IV 5 2 Advanced 56 IV 5 3 Cloud Service 58 IV 6 Status 59 IV 6 1 System Information 59 IV 6 2 System Log 60 V Myedimax com 61 VI FAQs 64 ...

Page 5: ...the camera viewer until the bolt has been installed through your peep hole Antenna Camera Viewer Gateway QIG Power Adapter Ethernet Cable Camera Battery Unit Installation Kit A Installation Kit B Installation Kit C Extension Bolts CD Alkaline Battery ...

Page 6: ... 4 2 4GHz above or similar VGA card 1024 768 or above CD ROM Drive At least 128MB hard disk space 256 MB recommended Windows XP Vista 7 or 8 Mac OS X or above Web browser Internet Explorer 7 0 Firefox 3 6 Chrome 10 Opera 11 Safari 5 or above ...

Page 7: ...e local network Quick Flashing LAN activity transferring data Internet Orange On Connected to Internet Quick Flashing Gateway is restarting Slow Flashing 1 x per second Not connected to Internet Camera LED LED Color LED Status Description Status Green On Camera is on and connected to cloud server Orange Slow Flashing PIR motion detection trigger Battery Red Flashing Low battery warning The camera ...

Page 8: ...com I 5 Reset If you experience problems with your network camera you can reset the camera back to its factory default settings This resets all settings back to default Press and hold the Pair Reset button on the back panel for at least 10 seconds Release the button when the power LED is flashing quickly green and wait a couple of minutes for the unit to restart Take care to hold the button for at...

Page 9: ...unit The smaller bolt is for door thickness 55 75mm The longer bolt is for door thickness 75 90mm To use an extension bolt 1 Remove the plastic tube from the camera viewer s bolt The cable inside the plastic tube will fall loose 2 Hold the lens in place and unscrew and remove the original bolt that s currently attached Make sure you hold the lens in place while you unscrew the bolt otherwise the l...

Page 10: ...replace of the original bolt 4 Slide the plastic tube back on to the bolt with the cable inside The cable must be routed through the plastic tube as you slide the tube back on 5 Follow the Setup procedure from the beginning as explained in the next chapter ...

Page 11: ...peephole before you begin 1 Screw on the included antenna to the gateway unit and connect the power adapter The green power LED will flash slowly when the gateway is ready 2 Use an Ethernet cable to connect the gateway to your wireless router or access point The green power LED and orange Internet LED will display on to indicate successful cloud and Internet connections ...

Page 12: ...move the cover and insert 4 x AA batteries into the camera battery unit 4 To remove an existing peephole from your door you can usually simply unscrew it using a coin 5 Remove the warning sticker from the camera viewer ...

Page 13: ...r from the black double sided tape on the camera viewer 7 From the front of your door insert the camera viewer s bolt through your door s peephole until the unit is flush to your door 8 Remove the plastic tube from the bolt ...

Page 14: ...ew on the included Installation Kit A nut onto the camera viewer s bolt until tight to your door 10 Screw on the included Installation Kit B washer onto the camera unit s bolt 11 Connect the cable to the terminal on the camera battery unit ...

Page 15: ...wer unit s bolt with the battery side facing away from the door and then screw the included Installation Kit C cap onto the bolt to secure the battery unit in place 13 Switch the camera s power switch on and re attach the cover by twisting into place ...

Page 16: ...2 EdiLife App 1 Use a smartphone or tablet to search download and install the EdiLife app from Google Play or the Apple App Store 2 Open the EdiLife app and tap the icon in the top right corner of the screen ...

Page 17: ...ilable device list and wait a moment for the app to make a connection Tap refresh in the top right corner if your camera isn t listed 4 For better security enter a new device name and password when prompted Tap the check mark to continue ...

Page 18: ...your camera to see a live stream which you can view anytime you are connected to the Internet You can configure your camera s settings and functions using the icons below the live image 6 If you have a microSD card insert the card into the microSD slot on the back on the gateway unit ...

Page 19: ...ws 1 Insert the included CD into your CD ROM drive and if the setup utility does not automatically open please locate and open the Autorun exe file in the Autorun folder 2 Click Setup Utility to install the EdiView Finder software utility 3 Click Next and follow the on screen instructions to install the EdiView Finder software utility ...

Page 20: ...18 4 When installation is complete select Launch EdiView Finder Utility before clicking Finish Or double click the EdiView Finder Utility icon on your desktop to launch EdiView Finder ...

Page 21: ... on this screen After setup you can enter this IP address into the URL bar of a web browser on the same local network to access your network camera s web based configuration interface 6 Double click your camera and then choose Yes or No if you wish to set up a wireless connection If you choose No please go to step 10 7 Unplug the Ethernet cable from your network camera and click Next Please wait a...

Page 22: ...ted as shown below please click Next 9 Enter a name and password for your camera The password will be used later to log in to your camera remotely via its cloud ID web interface or via the EdiView II smartphone app Click OK to continue ...

Page 23: ...21 10 The next screen will indicate that setup is complete The camera is operational and ready for use Click OK or click the URL and a preview window showing a live stream from your camera may open ...

Page 24: ... 1 2 Wireless to set up the camera s wireless connection 1 Insert the included CD into your CD ROM drive and browse to the Mac folder 2 Copy the EdiView Finder file to your desktop and double click the icon to open EdiView Finder EdiView Finder is also available for download from the Edimax website http www edimax com EdiViewFinder htm ...

Page 25: ...The network camera s IP address is displayed on this screen After setup you can enter this IP address into the URL bar of a web browser on the same local network to access your network camera s web based configuration interface 4 Double click your network camera and wait a moment for the network camera to obtain an IP address and test the cloud connection EdiView should display Success as shown be...

Page 26: ...ely via its cloud ID web interface or via the EdiView II smartphone app Click Next to continue 6 The next screen will indicate that setup is complete The camera is operational and ready to be configured for a wireless connection Click Finish and a preview window showing a live stream from your camera may open ...

Page 27: ...d your network camera s IP address view a live stream or modify the network camera s IP address Double click the TV icon on the right side to view a live stream in a pop up window or click the wrench icon to open a new window with the network camera s IP address settings ...

Page 28: ...ddress subnet to the network camera should still be able to locate the network camera with EdiView Finder If you encounter difficulties it is recommended that you use a DHCP server though you can manually set the network camera s IP address using EdiView Finder above or using the web based configuration interface see IV 1 1 Network if you need ...

Page 29: ...ngs when pressed for 5 seconds Your gateway unit and camera unit and already paired when you purchase them and under normal circumstances no manual pairing is necessary 1 Push the Pair button on the gateway unit for 5 seconds to activate pairing After quickly flash of Power Led for 5 seconds press the Pair button on the gateway again 2 Within 30 seconds push the Pair button on the camera unit for ...

Page 30: ...ment interface with a web browser on a smartphone or computer For smartphone users the appearance of the interface will vary slightly to that which is displayed here though the menu functions which are described later from IV 1 Basic onwards are the same 1 Enter the network camera s IP address into the URL bar of a web browser The camera s IP address can be found by opening EdiView Finder as displ...

Page 31: ...ick Run Add on If any other security warnings prompts appear please select Run or Allow or similar depending on your browser 3 Enter the username and password for your network camera default username admin default password 1234 The network camera s web based management interface will then be displayed in your browser ...

Page 32: ...mera s current view You will be prompted to select a location to save the image Resolution Set the video resolution according to your preference Night Vision Enable or disable night vision PIR Enable Enable or disable the camera s passive infrared PIR sensor which senses motion Power Frequency Set 50MHz or 60MHz power frequency according to your display s capabilities Brightness Contrast Adjust va...

Page 33: ...0 seconds until the camera will go into standby After 120 seconds the button is labelled Continue The camera will remain in standby to conserve battery power until A The button is clicked B Motion is detected C The EdiLife app live view is activated 5 Select Setup at the top center and use the menu down the left side to navigate to the network camera s various settings Each menu item is described ...

Page 34: ...32 6 After making any changes click Save Settings to save the settings and bring the changes into effect ...

Page 35: ...33 IV 1 Basic The Basic menu opens a submenu with eight categories of settings for your network camera s basic operation Select a category and refer to the appropriate chapter ...

Page 36: ... camera from your router or Static IP to manually set a static IP address using the fields below IP Address Static IP users specify an IP address here which will be the IP address of your network camera Subnet Mask Enter the subnet mask of the IP address Gateway Enter the gateway address of your network Primary DNS Enter the IP address of your primary DNS server Secondary DNS Enter the IP address ...

Page 37: ...re available online please use the information provided by your DDNS provider to configure the settings on this page Enable DDNS Select Enable to enable DDNS functionality or select Disable to disable DDNS functionality Provider Select your dynamic DNS service provider from the dropdown menu Host Name Enter the hostname you registered with the DDNS service provider User Name Enter the user name yo...

Page 38: ...etwork camera to be used with a streaming media server Enter the required RTSP settings RTSP Port Enter the RTSP port MJPEG RTSP Path Enter the MJPEG RTSP path RTP Port Range Enter the RTP port range Verification Select a verification type from the drop down menu ...

Page 39: ...me and date automatically via an NTP server on the local network if available Set Time Date Manually For manual setting mode enter the correct time and date in the following format YYYY MM DD HH MM SS Synchronize to PC time Click here to automatically enter the same time and date as your computer NTP Server For NTP mode enter the NTP server s hostname or IP address Time Zone Select the correct tim...

Page 40: ...ctions of the network camera similar to the administrator account while guest accounts can only view the camera s image User List Existing users are listed here Select a user here to modify the settings User Name Input user s name here Password Input user s password here Confirm password Input user s password here again for confirmation Add Add a new user Modify Save the changes to an existing sel...

Page 41: ...dows computers can automatically discover the network camera on the local area network The network camera also supports IGD Enable Disable Enable or disable UPnP IGD Enable UPnP Port Forward Enable or disable Internet Gateway Device IGD IGD Configuration External Port Select fully automated or semi automated IGD External HTTP Port Enter an external HTTP port External RTSP Port Enter an external RT...

Page 42: ... allows Safari web browser to discover devices and services on the local network and provide a quick shortcut for access When enabled Safari users on the local network can find a shortcut to the network camera under Safari s Bonjour menu Select Enable or Disable ...

Page 43: ...tings Select an item from the submenu and refer to the appropriate following chapter IV 2 1 Privacy Protector Privacy Protector is a function which will display the camera s live view as a black screen This can be a useful tool when occupants are at home to address privacy concerns about network intruders ...

Page 44: ...You can set the camera to send this recording as a notification via email and or to local storage such as a NAS or microSD card inside the camera You can also set the camera to send a push notification for each event to a smartphone with EdiLife installed You can view a 10 second recording of the event which is automatically stored in the network camera s memory from the app s Events menu Recordin...

Page 45: ...Select Enable or Disable for this function When enabled you need to configure email settings in the Events Notifications Mail Settings menu Save Event Files to NAS or SD Enable or disable the camera s function to save video files to NAS or MicroSD card When enabled you need to configure the settings in the Storage Settings menu Video Recording Time Specify the length of time for the NAS or microSD...

Page 46: ... which times the network camera s motion detection will be active using the table below For each day click and drag across the timeline on the times which you want motion detection to be active A blue box indicates a scheduled recording In the example below motion detection is scheduled for 8am 6pm Monday to Saturday By default the schedule may be full Delete existing entries if necessary ...

Page 47: ...Delete the selected blue recording block on the timeline Delete All Delete all blue recording blocks on the timeline Select All Select all blue recording blocks Store Store the recording settings on the timeline ...

Page 48: ...Provider Select Manual Settings to enter the information manually or select a common email provider to enter some of the information automatically SMTP Server Input the host name or IP address of the SMTP server for the email sender This information can be provided by your email service provider SMTP Port Input the SMTP port number for the email sender Most SMTP servers use port number 25 while so...

Page 49: ...hen your SMTP server requires authentication This information can be provided by your email service provider Account Input the SMTP account name when your SMTP server requires authentication This information can be provided by your email service provider Password Input the password used for SMTP server authentication Send Test Email Click here to send a test email with the current settings Gmail u...

Page 50: ...er a disconnection Reconnection alerts are sent when the camera actually reconnects to the Internet not when a disconnection occurs Push notification Enable or disable all push notifications Video motion alert Switch push notifications for motion detection events on or off Low battery alert Switch push notifications for low battery status on or off Reconnected to Internet alert Switch push notific...

Page 51: ... events Select PIR from the list to begin configurations Notification Enable or disable HTTP notifications URL Enter the URL of the HTTP server including the port number Method Select whether to use the GET or POST method for your HTTP server Authentication Enable or disable authentication with your HTTP server Username When authentication is enabled enter the username Password When authentication...

Page 52: ...led recording IV 4 1 Storage Directory The network camera can store recordings of motion detection events to local storage NAS or MicroSD Select your storage location and click Save settings A MicroSD card must be installed in the network camera to use this function Configure the settings for your NAS or MicroSD card in the NAS Settings or SD Card Settings menu respectively ...

Page 53: ...ull Enable or disable email notifications when your storage space is full Cycle Recording Enable or disable cycle recording When enabled cycle recording will overwrite the earliest recordings when the storage space becomes full When disabled recording will stop when storage is full Authentication Select Account and enter the username and password in the fields below if your NAS server requires aut...

Page 54: ...is not enough Enable or disable email notifications when your storage space is full Cycle Recording Enable or disable cycle recording When enabled cycle recording will overwrite the earliest recordings when the storage space becomes full When disabled recording will stop when storage is full Format SD Card Click to format your MicroSD card This will erase all data on your MicroSD card Unmount Clic...

Page 55: ... date and time of the JPEG Back Go back to the previous page in the file browser First Page Go back to the first page in the file browser Previous Page Go back to the previous page in the file browser Next Page Go to the next page in the file browser Last Page Go to the last page in the file browser Select All Select all files or folders visible in the file browser Select None Deselect all selecte...

Page 56: ...nt from the camera Folder Location Displays the folder location where recordings will be saved in your account Cycle Recording Enable or disable cycle recording When enabled cycle recording will overwrite the earliest recordings when the storage space becomes full or at the specified number of days below When disabled recording will stop when storage is full Cycle Recording Notification Enable or ...

Page 57: ... reference identification purposes This is especially useful when managing multiple network cameras Administrator Password Enter your desired administrator password here This is the password used to log into the camera with the admin account The default password is 1234 Confirm Password Confirm your desired administrator password here LED Indication Select On or Off to switch the network camera s ...

Page 58: ...ocate the firmware file on your computer Upgrade Firmware Click to upgrade the firmware to your selected file Backup Settings Click Apply to save the current settings on your computer as config bin file Restore Settings Click Browse to find a previously saved config bin file and then click Upload to replace your current settings Restart Click Restart Network Camera to restart the network camera Pl...

Page 59: ...resets Keep Network Settings will reset all settings but keep the current network settings The network camera s IP address will remain the same Default Settings will reset all of the camera s settings including network settings back to the factory default status ...

Page 60: ...58 IV 5 3 Cloud Service Edimax Plug View is a function to allow you to view your network camera remotely via a cloud server see V Myedimax com You can enable or disable this feature here ...

Page 61: ...he network camera This information is useful for troubleshooting purposes or for network configuration IV 6 1 System Information A summary of system wide information about the network camera is displayed on this page displayed under four categories System LAN and IGD UPnP Port Forward ...

Page 62: ...el of detail for the log from the dropdown list from 0 4 0 minimum will only log critical information while 4 maximum will log everything Remote Log Enable or disable the network camera s remote log function to send the log to a remote server for archiving The network camera supports syslog log servers Remote Log Server Enter the IP address or host name of the log server you wish to use ...

Page 63: ...D The cloud ID is displayed in EdiView Finder see II 2 EdiView Finder and on the product label on the back of the network camera see I 4 Product Label The cloud ID is a string of 12 characters consisting of numbers 0 9 and letters A F which is unique to your network camera 2 Enter cloudID myedimax com into the URL bar of a web browser For example if your cloud ID is 001109010204 then enter 0011090...

Page 64: ...ther security warnings prompts appear please select Run or Allow or similar depending on your browser 4 Enter your camera s password default password 1234 and click OK to see a live stream from your network camera ...

Page 65: ...ork camera click to show the configuration menu window 6 Use the slider controls to change the image brightness saturation sharpness video quality and pan tilt speed Use the dropdown lists to change the video resolution and operating language and click Apply when finished Functionality of myedimax com may vary according to version ...

Page 66: ...switch to login to your account You can enable cycle recording overwrite earlier recordings when data storage is full with push notifications and check the cloud status as well as enable or disable the cloud service function altogether 2 Are there any microSD SDHC cards recommended for the IC 6220DC IC 6230DC IC 5160GC IC 9110W IC 7113W IC 3140W b Minimum 8GB capacity is recommended with Class 10 ...

Page 67: ...rmatting your card removes all existing data and backup accordingly 5 My camera stopped recording to my microSD SDHC card a Go to SD Card Settings in the camera s user interface 1 Ensure there is enough space on your microSD SDHC card 2 Try using cycle recording to periodically overwrite old recordings b Alternatively you can try formatting your SD card Be aware that formatting your card removes a...

Page 68: ...old or licensed as is Should the programs prove defective following their purchase the buyer and not this company its distributor or its dealer assumes the entire cost of all necessary servicing repair and any incidental or consequential damages resulting from any defect in the software Edimax Technology Co Ltd reserves the right to revise this publication and to make changes from time to time in ...

Page 69: ... This equipment complies with FCC radiation exposure limits set forth for an uncontrolled environment This equipment should be installed and operated with minimum distance 20cm between the radiator your body For product available in the USA Canada market only channel 1 11 can be operated Selection of other channels is not possible This device and its antenna s must not be co located or operating i...

Page 70: ... 53 EU 2014 35 EU Deutsch Dieses Gerät erfüllt die Voraussetzungen gemäß den Richtlinien 2014 53 EU 2014 35 EU Español El presente equipo cumple los requisitos esenciales de la Directiva 2014 53 EU 2014 35 EU Italiano Questo apparecchio è conforme ai requisiti essenziali e alle altre disposizioni applicabili della Direttiva 2014 53 EU 2014 35 UE Nederlands Dit apparaat voldoet aan de essentiële ei...

Page 71: ...2014 53 EU Spectrum EN 300 328 V2 1 1 2016 11 EMC Draft EN 301 489 1 V2 2 0 2017 03 Draft EN 301 489 17 V3 2 0 2017 03 EMF EN 62311 2008 Safety LVD IEC 62368 1 2014 2nd Edition and or EN 62368 1 2014 A11 2017 Date of Signature Nov 2020 Signature Printed Name Albert Chang Title Director Edimax Technology Co Ltd Edimax Technology Europe B V Fijenhof 2 5652 AE Eindhoven The Netherlands a company of E...

Page 72: ...oftware or if you modify it For example if you distribute copies of such a program whether gratis or for a fee you must give the recipients all the rights that you have You must make sure that they too receive or can get the source code And you must show them these terms so they know their rights We protect your rights with two steps 1 copyright the software and 2 offer you this license which give...

Page 73: ... work based on it under Section 2 in object code or executable form under the terms of Sections 1 and 2 above provided that you also do one of the following a Accompany it with the complete corresponding machine readable source code which must be distributed under the terms of Sections 1 and 2 above on a medium customarily used for software interchange or b Accompany it with a written offer valid ...

Page 74: ...ibution limitation excluding those countries so that distribution is permitted only in or among countries not thus excluded In such case this License incorporates the limitation as if written in the body of this License 9 The Free Software Foundation may publish revised and or new versions of the General Public License from time to time Such new versions will be similar in spirit to the present ve...

Reviews: