background image

6400LF Converged Network Appliance Installation Guide 


30 

Administration 


You can configure the 6400LF EdgeMarc and 6400LF EdgeProtect appliances using a simple web-
based user interface. Configure the 6400LF EdgeView appliance using YaST, a pre-installed, 
LINUX-based system management tool. 

Configuring the 6400LF EdgeMarc and 6400LF EdgeProtect 

You can configure the 6400LF EdgeMarc and 6400LF EdgeProtect appliance using a web 
browser such as Internet Explorer or Netscape Navigator. The 6400LF is shipped with the pre-
configured IP address 192.168.1.1 for the LAN port (LAN port 1).  

Requirement: 

To connect a PC directly to the appliance, you must use an ethernet  

                         crossover cable. 

To connect to the 6400LF EdgeMarc and 6400LF EdgeProtect, follow these steps: 

1.  Assign static IP address 192.168.1.2 with subnet 255.255.255.0 to a PC 

2.  Connect the PC to LAN port 2 (also labeled as NIC2) of the 6400LF using the ethernet 

crossover cable 

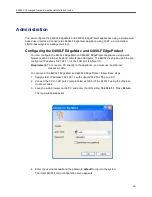
3.  Launch a web browser on the PC and enter the URL string: 

192.168.1.1

. Press 

Return


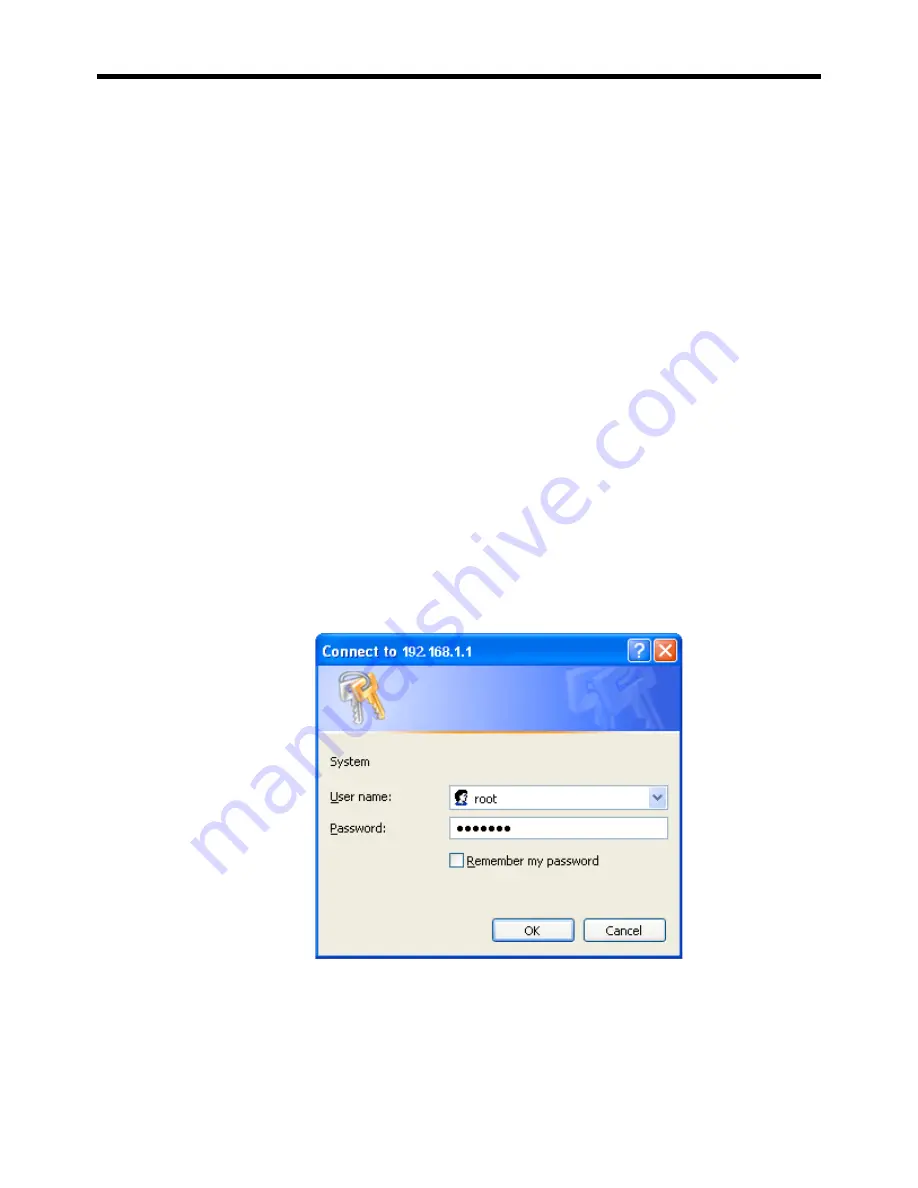
The login window appears 


4.  Enter the username 

root

 and the password 

default

 to log into the system 

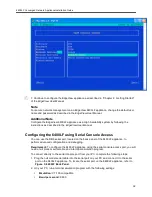
The initial 6400LF main configuration menu appears 

Summary of Contents for EdgeMarc 6400LF

Page 1: ...EdgeMarc 6400LF EdgeView 6400LF EdgeProtect 6400LF Hardware Installation Guide Version 1 0 ...

Page 2: ... local telecommunications company The equipment must also be installed using an acceptable method of connection The customer should be aware that compliance with the above conditions may not prevent degradation of service in some situations Repairs to certified equipment should be coordinated by a representative designated by the supplier Any repairs or alterations made by a user to this equipment...

Page 3: ... Panel 7 Back Panel 8 Getting Started 9 Physical Installation 9 Bracket Kit Installation Procedures 9 Install Chassis Handles 28 Connecting the Power and Cables 29 Administration 30 Configuring the 6400LF EdgeMarc and 6400LF EdgeProtect 30 Configuring the 6400LF EdgeView 31 Specifications 34 Warranty Information 35 Hardware Warranty 35 Certification 36 Safety 36 Emissions 36 Immunity 36 ...

Page 4: ... cautions indicate situations in which proper procedures must be followed to avoid the risk of data loss or equipment damage Warning Denoted with a lightening bolt symbol warnings indicate situations in which proper procedures must be followed to avoid the risk of bodily injury Chapter or Appendix Description Chapter 1 Overview Summary of the functional features of the 6400LF EdgeMarc EdgeView and...

Page 5: ...s Inc 2895 Northwestern Parkway Santa Clara CA 95051 http www edgewaternetworks com Phone 1 408 351 7200 General Email info edgwaternetworks com Sales Email sales edgewaternetworks com Edgewater Networks Inc Technical Assistance Center Phone 1 408 351 7200 ext 2 Support Email support edgewaternetworks com ...

Page 6: ...ero suppression Response to Inband Loop codes Manual payload loop through the GUI External transmit clock input and receive clock output headers Timing internal or external loop times from the network Provides long haul CSU or short haul DSU signaling Meets FCC part 68 protection requirements Security A stateful packet inspection firewall is used in combination with a voice over IP VoIP applicatio...

Page 7: ...tching to PSTN gateways during WAN link failures SIP only QoS Class based queuing prioritization Diffserv marking and policing Traffic shaping VoIP call admission control prevents oversubscription of priority queue Security Stateful packet inspection firewall VoIP aware firewall dynamically provisioning and closing of UDP ports used for VoIP calls IPSec 3DES SHA 1 NAT PAT server that hides enterpr...

Page 8: ... critical voice video and data infrastructure components In either service provider or enterprise environments the EdgeProtect 6400LF is usually installed at the edge of the operations center to secure critical voice video and data infrastructure components such as VoIP softswitches video gatekeepers gateways and media servers Resolves firewall traversal problems at the Network Operations Center f...

Page 9: ...me Description A Storage Area 1 Slimline drive bay B Storage Area 2 Optional 6 th hard disk drive or tape drive bay C System Control Panel See Figure 2 6400LF System Panel for more details D Storage Area 3 1 Hard disk drive bay or optional floppy drive bay E Storage Area 4 1 Hard disk drive bays x5 ...

Page 10: ...ystems The system ID LED will blink when the System ID button on the control panel is pressed or it can be illuminated remotely through server management software B NIC 2 Activity LED H System Identification Button C NIC 1 Activity LED I System Reset Button D Power Sleep LED J USB 2 0 Connector E Hard Drive Activity LED K Recessed NMI Button Tool Required Pressing the recessed button with a paper ...

Page 11: ...l panel having priority over the rear video This provides for easy front accessibility to the server Back Panel Figure 3 6400LF Back Panel Description Description A Low Profile PCI Add in Card Slots H NIC 2 Connector B Management NIC I DB9 Serial A Port Cut out C Full Height PCI Add in Slots J Video Connector D Power Supply Modules 1 1 Configuration Shown K USB 1 Connector E PS2 Keyboard and Mouse...

Page 12: ...re that the installation site has adequate air circulation and meets the minimum operating conditions for the system as specified in Specifications section of this document Bracket Kit Installation Procedures This bracket kit allows you to install 6400LF platform in most four post rack and cabinet systems Required Tools Cross Phillips screwdriver Kit Contents Chassis brackets qty 2 Rear brackets q...

Page 13: ...ed Network Appliance Installation Guide 10 A Screw 10 32 x inch qty 8 B Screw hex head qty 6 C Screw 10 32 x 7 8 inch qty 2 D Handle spacers qty 2 E Nut bar qty 4 F Chassis disks qty 2 Figure 4 Fastener Pack Contents ...

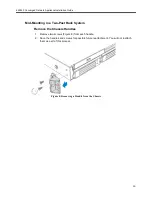
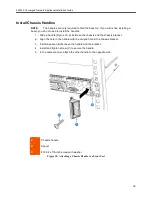
Page 14: ...e Installation Guide 11 Mounting in a Four Post Rack System Remove the Chassis Handles 1 Remove two screws Figure 2 from each handle 2 Set the handles and screws aside for reattachment later Figure 1 Removing a Handle from the Chassis ...

Page 15: ...e tabs C on the chassis and place the bracket against the chassis 3 Slide the bracket as far as it will go toward the front of the chassis 4 Fasten the bracket to the chassis using screw D 5 In the same manner attach a chassis bracket to the other side of the chassis A Chassis bracket in front mount position B Bracket holes C Chassis tabs D Hex head screw Figure 2 Installing a Chassis Bracket in t...

Page 16: ...assis 1 Place a chassis disk at the side of the chassis towards the rear see Figure 4 A 2 Install screw B and tighten 3 In the same manner attach a chassis disk to the opposite side of the chassis A Chassis disk B Hex head screw Figure 3 Attaching a Chassis Disk to the Chassis ...

Page 17: ...Do not completely tighten the screws leave them loose enough to allow insertion of the brackets in step 2 2 Insert the slotted foot of a rear bracket B between each nut bar and post 3 Align the face of the bracket foot with the edge of the rack post and firmly tighten the screws A 10 32 x inch screw B Nut bar C Rear Bracket Figure 4 Attaching a Rear Bracket to a Rear Post ...

Page 18: ... weighs approximately 13 9 kg 30 6 lbs and a fully loaded SR2400 server weighs approximately 23 4 kg 51 5 lbs 5 With the chassis front facing you lift the chassis and position the chassis disks Figure 6 A so they fit in the rear brackets B A Chassis disk B Rear bracket Figure 5 Installing the Chassis in the Rear Brackets 6 Slide the chassis toward the rear of the rack until the front of the chassi...

Page 19: ...6400LF Converged Network Appliance Installation Guide 16 A Chassis bracket B Front post C 10 32 x inch screw D Nut bar Figure 6 Attaching a Front Bracket to a Front Post ...

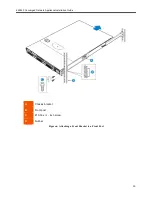
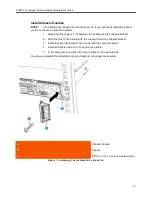
Page 20: ... chassis bracket 2 Align the hole in the handle with the unused hole in the chassis bracket 3 Install a spacer B between the handle and the chassis bracket 4 Install and tighten screw C to secure the handle 5 In the same manner attach the other handle to the opposite side You have completed the installation of your chassis in a four post rack system A Chassis handle B Spacer C 10 32 x 7 8 inch scr...

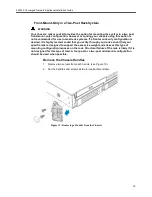
Page 21: ...ounting in a Two Post Rack System Remove the Chassis Handles 1 Remove two screws Figure 8 from each handle 2 Save the handles and screws for possible future reattachment You will not reattach them as part of this process Figure 8 Removing a Handle from the Chassis ...

Page 22: ...ith the tabs C on the chassis and place the bracket against the chassis 3 Slide the bracket as far as it will go toward the front of the chassis 4 Fasten the bracket to the chassis using screw D 5 In the same manner attach a bracket to the other side of the chassis A Chassis bracket in mid mount position B Bracket holes C Chassis tabs D Hex head screw Figure 9 Installing a Chassis Bracket in the M...

Page 23: ...the front side of the center post C 2 Attach the L bracket to the center post using the screws B supplied with your rack Do not fully tighten at this time 3 In the same manner attach an L bracket to the other center post A L bracket B Screw C Front side of typical right center post Figure 10 Attaching an L Bracket to a Center Post ...

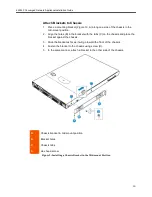
Page 24: ...sis so that the L brackets Figure 12 A are inserted into the chassis mounting brackets B 3 While supporting the weight of the chassis adjust the L brackets to fit tightly into the chassis brackets C Figure 11 L Brackets Inserted into Chassis Mounting Brackets Front View 1 Slide the chassis toward the front of the rack until the front of the chassis mounting brackets contact the rear of the center ...

Page 25: ...6400LF Converged Network Appliance Installation Guide 22 A Chassis bracket in mid mount position B L bracket C Screw Figure 12 Installing the Chassis in the Rack ...

Page 26: ...is desired it is highly recommended that you verify through your rack vendor that your specific rack is designed to support the excessive weight and stresses this type of mounting configuration imposes on the rack Structural failure of the rack is likely if it is not designed for this type of load A four post or a two post mid mount configuration should be used when possible Remove the Chassis Han...

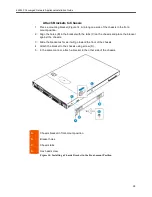
Page 27: ...h the tabs C on the chassis and place the bracket against the chassis 3 Slide the bracket as far as it will go toward the front of the chassis 4 Attach the bracket to the chassis using screw D 5 In the same manner attach a bracket to the other side of the chassis A Chassis bracket in front mount position B Bracket holes C Chassis tabs D Hex head screw Figure 14 Installing a Chassis Bracket in the ...

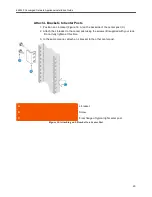
Page 28: ...the backside of the center post C 2 Attach the L bracket to the center post using the screws B supplied with your rack Do not fully tighten at this time 3 In the same manner attach an L bracket to the other center post A L bracket B Screw C Front flange of typical right center post Figure 15 Attaching an L Bracket to a Center Post ...

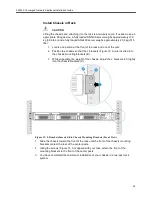
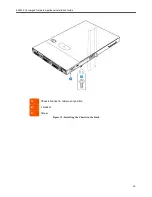
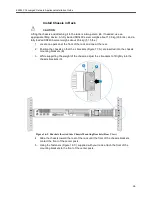
Page 29: ...k and one at the rear 2 Position the chassis so that the L brackets Figure 17 A are inserted into the chassis mounting brackets B 3 While supporting the weight of the chassis adjust the L brackets to fit tightly into the chassis brackets C Figure 16 L Brackets Inserted into Chassis Mounting Brackets Rear View 4 Slide the chassis toward the rear of the rack until the front of the chassis brackets c...

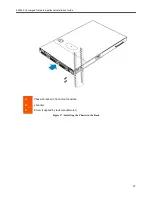
Page 30: ...6400LF Converged Network Appliance Installation Guide 27 A Chassis bracket in front mount position B L bracket C Screw supplied by rack manufacturer Figure 17 Installing the Chassis in the Rack ...

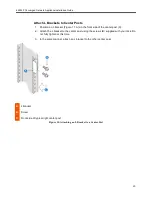
Page 31: ...handle Figure 19 A between the chassis and the chassis bracket 2 Align the hole in the handle with the unused hole in the chassis bracket 3 Install a spacer B between the handle and the bracket 4 Install and tighten screw C to secure the handle 5 In the same manner attach the other handle to the opposite side A Chassis handle B Spacer C 10 32 x 7 8 inch screw with washer Figure 18 Attaching a Chas...

Page 32: ...m the power adapter to the Power Connector on the 6400LF Sometimes a little force is necessary to get the plug properly positioned Caution Secure the power adapter using a fastener or tie wrap to nearby shelf so that it does not hang from the power connector If connecting to the WAN using the T1 then connect the T1 cable to the T1 E1 port and the other end of the cable to the T1 line Enable the T1...

Page 33: ...tor The 6400LF is shipped with the pre configured IP address 192 168 1 1 for the LAN port LAN port 1 Requirement To connect a PC directly to the appliance you must use an ethernet crossover cable To connect to the 6400LF EdgeMarc and 6400LF EdgeProtect follow these steps 1 Assign static IP address 192 168 1 2 with subnet 255 255 255 0 to a PC 2 Connect the PC to LAN port 2 also labeled as NIC2 of ...

Page 34: ...terface of the EdgeView appliance To connect to the 6400LF Edgeview appliance follow these steps 1 Connect a PC with a cross over Ethernet cable to Port 1 of the EdgeView chassis 2 Since Port 1 is 192 168 1 1 configure your PC to have the IP address of 192 168 1 2 subnet mask of 255 255 255 0 and default gateway of 192 168 1 1 3 Make sure you can ping 192 168 1 1 from your PC 4 Open your favorite ...

Page 35: ...nsole Access You can use the DB9 serial port located on the back panel of the 6400LF appliance to perform advanced configuration and debugging Requirement To configure the 6400LF appliance using the serial console access port you will need a null modem serial cable and a terminal emulation program To connect directly to the serial console port from your PC complete the following steps 1 Plug the n...

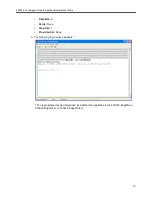
Page 36: ... Installation Guide 33 Data bits 8 Parity None Stop bits 1 Flow Control None 3 The following login screen appears The login prompt text is determined by whether the appliance is the 5300LF EdgeMarc 5300LF EdgeView or 5300LF EdgeProtect ...

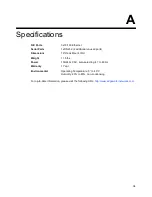
Page 37: ...nused ports Dimensions 19 Rack Mount 1RU Weight 11 5 lbs Power 100 240v VAC auto selecting 47 to 63 Hz Warranty 1 Year Environmental Operating Temperature 5 to 40 C Humidity 20 to 80 non condensing For up to date information please visit the following URL http www edgewaternetworks com ...

Page 38: ...conforming Hardware from Edgewater and return the nonconforming Hardware to Edgewater s designated repair facility freight prepaid with a statement describing the nonconformity Edgewater s exclusive obligations with respect to nonconforming Hardware shall be at Edgewater s option to advance replace such Hardware if it is determined to be defective or to refund to End user the purchase price paid f...

Page 39: ...36 C Certification RoHS Compliant WEEE Compliant Safety cUL CE Emissions FCC Part 15 Class A ICES 03 VCCI Class A MIC C tick Immunity CE ...

Page 40: ...Edgewater Networks Inc 2895 Northwestern Parkway Santa Clara CA 95051 Phone 408 351 7200 info edgewaternetworks com Converged Networking Simplified ...

Reviews: