background image

EdgeStore NAS400 User Manual

46

Within moments, the folders you specified are backed up onto the EdgeStore. 
The One Touch Backup function backs up all of the folders on your PC for which 
you created a backup schedule.

Viewing Your Backup Files

To view your backup files on the EdgeStore:
1.

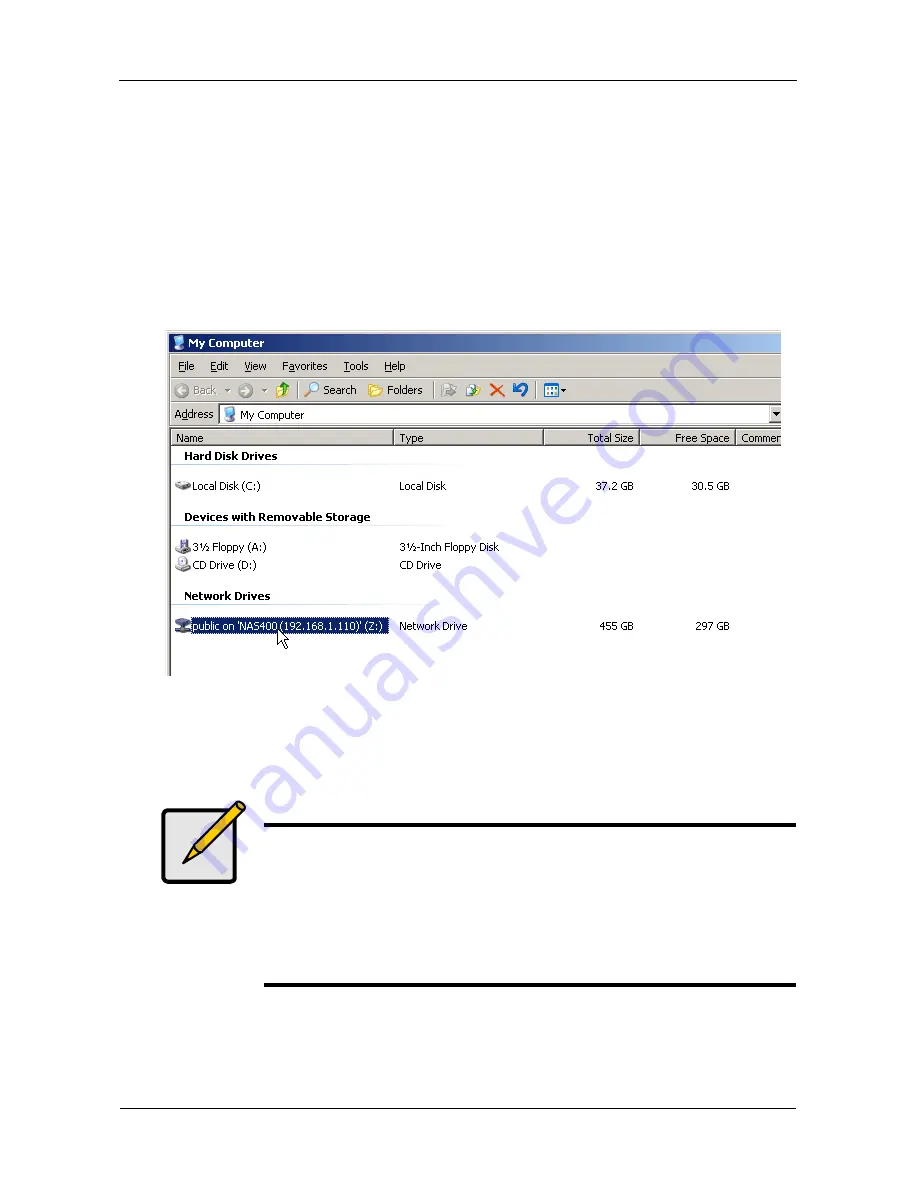
On the Windows PC desktop, double-click the My Computer icon.

2.

Under Network Drives, double-click the EdgeStore.

3.

On the EdgeStore, find the BACKUP folder.
The BACKUP folder contains the results of the One Touch Backup from your 
PC. The subfolders inside the BACKUP folder match the file structure on 
your PC’s hard disk drive.

Note

The BACKUP folder takes its name from your account name. For 
example:

If your account name is “admin,” the folder name is 
BACKUP_admin.

If your account name is “Billy,” the folder name is 
BACKUP_Billy.

Summary of Contents for EDGESTORE NAS400

Page 1: ...EDGESTORE NAS400 User Manual Version 1 0...

Page 2: ...this publication and for damages whether direct indirect incidental consequential or otherwise that may result from such error including but not limited to loss of data or profits Edge10 provides thi...

Page 3: ...12 Setting up the EdgeStore 13 Connecting to EASM 17 Browser Support 17 Finding the EdgeStore s IP Address 17 EASM in your Browser 18 EASM in SmartSYNC 19 Shutting Down the EdgeStore 20 Chapter 3 Conn...

Page 4: ...cords 53 Performing a Backup 53 Viewing Your Backup Folders 54 Performing a Restore 55 Scheduling a Backup 56 Modifying a Backup Schedule 57 Deleting a Backup Schedule 57 Setting the Default Browser f...

Page 5: ...eting a Folder 76 Setting up Windows Sharing for a Folder 77 Setting up UNIX and Linux Sharing for a Folder 77 Setting up FTP Sharing for a Folder 78 Managing RAID Volumes 79 Viewing RAID Volume Statu...

Page 6: ...talling an Application Plug in 93 Enabling and Disabling the Buzzer 94 Viewing UPS Status 94 Setting up a UPS 95 Managing Services 96 Setting System Date and Time 96 Running the Network Time Protocol...

Page 7: ...RAID Volume 114 Responding to an Invalid RAID Volume 114 Checking File System Status in EASM 115 Rebuilding the File System 116 Checking the Event Log in EASM 116 Responding to Events 117 Checking Enc...

Page 8: ...Manual viii Appendix B Maintenance 143 Upgrading the Firmware 143 Rebooting the EdgeStore 144 Installing Application Plug ins 145 Connection Problems After Restart 146 Appendix C GNU General Public L...

Page 9: ...trator can manage access privileges for greater security Multiple backup and synchronization functions protect your data About This Manual This Product Manual describes how to setup use and maintain t...

Page 10: ...AFP protocol FTP clients through the FTP protocol DLNA clients through UPnP protocol with an optional plug in Up to 16 concurrent connections Key Benefits Easy to use browser based management interfac...

Page 11: ...tatus polled every 15 minutes Online capacity expansion RAID Level Migration Hot spare drives RAID Volume rebuilding Gigabyte rounding Background rebuilding RAID level support RAID 0 1 5 and 10 Large...

Page 12: ...osh Client OS Support Microsoft Windows Vista Business Enterprise and Ultimate Server 2003 XP Professional 2000 Supports Intel IA32 AMD64 and Intel EM64T platforms UNIX Linux Red Hat Enterprise Linux...

Page 13: ...g items EdgeStore NAS400 Unit Quick Start Guide Screws for disk drives 16 including 4 spares Ethernet cable 1 5m 4 9 ft Power cord CD with NAS Setup Wizard SmartSYNC software and Configuration Tool Pr...

Page 14: ...Rear View Disk Drive Drive Carrier Disk Activity LED Power Button Ethernet Activity LED One Touch Backup Button Disk Status LED Note This EdgeStore is shown without the front door System Status LED Po...

Page 15: ...rough the holes in the drive carrier and into the sides of the disk drive Install only the counter sink screws supplied with the EdgeStore Install four screws per drive Snug each screw Be careful not...

Page 16: ...eps one time Installing the Software When you install the software onto your Windows PC three new items are added to the Windows Start menu SmartWizard Sets up the EdgeStore SmartSYNC Connects your PC...

Page 17: ...Installation and Setup 9 The first installer screen appears 4 Click the Next button to begin installation The License Agreement screen appears 5 Click the I accept the terms option then click the Nex...

Page 18: ...screen appears 6 Type a user name and organization name into the respective fields or leave them unchanged to accept the default entries Click the Install option for Anyone who uses this computer all...

Page 19: ...nd Setup 11 The Ready to Install screen appears 7 Click the Install button to proceed with installation When the installation is finished the final installation screen appears 8 Click to Finish button...

Page 20: ...system configuration screen appears 2 From the Language dropdown menu choose the language you prefer 3 From the Scan Network Interface dropdown menu choose the IP address for the network where you in...

Page 21: ...oosing a language dropdown menu choose the language you prefer 3 Choose an Initiation Mode Click the Express Mode option if ALL of these conditions apply You have a DHCP server on your network with ad...

Page 22: ...address manually You want maximum capacity RAID 0 Volume You want to set date and time manually The rest of the setup instructions describe Express mode For setup instructions using Advanced mode see...

Page 23: ...rd field then click OK The password is case sensitive The Select a Device Name screen appears 7 Select a Device Name drive letter to represent the default folder on the EdgeStore as a network drive on...

Page 24: ...ther System Message appears 9 Click OK to finish the system initiation The Wizard creates a RAID Volume and a default folder called Public If two disk drives are installed in your EdgeStore the Wizard...

Page 25: ...ss the EdgeStore in your browser you must know the EdgeStore s IP address Use SmartSYNC for this purpose 1 From the Windows Start menu choose Programs then Edge10 NAS Utility and then SmartSYNC 2 To o...

Page 26: ...The IP address you type into your browser will be different EASM uses an HTTP connection http Enter the EdgeStore s IP address 192 168 1 110 Together your entry looks like this http 192 168 1 110 The...

Page 27: ...erver Information tab displayed 2 Click the Open GUI button right Your default browser starts and the EASM login screen displays 3 Type the user name and password in the respective fields then click t...

Page 28: ...nd hold the power button for five seconds See Figure 3 The system status LED turns red then goes dark To restart the EdgeStore press the power button again Figure 3 Press and hold the Power button for...

Page 29: ...ake the folder a network drive on your PC To use the EdgeStore as a print server you must connect the USB printer enable EdgeStore s print server and set up printing on your PC Setting up a Network Dr...

Page 30: ...See Finding the EdgeStore s IP Address on page 17 The EdgeStore appears in the search results list 4 Double click the EdgeStore to show the Public folder and any other folders you have created EdgeSt...

Page 31: ...folder you want and choose Map Network Drive from the dropdown menu The Map Network Drive dialog box appears 6 In the Map Network Drive dialog box choose a drive letter and click the Finish button 7...

Page 32: ...e EdgeStore from a UNIX or Linux PC you must configure the EdgeStore to communicate with UNIX and Linux On the Windows PC 1 Start EASM See EASM in your Browser on page 18 or EASM in SmartSYNC on page...

Page 33: ...x Linux box then click the OK button The UNIX Linux file sharing enables UNIX and Linux PCs to access folders on the EdgeStore In this case access is given for the PUBLIC folder 8 Click the Sharing Se...

Page 34: ...d during setup See page 13 If you created another volume or folder use their names 4 Change to the EdgeStore directory Type cd EdgeStore and press Enter You can now copy files to and from the folder o...

Page 35: ...are case sensitive Leave the Domain field blank The folder opens You can now copy files to and from the folder on the EdgeStore Setting up a Network Drive on a Macintosh PC Before you can access the...

Page 36: ...osh protocol enables Macintosh PCs to connect to EdgeStore 5 Click the File Sharing icon in the Tree 6 Click the Modify tab 7 Check the Macintosh box then click the OK button The Macintosh file sharin...

Page 37: ...shown below is only an example The IP address you type in the dialog box on your Macintosh will be different See Finding the EdgeStore s IP Address on page 17 Click the button to add this IP address...

Page 38: ...0 User Manual 30 Note that the EdgeStore NAS400 is identified by its server name 4 In the Select the volumes dialog box click the folder you want then click the OK button 5 In the Welcome screen click...

Page 39: ...tore Connecting a USB Printer to EdgeStore To connect a USB printer to the EdgeStore 1 Set up your printer according to the printer s Setup Guide or User Manual 2 Install the printer drivers onto your...

Page 40: ...lick the Printer Server tab 7 Click the Enable option button beside Printer Server 8 Click the OK button to save your settings Setting up Windows Printing To set up printing on a Windows PC 1 On the W...

Page 41: ...espective fields then click the OK button The default user name is admin The default password is admin The user name and password are case sensitive 5 Right click the usbptr1 icon folder and choose Co...

Page 42: ...then Printers and Faxes The Printers and Faxes screen appears The usbptr1 is the USB printer on the EdgeStore Setting up Linux Printing This procedure is for a RedHat Enterprise Linux 4 configuration...

Page 43: ...5 From the Select a queue type dropdown menu choose Network Windows SMB 6 Scroll the list and click the triangle icon beside EdgeStore Note that the EdgeStore NAS400 is identified by its server name U...

Page 44: ...en click the OK button The user name and password are case sensitive The Printer Model dialog box opens 8 From the dropdown menu choose the manufacturer of your printer From the model list highlight t...

Page 45: ...ces 2 Double click the Print Fax icon 3 Click the Setup Printers button 4 In the Printer List click the Add icon The Printer List displays a new panel 5 In the new panel from the popup menus choose Wi...

Page 46: ...min The default password is admin The user name and password are case sensitive The printer list displays a new panel 8 Highlight the USBPTR01 in the list USBPRT01 represents the USB printer connected...

Page 47: ...the EdgeStore If you have a USB memory stick attach it directly to one of the USB connections or use a USB cable whichever is more convenient The USB drive or memory stick appears as a folder called...

Page 48: ...emory Stick on page 83 Windows PC The USB drive appears as a folder on the EdgeStore when you create a network drive on a Windows PC Follow the procedure Setting up a Network Drive on a Windows PC on...

Page 49: ...Setting up a Network Drive on a UNIX or Linux PC on page 24 but choose the USBDISK folder instead of the PUBLIC folder Macintosh PC The USB drive appears as a folder on the EdgeStore when you create a...

Page 50: ...To disconnect a USB drive or memory stick from the EdgeStore 1 Be sure that no files on the USB drive or memory stick are still open 2 Unplug the USB drive or memory stick from the EdgeStore The EdgeS...

Page 51: ...SmartSYNC Enabling One Touch Backup To enable One Touch Backup on the EdgeStore 1 On the Windows PC start EASM See EASM in your Browser on page 18 or EASM in SmartSYNC on page 19 2 In the Tree click...

Page 52: ...e window verify the Destination The destination is a letter typically Z Y or X which represents a network drive on your PC and a specific folder on the EdgeStore 5 In the folder list click the icons t...

Page 53: ...se weekly choose the time of day and day of the week in the hour 24 hour clock minutes and day dropdown menus 10 Click the Finish button Your Backup Schedule appears in the Schedule tab Performing a O...

Page 54: ...C desktop double click the My Computer icon 2 Under Network Drives double click the EdgeStore 3 On the EdgeStore find the BACKUP folder The BACKUP folder contains the results of the One Touch Backup f...

Page 55: ...ch as Z Y or X 3 In the Folder List click the folders that contain the backup files you want to restore Caution The Restore function will overwrite files in the destination folder on your PC If the ba...

Page 56: ...estore location Original location The same folder on your PC from which the files were copied for the backup Select a restore location A folder on your PC that you specify 5 Click the Start button The...

Page 57: ...iewing the Event Log page 58 After installation the SmartSYNC utility starts automatically in the background on your Windows PC SmartSYNC does not run on UNIX Linux or Macintosh PCs Opening the SmartS...

Page 58: ...e following actions Log out of Windows then log in again From the Windows Start menu choose Programs then Edge10 NAS Utility and then SmartSYNC Displaying the EdgeStores on your Network To display a l...

Page 59: ...name and password in the respective fields then click the Login button The default user name is admin The default password is admin The user name and password are case sensitive For more information a...

Page 60: ...t then click the Connect Network Drive button right The Connect Network Drive dialog box appears 3 Choose the Device Name and Share Folder from the dropdown menus The Device Name list begins with Z an...

Page 61: ...kup copies folders from your PC to the EdgeStore Also see Chapter 4 One Touch Backup on page 43 To perform a backup of a selected folder 1 Open the SmartSYNC window 2 Highlight a server in the Server...

Page 62: ...settings When you are ready perform the backup click the Backup button right Viewing Your Backup Folders To view your backup folders on the EdgeStore 1 On the Windows desktop double click the My Compu...

Page 63: ...d 6 Optional If you chose a new Restore location click the Browse button right navigate to the destination you want highlight the destination folder then click the Open button to choose the folder 7 I...

Page 64: ...your PC 6 Click the folder you want to backup A checkmark appears beside the selected folder The backup will include the folder you select and all subfolders 7 Click the Next button 8 Choose a Schedul...

Page 65: ...You can change source folders time and day settings for a scheduled Backup To modify a Backup Schedule 1 Open the SmartSYNC window 2 Click the Schedule tab 3 In the Schedule list highlight the schedul...

Page 66: ...tab 3 From the Type menu choose the type of events you want to display All All events Info Information events only Error Error events only Clearing the Event Log To clear the Event Log 1 Open the Smar...

Page 67: ...vices page 70 Managing RAID Volumes page 79 Managing Backups page 84 Managing the Network Connection page 88 Making Management Settings page 91 Managing Services page 96 Connecting to EASM The Edge10...

Page 68: ...shown below is only an example The IP address you type into your browser will be different EASM uses an HTTP connection http Enter the EdgeStore s IP address 192 168 1 110 Together your entry looks l...

Page 69: ...artSYNC opens with the Server Information tab displayed 2 Click the Open GUI button right Your default browser starts and the EASM login screen displays 3 Type the user name and password in the respec...

Page 70: ...efer Navigating in EASM The Tree is the primary navigation tool in EASM Categories of functions listed with a sign before the icon Icons for specific functions are listed under the categories Click th...

Page 71: ...s a DCHP server with addresses available Configure using Specify an IP address Choose this option if you want to set the IP address and other network setting manually 5 If you chose the Configure usin...

Page 72: ...the field provided check the boxes of the services you expect to use with this folder then click the Add button Add more folders as required 16 Click the Next button to continue The Step 5 screen appe...

Page 73: ...e 68 Viewing a List of Users To view the list of Users 1 In the Tree click the beside the Users Groups icon 2 Click the User Management icon A list of users appears on the Information tab Creating a U...

Page 74: ...you want to change 5 Type a new password into the fields provided 6 Click the OK button Deleting a User You cannot delete the Administrator or the Guest To delete any other user 1 In the Tree click th...

Page 75: ...members to a group 1 In the Tree click the beside the Users Groups icon 2 Click the Group Management icon 3 Click the Group Members tab 4 From the dropdown menu choose a group to which you want to ad...

Page 76: ...Quota icon A list of users and groups and the following data appear on the screen Currently assigned quotas Free space Used space Setting Quotas Quotas are portions of storage space that you assign t...

Page 77: ...Quota type a number into the field provided This number represents how many MB of data the user or group can access 7 Click the OK button Note If you set different size quotas for the user and the gr...

Page 78: ...r a Folder page 78 Setting up Windows Access Follow this procedure to set up access from a Windows PC 1 In the Tree click the beside the File Print icon 2 Click the Protocol Control icon 3 Click the W...

Page 79: ...the EdgeStore on page 21 for information about the settings that you must make on your PC Setting up UNIX Linux Access Follow this procedure to set up access from a UNIX or Linux PC 1 In the Tree clic...

Page 80: ...ick the OK button to save your settings You can now access the folder you chose from a UNIX or Linux PC See Chapter 3 Connecting to the EdgeStore on page 21 for information about the settings that you...

Page 81: ...range is 1024 to 65535 Be sure the port numbers you enter are enabled on your firewall and server In active mode the FTP server uses port 20 for the data port 7 Optional If your FTP client uses doubl...

Page 82: ...lient on the network where the EdgeStore is connected and use the EdgeStore to play image audio and AV media You must install the optional DLNA plug in before you can make this setting and use the UPn...

Page 83: ...ders appears in the Information tab Modifying Folder Services Services enable different types of PCs to access your folders Use this function to add or remove a service for a specific folder To modify...

Page 84: ...m a Windows PC see Setting up Windows Sharing for a Folder on page 77 To access the new folder from a UNIX or Linux PC see Setting up UNIX and Linux Sharing for a Folder on page 77 To make the folder...

Page 85: ...ndows service is running for this folder See Setting up Windows Access on page 70 Setting up UNIX and Linux Sharing for a Folder UNIX and Linux sharing designates which UNIX and Linux PCs can access t...

Page 86: ...ree click the beside the File Print icon 2 Click the Sharing Setup icon 3 Click the FTP Sharing tab 4 From the Volume dropdown menu choose the RAID Volume containing the folder you want to modify 5 Fr...

Page 87: ...RAID File System icon 2 Click the RAID Management icon The RAID Status tab displays the current RAID system and its status RAID Name The name of your RAID automatically assigned when it was created RA...

Page 88: ...rnal USB Drive or Memory Stick on page 83 You must have unassigned disk drives in your EdgeStore to create a new RAID To create a new RAID Volume 1 In the Tree click the beside the RAID File System ic...

Page 89: ...ide the RAID File System icon 2 Click the RAID Management icon 3 Click the Modify tab 4 From the Current Volume dropdown menu choose the RAID Volume which you want to modify 5 In the Migrate to RAID L...

Page 90: ...me is deleted the EdgeStore reboots automatically When the EdgeStore is fully booted The System Status LED turns green right The buzzer beeps one time if the buzzer is enabled 7 Close your browser the...

Page 91: ...on page 21 for more information Formatting an External USB Drive or Memory Stick This option only appears when EdgeStore does not recognize the file system on the USB drive or memory stick To format...

Page 92: ...Snapshots displays on the Information tab Setting up a Snapshot Backup To setup a Snapshot Backup 1 In the Tree click the beside the Backup icon 2 Click the Snapshot Backup icon 3 Click the Setup tab...

Page 93: ...s from the dropdown menus 6 Click the OK button The new backup schedule is applied If you have not yet made your Snapshot settings click the Setup tab and make them now Recovering Snapshot Backups The...

Page 94: ...up Server The IP address of the other EdgeStore on the network Schedule Replication schedule in number of hours daily or weekly Appears on the primary server Setting up NAS Replication To set up NAS r...

Page 95: ...he week when the NAS Replications happen 7 Click the OK button Enabling One Touch Backup One Touch Backup is a feature that enables you to backup specified folders from your PC to the EdgeStore by pre...

Page 96: ...on tab Computer Name IP Address Subnet Mask Default Gateway IP Address Primary Domain Name Server IP Address Secondary Domain Name Server IP Address To change these settings click the Setup tab Making...

Page 97: ...l area network that is larger than the standard 1518 byte size EdgeStore supports jumbo frames up to 9000 bytes On EdgeStore the frame size setting is called Maximum Transmission Unit MTU The default...

Page 98: ...r to obtain your domain name user name and password Follow this procedure to set up the DDNS service 1 In the Tree click the beside the Network icon 2 Click the Network Setup icon 3 Click the DDNS tab...

Page 99: ...ervices to enable PCs to access the folders on the EdgeStore and to work as a print server To view Service Status 1 In the Tree click the beside the Management icon 2 Click the Service Status icon The...

Page 100: ...ormation See your Network Administrator for help with these settings To set up SMTP authentication 1 In the Tree click the beside the Management icon 2 Click the Mail Alert icon 3 Click the Setup tab...

Page 101: ...l Alert recipient 1 In the Tree click the beside the Management icon 2 Click the Mail Alert icon 3 Click the Add tab 4 In the E Mail Address field type the recipient s email address 5 Click the OK but...

Page 102: ...agement icon 2 Click the Buzzer icon 3 Click the Disable option button 4 Click the OK button Click the Enable option button then click the OK button to enable the buzzer Viewing UPS Status If you have...

Page 103: ...the shutdown option you want Disable the EdgeStore will continue to run until the UPS battery is depleted Shutdown when the UPS reaches a set percentage of reserve power Shutdown when the UPS reaches...

Page 104: ...e In the Tree click the beside the System icon 2 Click the Date Time icon 3 Click the Setup tab 4 From the dropdown menus choose the time and date values 5 Click the OK button Running the Network Time...

Page 105: ...synchronization are displayed Last Synchronization Time Time and date of the last synchronization Last Synchronization Result OK means success Rebooting the EdgeStore Normally you will only need to r...

Page 106: ...ystem status LED turns red then goes dark right Restarting the EdgeStore To restart the EdgeStore after a shutdown press the power button on the front of the EdgeStore chassis right When the EdgeStore...

Page 107: ...re on page 143 CPU model MPC 8343 Network Adapter Gigabit Ethernet Network Flow Inflow and Outflow speeds in bits per second Viewing Enclosure Information To view enclosure information 1 In the Tree c...

Page 108: ...EdgeStore NAS400 User Manual 100...

Page 109: ...rform the setup procedure either in the NAS Setup Wizard or the EASM Setup Wizard The benefits of a RAID can include Higher data transfer rates for increased server performance Increased overall stora...

Page 110: ...cross multiple drives The RAID Volume s data capacity equals the capacity of the smallest disk drive times the number of disk drives For example one 100 GB and three 120 GB drives will form a 400 GB 4...

Page 111: ...ult Tolerance Moreover if a spare disk drive is present the spare drive will be used as the replacement drive and data will begin to be mirrored to it from the remaining good drive Figure 2 RAID 1 Mir...

Page 112: ...and web servers Figure 3 RAID 5 Stripes all drives with data and parity information The capacity of a RAID 5 Volume equals the smallest disk drive times the number of disk drives minus one Hence a RA...

Page 113: ...gether then striped over a second drive pair Figure 4 RAID 10 takes a data mirror on one drive pair and stripes it over two drive pairs The data capacity RAID 10 Volume equals the capacity of the smal...

Page 114: ...antages Implements a striped disk RAID Volume the data is broken down into blocks and each block is written to a separate disk drive I O performance is greatly improved by spreading the I O load acros...

Page 115: ...the failed drive in a RAID 0 Volume because of the way in which data is written to the disk drives under RAID 0 A spare drive is not available for a RAID 10 Volume because RAID 10 requires all four d...

Page 116: ...automatically using the spare drive For RAID 1 RAID 5 and RAID 10 Volumes without a spare drive the RAID Volume will begin to rebuild itself automatically when you remove the failed disk drive and ins...

Page 117: ...e the migration is running you can still access the folders on your RAID Volume and the data they contain The tables below shows the migration options for a source RAID Volume according to its RAID le...

Page 118: ...AID 5 A RAID 5 source Volume can migrate to the following target RAID levels RAID 10 A RAID 10 source Volume cannot migrate or add more disk drives Target Requirements RAID 0 Can use same number of di...

Page 119: ...pter deals problems you might encounter with your EdgeStore and how to resolve them Also see Frequently Asked Questions on page 127 Responding to an Audible Alarm The EdgeStore has two beep patterns S...

Page 120: ...or file system has failed If your EdgeStore is configured to work with a UPS it will continue to run after a power supply failure Checking Disk Status LEDs The disk status LEDs see Figure 1 report the...

Page 121: ...e carrier 5 Place the carrier with the new disk drive back into the open slot in the EdgeStore If the failed drive belonged to a RAID Volume the RAID Volume will begin rebuilding as soon as the new dr...

Page 122: ...113 RAID 0 Volumes go offline after a disk drive failure A RAID 0 Volume cannot be rebuilt All data on the Volume is lost Additional Details about Rebuilds The Rebuild takes several minutes depending...

Page 123: ...Recover tab click the option button beside the invalid RAID Volume 5 Click the OK button The EdgeStore will reboot itself to update its configuration and recognize the RAID Volume Checking File Syste...

Page 124: ...ide the RAID File System icon 2 Click the File System Management icon 3 In the File System Status tab click the RAID Volume Critical icon to display the Rebuild File System button 4 Click the Rebuild...

Page 125: ...s buzzer sounds for serious events that require your attention A list of event categories is shown below File System page 117 NAS Replication page 118 Snapshots page 118 System enclosure page 118 Disk...

Page 126: ...eplication is done Then try the second replication again NAS replication is failed There is a failed network connection between the two EdgeStores Correct the problem and try again See page 123 Snapsh...

Page 127: ...ss A LBA error Check the disk drives See page 112 Check the RAID Volume See page 113 Replace the disk drive or rebuild the RAID Volume as needed Task X disk error on disk Y at LBA address with status...

Page 128: ...ished Normal Migration or Rebuilding on array X aborted at Y RAID Volume Migration or Rebuild was aborted stopped by user action Migration or Rebuilding on array X aborted at Y because of error RAID V...

Page 129: ...See page 130 Resolving Connections with SmartSYNC The SmartSYNC utility is designed to detect the EdgeStore on your network If SmartSYNC does not detect your EdgeStore check the following items Be su...

Page 130: ...re is installed 1 Open SmartSYNC In the Windows application tray lower right corner of the screen double click the SmartSYNC icon 2 From the Option menu choose Scan Network Interface 3 In the dropdown...

Page 131: ...that you are using is operational Switches and hubs have LEDs that light when there is a connection and flash when there is activity Network service connections generally do not have LEDs to verify wh...

Page 132: ...in EASM See Changing the Administrator s Password on page 65 If you changed the password and then forgot the new password you can reset the EdgeStore to the default password admin Use a straightened p...

Page 133: ...the EdgeStore over your network Follow this procedure to add an exception for the EdgeStore 1 From the Windows Start menu choose Settings then Network Connections The Network Connections window opens...

Page 134: ...ption of service field type Edge10 NAS utility 9 In the Name or IP address field type the IP address of the EdgeStore See Finding the EdgeStore s IP Address on page 17 10 In the External Port field ty...

Page 135: ...P address may cause an IP address conflict on your network Check with your Network Administrator before taking this action If you cannot restore the previous IP address you must create new network dri...

Page 136: ...pports Unicode so you can use non ASCII characters in your folder names Windows 98 and ME do not support Unicode so they cannot display your folder names properly But you can still access your folders...

Page 137: ...NA Server tab under Protocol Control in EASM You must download and install the DLNA plug in on your EdgeStore to access this feature See Installing Application Plug ins on page 145 Can I move the disk...

Page 138: ...of the problem situation System configuration information including motherboard and CPU type hard drive model s SAS SATA ATA ATAPI drives devices and other controllers Technical Support Visit the Edg...

Page 139: ...ster or maintenance by anyone other than a Edge10 or a Edge10 authorized service center Disclaimer of other warranties This warranty covers only parts and labor and excludes coverage on software items...

Page 140: ...medy and regardless of whether Edge10 has been advised of the possibility of such damages Edge10 is not an insurer If you desire insurance against such damage you must obtain insurance from another pa...

Page 141: ...provide you with the necessary instructions You are responsible for the cost of insurance and shipment of the product to Edge10 Note that damage incurred due to improper transport or packaging is not...

Page 142: ...EdgeStore NAS400 User Manual 134...

Page 143: ...ck the Express Mode option if ALL of these conditions apply You have a DHCP server on your network with addresses available You want data protection for your disk array You want to use date and time s...

Page 144: ...g up the EdgeStore on page 13 4 Click Next to continue The Discovering Edge10 NAS screen appears 5 Highlight the EdgeStore you are initiating then click Next to continue The Login dialog box appears 6...

Page 145: ...A SmartWizard Advanced Mode 137 7 From the dropdown menus choose your Time Zone Year Month Date Time in hours 24 hour clock minutes and seconds Click Next to continue The Making Network Settings scree...

Page 146: ...ble or you prefer to make your own network settings choose this option Click Next to continue If you chose the automatic option the Protecting Your Data Screen appears Skip to Step 10 If you chose the...

Page 147: ...way Primary DNS Secondary DNS Click Next to continue The Protecting Your Data Screen appears Note See your Network Administrator for help in making these settings Edge10 suggests that you set the firs...

Page 148: ...ve your existing file system intact If you checked the Create new storage box choose one of the following options Data Protection Creates a fault tolerant RAID Volume on your EdgeStore If two disk dri...

Page 149: ...of the disk drives fails Click Next to continue The Assigning a Network Device Name screen appears 11 Select a Device Name or drive letter to represent the EdgeStore as a network drive The list begin...

Page 150: ...o disk drives are installed in your EdgeStore the Wizard creates a RAID 1 Volume If three or four disk drives are installed the Wizard creates a RAID 5 Volume The Public folder on the EdgeStore appear...

Page 151: ...terface 2 In the Tree click the beside the Management icon 3 Click the System Upgrade icon 4 From the Volume dropdown menu choose the Volume that has the folder with the firmware image file 5 From the...

Page 152: ...ck the beside the System icon 2 Click the Reboot Shutdown icon 3 Click the Reboot option 4 Click the OK button 5 In the confirmation box click the OK button The reboot runs automatically When the Edge...

Page 153: ...he EdgeStore Installing the Plug in File 1 Start the EASM interface 2 In the Tree click the beside the Management icon 3 Click the System Upgrade icon 4 From the Volume dropdown menu choose the Volume...

Page 154: ...s See Finding the EdgeStore s IP Address on page 21 If the EdgeStore s IP address has changed your previous network drives and printer connections will no longer work Here are two possible solutions Y...

Page 155: ...cense GPL for the exact terms and conditions of this license at www gnu org The GPL source code incorporated into the product is available for free download at our web site at www edge10 com Subject t...

Page 156: ...EdgeStore NAS400 User Manual 148...

Page 157: ...6 BACKUP folder 46 54 backup folder select 54 view 54 backup schedule create 44 delete 57 modify 57 backup server 86 backup software 4 Browser Path 12 browser support 4 17 browser default 58 buttons e...

Page 158: ...DNS name SMTP server 92 DNS server 63 88 89 139 domain controller 70 domain name AD domain 70 DDNS 90 drive letter 44 drive record delete 53 dynamic domain name server 90 E EASM connect to 59 connect...

Page 159: ...backup 47 finding EdgeStore s IP address 17 firewall Windows 125 firmware updating 143 folder add 64 76 delete 76 FTP sharing 78 folder cont names 128 protected 43 56 select for backup 44 54 services...

Page 160: ...sion unit MTU 89 media 75 media formats 75 memory stick format 128 formatting 83 view 83 migrate a RAID Volume 81 mirror RAID 103 106 mirror stripe RAID 105 107 modify folder services 75 My Network Pl...

Page 161: ...wall 127 plug ins installing 145 power button 121 power status 99 power connecting to 8 primary server 86 print server setup 32 74 printer name in Linux 35 printing Linux 34 Macintosh 37 Windows 32 pr...

Page 162: ...es enable 64 settings network 88 quota 68 setup FTP access 73 Linux printing 34 Macintosh access 72 setup cont Macintosh printing 37 NAS replication schedule 86 print server 32 print server access 74...

Page 163: ...43 UPnP protocol 74 145 UPS 112 setup 95 view 94 USB drive connect 39 disconnect 42 file formats 39 formatting 83 RAID Volume on 80 USB drive cont view 83 Windows shortcuts 128 USB printer connecting...

Page 164: ...EdgeStore NAS400 User Manual 156 W Windows AD domain 70 firewall issue 125 setup access 70 setup network drive 21 setup sharing 77 workgroup 71...

Reviews: