ECS GQ Notebook User Manual Download Page 22


T

T

h

h

e

e


R

R

e

e

a

a

r

r


S

S

i

i

d

d

e

e


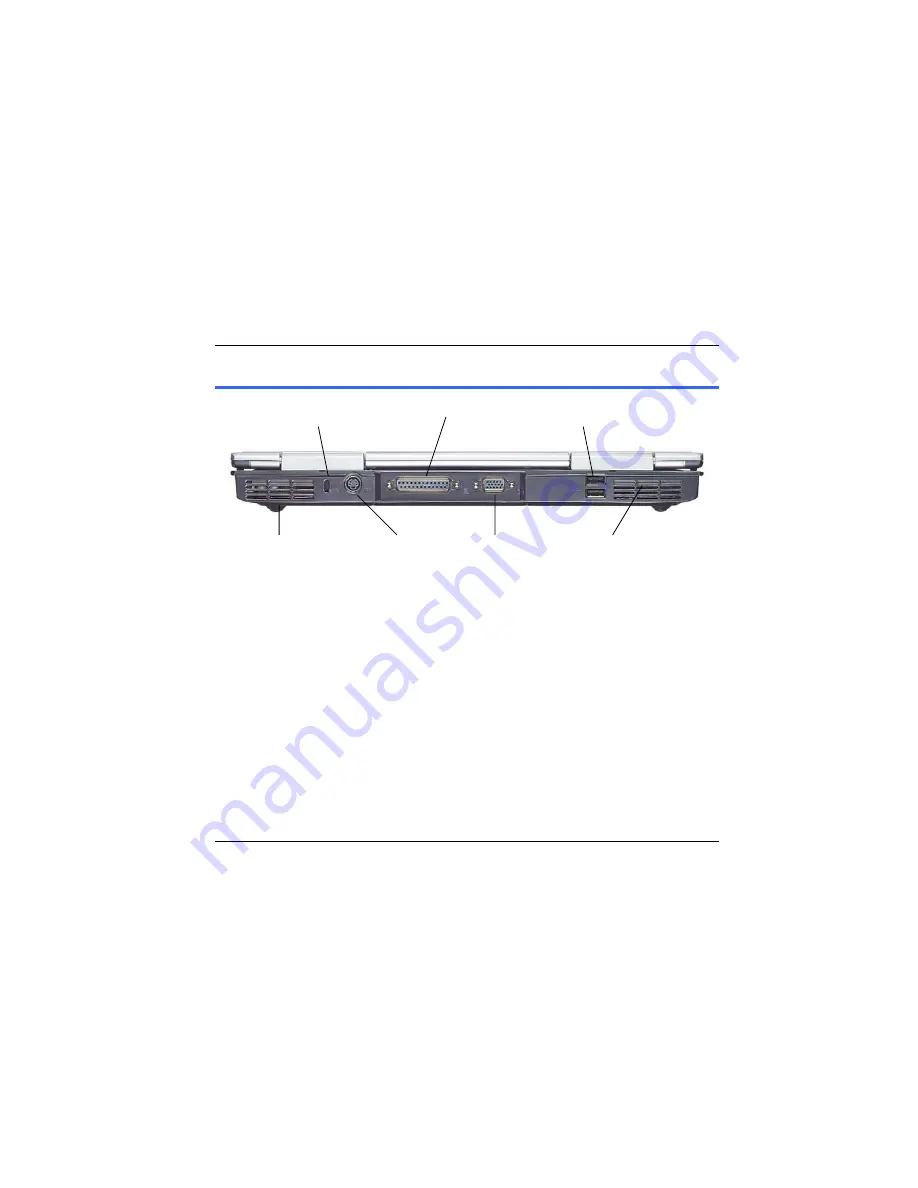
Kensington Lock                 Parallel Port                 USB Ports 

Ventilation Opening      TV Out Port       CRT Port           Ventilation Opening


Ventilation Opening 

Please don't block this opening during operation of the system. 

Kensington Lock 

Allows you to connect a special computer lock to secure your system. 
You can purchase a lock at most computer retailers. 

TV Out Port 

This 4-pin S-Video port allows you to view the Mobile PC's Video output on a television 
monitor. 

Parallel Port 

This port allows you to easily connect a parallel printer or plotter using this 25-pin bi-
directional female port. 

20 

Summary of Contents for GQ Notebook

Page 1: ...GQ Notebook U Us se er r s s G Gu ui id de e...

Page 2: ......

Page 3: ...t prior written permission of the manufacturer T Tr ra ad de em ma ar rk ks s CardSoft is a trademark of SystemSoft Corporation AutoCAD and Autoshade are trademarks of Autodesk Inc IBM OS 2 and VGA ar...

Page 4: ...ergy and if not installed and used in accordance with the instruction manual may cause harmful interference to radio communications However there is no guarantee that interference will not occur in a...

Page 5: ...the Canadian Interference Causing Equipment Regulations Cet appareil numerique de la classe B repecte toutes les exigences du R glement sur le mat riel brouilleur du Canada S Sa af fe et ty y P Pr re...

Page 6: ...ct the equipment from the main power outlet to avoid being damaged by transient overvoltage Never pour any liquid into the opening this could cause fire or electrical shock Never open the equipment Fo...

Page 7: ...uration for mating with a CEE22 EN6032 IEC 320 appliance inlet A For U S and Canada The cord set must be UL Listed and CSA Certified The minimum specifications for the flexible cord are No 18 AWG B Fo...

Page 8: ...e to report a gas leak in the vicinity of the leak 4 Use only the power cord indicated in this manual Do not use the AC adapter near open water or other liquids Never spill liquid into the AC adapter...

Page 9: ...of productive and pleasurable computing Use this section to keep notes about details of your purchase Update this section when you add new options Date of Purchase Dealer s Name Phone Address E Mail A...

Page 10: ......

Page 11: ...Chapter 1 I In nt tr ro od du uc ct ti io on n 9...

Page 12: ...ile PC when it s hot or cold outside try not to power up the computer immediately let the computer adjust to the room temperature gradually at least for three to four hours If your system arrives in c...

Page 13: ...M Mo ob bi il le e P PC C Congratulations on your purchase of the Mobile PC Your Mobile PC features the latest advances in portable computing technology The Mobile PC s modular design provides maximu...

Page 14: ...s turned off or in suspend mode before you close the display panel With the LCD screen open you will see several features important for operating your Mobile PC Internet Quick Launch Button E mail Qui...

Page 15: ...on Pressing this button for 4 6 seconds will also turn off the system System Status Indicator Panel The system status indicator panel keeps you informed of the computer s operating status Indicates th...

Page 16: ...low the TouchPad correspond to the left and right buttons on a standard mouse The PS 2 compatible mouse will work with the TouchPad simultaneously Internet Explorer Button Use this key to open the Int...

Page 17: ...de e LCD Cover Release Latch Slide this latch to the right to open the LCD cover LCD Cover Release Latch T Th he e L Le ef ft t S Si id de e USB Port Modem Port Headphone Jack Ventilation Opening LAN...

Page 18: ...nteference when transmitting The Modem Port This jack is an internal 56K voice fax data modem You will connect your computer to your phone line through this port Always disconnect all telephone lines...

Page 19: ...Headphone Jack You can plug an external speaker headphone or connect the line out jack to an audio device such as a cassette recorder to record the Mobile PC s audio output 17...

Page 20: ...Power On 1 2 3 1 2 3 Power On This indicator will lit when the Mobile PC is powered On Battery Charge This indicator will lit orange when the battery is in charging status The indicator will shut dow...

Page 21: ...T Th he e R Ri ig gh ht t S Si id de e DVD ROM DC IN Connector DVD ROM Your Mobile PC comes with a 8X DVD ROM DC IN Connector Plug the AC adapter into this connector 19...

Page 22: ...peration of the system Kensington Lock Allows you to connect a special computer lock to secure your system You can purchase a lock at most computer retailers TV Out Port This 4 pin S Video port allows...

Page 23: ...nnector USB Ports Your computer includes two Universal Serial Bus USB port USB is the latest development in Plug and Play technology It will eventually replace the need for separate connectors for ext...

Page 24: ...artment Expansion Compartment This compartment will serve as an expansion to upgrade your RAM module Battery Release Latch Lift up this latch to release the battery from its bay Hard Disk Drive Your c...

Page 25: ...Battery Compartment Your Mobile PC comes equipped with a factory installed battery pack module After the battery runs down the module can be removed and replaced with a charged battery 23...

Page 26: ...Chapter 2 G Ge et tt ti in ng g S St ta ar rt te ed d 24...

Page 27: ...r requires a three hole grounded AC outlet To connect the computer to an external power source Plug the AC adapter s connector into the DC IN connector on the rear of the computer 1 1 2 2 Connect the...

Page 28: ...C Turn on your Mobile PC by pressing the power button Hold the button down for a second or two and release The Power On Self Test POST runs automatically After the POST is completed the computer reads...

Page 29: ...e the computer for approximately 1 5 hours under the following conditions The removable battery pack initially has a full charge No peripheral devices are installed The disk CD ROM drives run no more...

Page 30: ...when you unpack it If not inserted follow these directions Turn over the Mobile PC with the front of the unit facing you and place it on a solid flat surface 1 1 2 2 Angle the battery into the bay Th...

Page 31: ...nel and turn it over and place it on a solid flat surface 3 Lift the release latch to release the battery from the bay At this time the battery will now be angled slightly out of the bay 4 Hold the re...

Page 32: ...te er ry y P Pa ac ck k The installed removable battery pack charges automatically any time the computer is connected to the AC adapter and an external power source It is a good idea to occasionally...

Page 33: ...Chapter 3 U Us si in ng g t th he e M Mo ob bi il le e P PC C 31...

Page 34: ...ease pay attention to the following precautions When you are not using the computer keep the LCD screen closed to protect it from dust If you need to clean your LCD screen use a soft tissue to gently...

Page 35: ...supports Windows by incorporating the two Windows specific keys With the two Windows keys you will be able to access and take advantage of many of the timesaving features of Windows software The func...

Page 36: ...numeric keypad while keeping the keypad on an external keyboard activated use the Fn NumLk hot key on the Mobile PC keyboard T Th he e M Mo ob bi il le e P PC C s s H Ho ot t K Ke ey y C Co on nt tr...

Page 37: ...key combination toggles the display between the LCD CRT simultaneous LCD CRT T Th he e T To ou uc ch hP Pa ad d The touchpad is a rectangular electronic panel located just below your keyboard You can...

Page 38: ...ote of the following precautions Make sure the TouchPad does not come into contact with dirt liquids or grease Do not touch the TouchPad if your fingers are dirty Do not rest heavy objects on the Touc...

Page 39: ...emovable allowing for easy upgrades D DV VD D R RO OM M F Fe ea at tu ur re es s o of f t th he e D DV VD D R RO OM M M Mo od du ul le e The features of the CD ROM DVD ROM Combo drive are listed below...

Page 40: ...out 1 1 2 2 3 3 1 1 2 2 3 3 Carefully lift the CD ROM DVD ROM Combo by the edges and make sure the shiny surface is face down the side with no writing on it Carefully insert the CD ROM onto the tray P...

Page 41: ...le located on the right side of the front panel The CD disk tray should eject immediately This procedure can also be used to remove a CD from the drive when the Mobile PC is powered off R Re em mo ov...

Page 42: ...rging the battery takes about 3 5 hours to charge for 8 cell when the system is in off state If possible always charge the battery completely N N NO O OT T TE E E When in the the Batterymode Windows c...

Page 43: ...ry y P Pa ac ck k C Ch ha ar rg gi in ng g F Fu un nc ct ti io on n You can automatically charge the removable battery pack by using the AC Adapter The charge time is about two hours when the Mobile...

Page 44: ...e setting for the system to enter the stand by mode whether you are operating the system by battery or AC power source System Stand by Hibernates Under this item you are also allowed to set the time s...

Page 45: ...item you are allowed to set the time setting for the system to enter the stand by mode whether you are operating the system by battery or AC power source Turn off monitor hard disks Under this item y...

Page 46: ...Management icon to display the Power Management Properties as shown on the right screen Power Scheme In setting your power options click on the Power Scheme tab to select the power scheme most approp...

Page 47: ...nd will prompt you to save your work and turn off the computer or connect the AC adapter The message is You should change your battery or switch to outlet power immediately to keep from losing your wo...

Page 48: ...4 Operates automatically in the background 46...

Page 49: ...el that is accessible via the control panel window The Windows XP Power Scheme tab gives the user access to the same performance on demand control that you ve come to expect from AMD PowerNow Technolo...

Page 50: ...this tab the user has access to the control of AMD PowerNow Technology Wth the proper settings a user can extend battery life without the worry of whether or not the most performance possible is bein...

Page 51: ...ry y f fo or r t th he e R Re ea al l T Ti im me e C Cl lo oc ck k There is a small built in battery pack that supplies power to the system in order to maintain certain system information while the p...

Page 52: ...r hardware or software problems which lock up the Mobile PC If this key combination does not shut down the Mobile PC you can reset the Mobile PC by using the Mobile PC s power button Should the Mobile...

Page 53: ...Chapter 4 M Mo ob bi il le e P PC C O Op pe er ra at ti io on n 51...

Page 54: ...al stereo speakers a microphone and input audio ports for external audio units An external microphone can be connected to the microphone jack External speakers or headphones can be connected to the Mo...

Page 55: ...ur system allows you to record sounds and store them as files using the microphone via the microphone jack on the rear of the Mobile PC Check the Windows Help and Support Center in Windows for informa...

Page 56: ...l D De ev vi ic ce es s To expand your computing capabilities you can add a variety of external devices to your computer You may for example want to add a mouse modem or a printer Connect peripheral...

Page 57: ...55...

Page 58: ...Chapter 5 R Ru un nn ni in ng g B BI IO OS S S Se et tu up p 56...

Page 59: ...sible If you accidentally make a setting and don t know which one to switch back to the Setup program has a hot key that allows you to return to the previous value A Ac cc ce es ss si in ng g t th he...

Page 60: ...e L Le eg ge en nd d B Ba ar r At the bottom of the Setup screen you will notice a legend bar The keys in the legend bar allow you to navigate through the various setup menus The following table lists...

Page 61: ...lp p In addition to the Item Specific Help window the BIOS Setup program also provides a General Help screen can be called up from any menu by simply pressing F1 or the Alt H combination Use the up an...

Page 62: ...the following screen appears D Da at te e T Ti im me e The current values for each category are displayed Enter new values through the keyboard P Pr ri i M Ma as st te er r S Se ec c M Ma as st te er...

Page 63: ...een appears C CP PU U D DR RA AM M B Ba as se e F Fr re eq qu ue en nc cy y Set this option to select the CPU DRAM base frequency for your system The settings are 100 100MHz or 100 133 MHz Q Qu ui ic...

Page 64: ...ROM and USB FDD default value 3 3r rd d B Bo oo ot t D De ev vi ic ce e This option sets the type of device for the third boot drives that the AMIBOOS attempts to boot from after AMIBIOS POST complet...

Page 65: ...em memory is over128 MB The settings are Enabled default value or Disabled G Gr ra ap ph hi ic c W Wi in n S Si iz ze e This field shows the graphic win size available The settings are 32M 64M default...

Page 66: ...lect keyboard language The settings are Standard default value or Brazil PT P Pr ri im ma ar ry y G Gr ra ap ph hi ic cs s A Ad da ap pt te er r This is only a display only item and cannot be altered...

Page 67: ...er ri ip ph he er ra al l S Se et tu up p T TV V D Di is sp pl la ay y T Ty yp pe e This field allows you to choose the television display option when using the TV out port The settings are PAL NTSC d...

Page 68: ...7 78 8h h 2 27 78 8h h o or r 3 3B BC Ch h P Pa ar ra al ll le el l P Po or rt t M Mo od de e This option specifies the parallel port mode T Th he e s se et tt ti in ng gs s a ar re e N No or rm ma al...

Page 69: ...t ti in ng gs s The optimal default settings are best case values that should optimize system performance To set the configuration highlight this field and press the Enter key The following dialog box...

Page 70: ...Quit without saving Y N 68...

Page 71: ...Chapter 6 T Th he e S So of ft tw wa ar re e U Ut ti il li it ti ie es s D Di is sk ks s 69...

Page 72: ...e Manual Installation for a more detailed explanation I In ns st ta al ll li in ng g V VG GA A D Di is sp pl la ay y D Dr ri iv ve er rs s f fo or r W Wi in n9 98 8 2 2K K M ME E X XP P Insert the CD...

Page 73: ...izard Follow the Wizard s on screen instructions to complete the installation Restart the system I In nt ta al ll li in ng g t th he e A Au ud di io o D Dr ri iv ve er r f fo or r W Wi in n9 98 8S SE...

Page 74: ...tility Touchpad 98 ME Setup exe for Win98SE ME or D Utility Touchpad 2K XP Setup exe for Win2K XP If D is not your CD ROM drive substitute D with the correct drive letter Click on Setup to begin the I...

Page 75: ...E E M Me e 2 2K K 1 1 2 2 3 3 4 4 Insert the CD ROM Driver into your CD ROM drive Click Start and Select Run Type the following D Utility AMD PowerNow Win9X setup exe for Win98SE ME or D Utility AMD P...

Page 76: ...itute D with the correct drive letter Click on USB20 to begin the Installation Wizard Follow the Wizard s on screen instructions to complete the installation Restart the system For using WinXP SiS rec...

Page 77: ...under Universal Serial Bus Controller directory I In ns st ta al ll li in ng g t th he e W Wi ir re el le es ss s L LA AN N D Dr ri iv ve er r f fo or r W Wi in n9 98 8 2 2K K M ME E X XP P To instal...

Page 78: ...noted by a yellow mark symbol Click the Update Driver tab on the Driver item and select the Next Select the Search for a suitable driver for my device recommended and click on the Next item Select the...

Page 79: ...Modem driver From your screen click on the My Computer icon and use your mouse or touchpad right button to select the Properties item 1 1 2 2 3 3 4 4 5 5 6 6 Click on the Hardware tab from the System...

Page 80: ...ties item 1 1 2 2 3 3 4 4 Click on the Device Manager and select the PCI Card item Use your mouse cursor to double click the Reinstall Driver item Select the Specify the location of the driver Advance...

Page 81: ...tings tab and click on the Advanced tab to enter the SiS 740 Properties window You will notice three new entries have been made in the Display Properties window Display Modes Video Setting and 3D Sett...

Page 82: ...to use The options are VGA and LCD or TV REMINDER The Auto tab will serve as additional function of the Mirror and VGA respectively by removing the check mark under the Display Combination selection f...

Page 83: ...to the external CRT screen Click on the Apply tab and you will be ask to keep the new setting The Mobile PC and external monitor TV screen will now simultaneously display the same image Multi Monitor...

Page 84: ...r to enable the monitor that you have chosen Click Yes to accept the change 4 Click the Apply tab to run the function and restart the computer 5 After the system has restarted your Mobile PC LCD scree...

Page 85: ...V Vi id de eo o S Se et tt ti in ng g From the Setting you can also adjust the video of your display to overlay contrast or brightness 83...

Page 86: ...rmance D D3 3D D Modify the speed and quality of your 3D display G Ga am mm ma a C Co or rr re ec ct ti io on n You can adjust the right color for your window screen by moving the Brightness adjustmen...

Page 87: ...85...

Page 88: ...Panel and double click on the Display icon From the Display Properties window select the Settings tab and click on the Advanced tab to enter the SiS 740 Properties window You will notice four new ent...

Page 89: ...ti io on n You can adjust the right color for your window screen by moving the Tint adjustment window Adjust the Brightness to increase or decrease the right resolution for your screen display V Vi i...

Page 90: ...n ne es ss s Use this scroll bar to adjust the overall intensity of light emitted by the video display C Co on nt tr ra as st t Use this scroll bar to adjust the contrast level between the bright and...

Page 91: ...ve er r M Mo od de e S Se et tt ti in ng gs s The SiS s driver allows five simultaneous outputs to LCD LCD CRT CRT TV TV and CRT Before proceeding be sure the monitor is connected to the Mobile PC co...

Page 92: ...nd CRT screen display the same image D Di is sp pl la ay y C Co om mb bi in na at ti io on n This applies to the display that you prefer to use The options are VGA and LCD and TV REMINDER The Auto tab...

Page 93: ...taneous Display This function supports two asynchronous simultaneous display paths with the features LCD CRT or CRT TV 1 Select the VGA or LCD or TV tab by clicking on the button on Primary and Second...

Page 94: ...92...

Page 95: ...Chapter 7 T Tr ro ou ub bl le es sh ho oo ot ti in ng g 93...

Page 96: ...urther divided into electrical and mechanical problems You will know you have a hardware problem if the screen is dark the computer cannot read the disk drives or you get an error message during the P...

Page 97: ...If the outlet is controlled by a dimmer switch use a different outlet If your computer is plugged into a power strip with an On Off switch make sure the switch is on With the computer s power switche...

Page 98: ...l or could cause incorrect and apparent results An example of a critical error is microprocessor malfunction Messages that furnish important information on the power on and boot processes such as memo...

Page 99: ...re ec ct t d da at te e a an nd d t ti im me e a ar re e d di is sp pl la ay ye ed d Correct the date and time using the DOS DATE and TIME commands or the options in the Setup Utility If the date and...

Page 100: ...RO OM M d dr ri iv ve e Check that a CD is properly inserted in the drive Make sure that you are using the correct program for that kind of CD For example the system cannot read a data CD using an aud...

Page 101: ...n C Co on nt ta ac ct ti in ng g Y Yo ou ur r D De ea al le er r If you still have a problem after reading the preceding sections the next step is to contact your dealer Your dealer can determine if t...

Page 102: ...100 Chapter 8 U Up pg gr ra ad di in ng g y yo ou ur r S Sy ys st te em m...

Page 103: ...lowing instructions and illustration for information on upgrading your Mobile PC s memory Turn off the computer and disconnect the AC adapter and all peripherals 1 1 2 2 Turn the Mobile PC over so tha...

Page 104: ...module s To install the new memory card hold the card with its gold edge connector toward the edge connector slot of the compartment To help you orient the cards the edge connector has been made with...

Page 105: ...d drive Make sure that before you install a new drive all the files in your system should be backed up T To o u up pg gr ra ad de e y yo ou ur r H Ha ar rd d D Dr ri iv ve e 1 1 2 2 3 3 Power down the...

Page 106: ...here are 4 screws hold the bracket Remove the screws and set them in a safe place 4 4 5 5 6 6 Push the HDD slightly in the direction of the arrow as shown in the illustration to release it from the pi...

Page 107: ...ly on the drive bracket until it engages with the system Do not force the drive into place this can bend the pins on the hard drive 7 7 8 8 9 9 Slide the compartment cover into place and be sure the s...

Page 108: ...106 Appendix A S Sp pe ec cs s S Su up pp po or rt t...

Page 109: ...package With AMD Power Now TM technology C Co or re e L Lo og gi ic c North Bridge SiS 740 South bridge SiS962L USB 2 0 compatible M Me em mo or ry y M Ma ai in n M Me em mo or ry y 128 MB DDR RAM me...

Page 110: ...ce es s Synaptics TouchPad Support four way scrolling feature K Ke ey yb bo oa ar rd d US Europe DOS V keyboard for Japan full size keyboard alike pitch 300 mm keyboard with key stroke 3 0mm Twelve f...

Page 111: ...D connector USB 2 0 port x 4 MIC in headphone jack w adaptor for 5 1 channel SP DIP support RJ 11 jack for Fax Modem RJ 45 jack for LAN V Vi id de eo o S Sy ys st te em m C Co on nt tr ro ol ll le er...

Page 112: ...55 mm H 13 14 W x 10 78 D x 1 33 H W We ei ig gh ht t 2 7kg 5 9 lbs with 14 1 panel 4 cell battery and DVD ROM Drive installed O Op pe er ra at ti in ng g E En nv vi ir ro on nm me en nt t T Te em mp...

Page 113: ...re e S Sp pe ec ci if fi ic ca at ti io on ns s S Sy ys st te em m S So of ft tw wa ar re e System BIOS AMI BIOS Supported Operating Systems Optional Windows 98SE Optional Windows XP or above version...

Page 114: ...em please try our website at www fryssupport net Here you will find the latest FAQ s and latest driver downloads bios updates for your system If you cannot find the answers to your questions there is...

Page 115: ...abor For a period of Ninety 90 calendar days from the date of purchase GQ will repair the defects in the Computer System at no charge After the Ninety 90 day period is over you will be responsible for...

Page 116: ...ss of software programs personal business data and or any other information stored on any media or any part of the product serviced IF DURING THE REPAIR OF THE PRODUCT THE CONTENTS OF THE HARD DRIVE A...

Page 117: ...mited warranty is invalid if the factory applied serial number is missing or has been altered or defaced in any way Repair or replacement of defective parts or hardware provided under this limited war...

Reviews: