background image

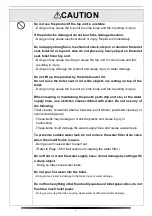
CAUTION

Do not use the product if the top unit is unstable.


Doing so may cause the top unit to come loose and fall, resulting in injury.

If the product is damaged, do not touch the damaged section.


Doing so may cause electrical shock or injury. Replace it immediately.

Do not apply strong force, mechanical shock, step on or stand on the toilet 
seat, toilet lid or top unit. Also do not place any heavy object on the toilet 
seat, toilet lid or top unit.


Doing so may cause cracking or cause the top unit to come loose and fall,
resulting in injury.

Doing so may damage the product and cause injury or water damage.

Do not lift up this product by the toilet seat or lid.


Do not raise the toilet seat or  lid while  objects are resting on top  of the 
toilet.


Doing so may cause the top unit to come loose and fall, resulting in injury.

When cleaning or maintaining the plastic parts (top unit etc.) or the water 
supply hose, use a kitchen cleaner diluted with water. Do not use any of 
the following.


Toilet cleaner, household cleaner, benzene, paint thinner, powdered cleanser, or 
nylon scrubbing pads. 

These items may damage or crack the plastic and cause injury or
malfunction.

These items could damage the water supply hose and cause a water leak.

To prevent a sudden water leak, do not remove the water filter drain valve 
when the shutoff valve is open.


Doing so will cause water to spurt out.
(Refer to Page 

19

 for instructions on cleaning the water filter.)

Do not fold or crush the water supply hose; do not damage by cutting with 
a sharp object.


Doing so may cause water leaks. 

Do not pour hot water into the toilet.


Doing so may result in damage to the toilet, injury or water damage.

Do not flush anything other than bodily waste and toilet paper. Also, do not 
flush too much toilet paper.


Doing so may clog the toilet, causing waste water overflow and water damage.

Summary of Contents for TitanDT300 2050

Page 1: ...TITANDT300 2050 USER MANUAL Ecoway 174 Torbay Rd L3R 1G6 Markham Ontario www eco way ca service eco way ca 1 833 3ECOWAY 1 833 332 6929 ...

Page 2: ... and bowl unit 9 Water supply 9 Seal the bowl unit 10 Connect power cord 10 Checklist and trial run 11 NAMES OF PARTS 12 WHAT S IN THE BOX 13 FUNCTIONS OVERVIEW 13 SIDE BUTTON OPERATION 14 When user is sitting on the unit 14 When user is not sitting on the unit 14 REMOTE CONTROL OPERATION 15 CUSTOMIZING THE TITANDT300 18 MAINTENANCE 19 SPECIFICATIONS 20 ...

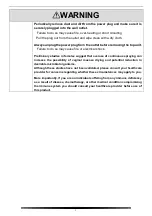
Page 3: ...y Children should be supervised to ensure that they do not play or tamper with the appliance WARNING DO NOT IMMERSE Doing so may cause electrical shock Do not get any water or cleaning solution on the top of unit or power plug Doing so may cause fire electric shock burns or short circuiting Doing so may cause the product to crack resulting in injury or water damage Never disassemble repair or alte...

Page 4: ...ause condensation resulting in a fire electrical shock burn or short circuiting Do not do anything that may damage the power cord power plug Do not strike yank twist excessively bend damage alter or heat the power cords Also do not place anything heavy on bind or pinch the power cords Using a damaged power cord may result in a fire electrical shock burn or short circuiting Do not use a loose or fa...

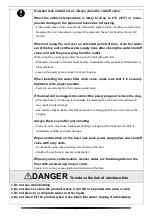
Page 5: ...y to form on the surface of this product When using the product in a bathroom install a fan or ventilation port and ensure good air flow through the bathroom Failure to do so may cause fire or electrical shock Always connect the TitanDT 300 to the cold water supply Connecting to hot water supply may result in burns and equipment damage Make sure that a properly grounded 3 prong outlet has been ins...

Page 6: ...eliminary studies in females suggest that overuse of continuous spraying can increase the possibility of vaginal mucosa drying and potential reduction in desirable microbial organisms Although these studies have not been validated please consult your healthcare provider for concerns regarding whether these circumstances may apply to you More importantly if you are an individual suffering from any ...

Page 7: ...ry When cleaning or maintaining the plastic parts top unit etc or the water supply hose use a kitchen cleaner diluted with water Do not use any of the following Toilet cleaner household cleaner benzene paint thinner powdered cleanser or nylon scrubbing pads These items may damage or crack the plastic and cause injury or malfunction These items could damage the water supply hose and cause a water l...

Page 8: ...ay cause a water leak If the bowl unit is clogged disconnect the power plug and remove the clog If the auto flush Is functioning it could make the wastewater in the bowl unit overflow and may result in water damage Use commercially available tools that are made for unclogging the bowl unit to remove the clogging Always flush even after just urinating Failure to do so may cause inadequate flushing ...

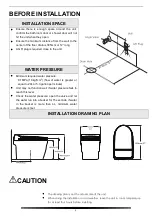
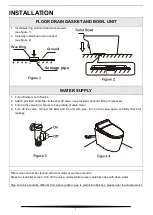
Page 9: ...essure 0 1MPa 1 0kgf cm2 flow of water is greater or equal to 20L or 5 3 gallon per minute Unit may not function well if water pressure fails to reach this level Check the water pressure open the valve and let the water run into a bucket for 15 seconds if water in the bucket is more than 4L minimum water pressure is met INSTALLATION DRAWING PLAN CAUTION The drawing plan is not the actual scale of ...

Page 10: ...ary 3 Turn on the valve for a minute to keep inside of valve clean 4 Turn off the valve connect the filter and the unit with pipe turn on the valve again carefully check for leakage Filter screen should be cleaned with clear water every three months Steps to clean filter screen Turn off the valve unscrew filter screen carefully rinse with clean water Pipe and valve could be different from above graphic ...

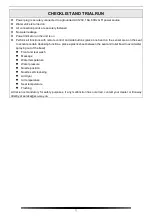
Page 11: ...least 24 hours Follow instructions of specific sealant used for installation CONNECT POWER CORD 1 Power cord must be connected to a 120V 60Hz 16A grounded GFI Ground Fault Circuit Interrupter power socket 2 Wait for the unit to finish self inspection after connected It is normal that user see side button flash blue light nozzle stretch out machine engage on and flash sound 3 User should do a trial run...

Page 12: ... buttons place one hand on the sensor area on the seat to activate certain cleansing functions place a plastic sheet between the seat and toilet bowl to avoid water spraying out of the bowl Front and rear wash Massage Water temperature Water pressure Nozzle position Nozzle self cleansing Air dryer Air temperature Seat temperature Flushing A trial run is mandatory for safety purposes if any malfunc...

Page 13: ...12 NAMES OF PARTS There could be minor difference between actual product and above graphic due to production batches 305mm 12 ...

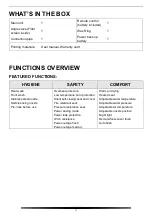
Page 14: ...sh Stainless steel nozzle Self cleansing nozzle Pre rinse before use Overheat protection Low temperature burn protection Silent self closing seat and cover Fire retardant seat Pressure resistance seat Power saving mode Power leak protection IPX 4 resistance Power outage flush Power outage memory Warm air drying Heated seat Adjustable water temperature Adjustable water pressure Adjustable air tempe...

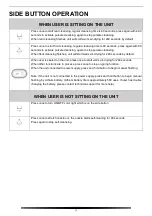
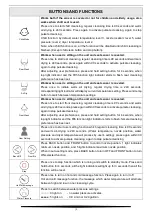
Page 15: ... seconds by default When user is seated on the unit press once to start warm air drying for 240 seconds When other functions are in process press once to stop on going function When the unit connected to power supply press and hold button to begin manual flushing Note if the unit is not connected to the power supply press and hold button to begin manual flushing by Lithium battery Lithium battery ...

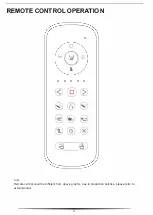
Page 16: ...REMOTE CONTROL OPERATION 0 09 0 0 0 0 0 5 复 包 Note Remote control could be different from above graphic due to production batches please refer to actual product 15 ...

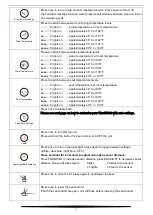
Page 17: ...once to start front cleansing regular cleansing time is 90 seconds and warm air drying is 240 seconds press again within 90 seconds to activate pulsate cleansing again to stop pulsate cleansing After adjusting user preferences press and hold setting button for 4 seconds when top light indicator and the fifth function light indicator starts to flash female cleansing preference has been set Press once...

Page 18: ...e is at room temperature 1 light on approximately 32 C or 89 F 2 lights on approximately 34 C or 93 F 3 lights on approximately 36 C or 96 F 4 lights on approximately 38 C or 100 F 5 lights on approximately 40 or 104 Press once to initiate flush Please see next page on how to customize your TitanDT300 with auto settings Press once to turn ON the unit Press and hold the button for 2 seconds to turn ...

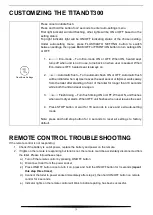
Page 19: ...d and seat are open 3 Flush timing Turn flush timing ON or OFF When ON unit flushes when warm dryer starts When OFF unit flushes when user leaves the seat 4 Press STOP button or wait for 18 seconds to save and exit auto setting mode Note press and hold stop button for 4 seconds to reset all settings to factory default REMOTE CONTROL TROUBLESHOOTING If the remote control is not responding 1 Check if t...

Page 20: ...nozzle with a soft cloth or brush with toothbrush 2 The cleansing schedule is 90 seconds the nozzle will be static in first 70 second and will move back and forth in last 20 seconds Nozzle will retract back to the unit after cleansing Repeat the process if necessary 3 Warning do not apply force by pulling pushing or attempt to bend the nozzle this w ill result in damage or electrical shock Cleaning...

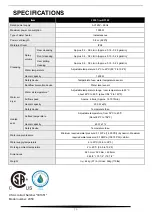
Page 21: ... Water level sensor Warm air dryer Warm air temperature 2 Adjustable temperature range room temperature to 60 C about 40 C to 60 C about 104 F to 140 F Airflow speed Approx 4 8m s Approx 15 75 ft min Heater capacity 200 W 5 Safety device Temperature fuse Heated seat Surface temperature Adjustable temperature from 32 C to 40 C About 89 F to 104 F Heater capacity 40 W 7 Safety device Temperature fuse...

Reviews: