


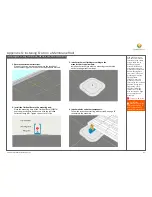

Use an impact driver to
tighten the Strut Bolt
and engage the Strut
Nut channels with the
two flanges of the Base.
Leave the Clamp open
to accept the Module.
Further tightening will
be done as the Modules
are installed.
1c. Engage Strut Nut with Base
Strut Bolt
Strut
Nut
Flanges
Channels
A String Line is used to
level and align Clamp
Assemblies on the first
downhill row only.
The body of the Glider
includes one “String
Groove” specifically
designed to assist with
this process.
Run and secure the
String Line between the
two outermost left/right
Clamp Assemblies. Place
String on the top String
Grooves, pulling it taught
and securing its ends.
Torque to: 14 ft-lbs
2a. Run a E-W String Line
String
Groove
Run String on
uphill side of
Clamp Assembly
Position String
on top groove
of the two
outermost left/right
Clamp Assemblies
F-2
App. F: Install the Skirt-Less Clamp Assemblies (cont.)
App. F: Level and Align the Skirt-Less Clamp Assemblies
EcoX Gen2 Installation Guide, Rev 1.11
Summary of Contents for EcoX
Page 1: ...EcoX Gen2 Installation Guide Rev 1 11 Installation Guide Gen2 ...
Page 31: ...EcoX Gen2 Installation Guide Rev 1 11 26 of 31 11 Grounding and Bonding cont ...
Page 32: ...EcoX Gen2 Installation Guide Rev 1 11 27 of 31 11 Grounding and Bonding cont ...
Page 33: ...EcoX Gen2 Installation Guide Rev 1 11 28 of 31 11 Grounding and Bonding cont ...


