


Appendix A: How to replace the Clamp Assembly with a Coupling
This procedure is
used only in those
situations wherein
adjusting Attachments
(Step 8e), fails to resolve
interference issues
between an Attachment
and a Coupling. A
common example of this
is shown at left when a
rafter falls where two
modules meet.
To ensure proper
electrical bonding
install the modified
Coupling within the
allowable left/right
limits. The following
page demonstrates the
maximum allowable
range of positions
between the Coupling
and Module Frame(s).
Use the Alignment
Marks and align to the
Module Frame. Any less
overlap inhibits proper
bonding and may not
properly support
components.
Remove the Glider and
Clamp assembly from
the Base. Next, remove
the Upper and Lower
Clamps from the Glider
by removing the Strut
Bolt and Strut Nut.
Position the Coupling
onto the Glider and re-
install the Strut Bolt and
Strut Nut. Return the
Glider to its original
position on the Base.
Align the Glider and
Coupling to the Modules
as described in sections
8, 9, and A-2. Tighten
and torque the Strut
Bolt and Coupling Clamp
to 14 ft-lbs.
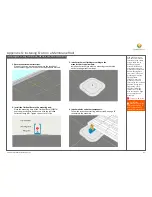
Rafter happens
to fall where two
Modules meet
Attachment
mounted to rafter.
Clamp Assembly
must be replaced
with Coupling
Module
Module
Skirt
Skirt
Strut Bolt
Coupling
Clamp Assembly
Glider
O-ring
Strut Nut
This situation requires a Coupling:
When a Rafter falls where two Modules meet, the Clamp
Assembly must be removed and replaced with a Coupling.
Swap Clamp Assembly for Coupling:
Disassemble and reassemble with Coupling. Reuse Strut Bolt,
Glider, O-ring and Strut Nut
A-1
A1. Disassemble Clamp Assembly and Rebuild using a Coupling
EcoX Gen2 Installation Guide, Rev 1.11
Summary of Contents for EcoX
Page 1: ...EcoX Gen2 Installation Guide Rev 1 11 Installation Guide Gen2 ...
Page 31: ...EcoX Gen2 Installation Guide Rev 1 11 26 of 31 11 Grounding and Bonding cont ...
Page 32: ...EcoX Gen2 Installation Guide Rev 1 11 27 of 31 11 Grounding and Bonding cont ...
Page 33: ...EcoX Gen2 Installation Guide Rev 1 11 28 of 31 11 Grounding and Bonding cont ...


