background image


@2021 EcoAir  

-

 V1.4                                                                   

Page 3

                                               All rights reserved (E&OE)


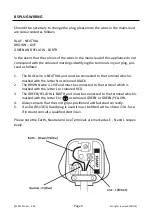
Should it be necessary to change the plug, please note the wires in the mains lead 

are colour coded as follows:


BLUE 

-

 NEUTRAL


BROWN –


LIVE


GREEN AND YELLOW 

-

 EARTH


In the event that the colours of the wires in the mains lead of this appliance do not 

correspond with the coloured markings identifying the terminals in your plug, pro-
ceed as follows:


1.


The BLUE wire is NEUTRAL and must be connected to the terminal which is 
marked with the letter N or coloured BLACK.


2.


The BROWN wire is LIVE and must be connected to the terminal which is 
marked with the letter L or coloured RED.


3.


The GREEN/YELLOW is EARTH and must be connected to the terminal which is 
marked with the letter E or         or coloured GREEN or GREEN/YELLOW.


4.


Always ensure that the cord grip is positioned and fastened correctly.


5.


If a 10A (BS 1363) fused plug is used it must be fitted with a 10A or 13A


-fuse. 

If in doubt consult a qualified electrician.


Please note the Earth, Neutral and Live Terminals are marked as E , N and L respec-

tively.


BS PLUG WIRING


Summary of Contents for SUMMIT-S

Page 1: ... 2021 EcoAir SUMMIT S DC 100016 COMPRESSOR DEHUMIDIFIER USER MANUAL Please read instructions before use Keep for future reference Visit ecoair org to register your product or terms and conditions ...

Page 2: ...ents and artwork by drying it out too much High humidity High humidity indoors causes damp and condensation The damp left by condensation can damage plaster wall paper furniture vehicles timber windows doors and clothes It can be harmful to our health when bacteria thrives causing mould and fungus Maintaining safe levels of humidity It is important to maintain a consistent humidity range to preser...

Page 3: ... R290 2 BS Plug Wiring 3 The Appliance and Accessories 4 Important Safeguards 5 Installation 6 Setup Continuous Drainage 7 Control Panel 8 Operation 9 10 Emptying the Water Tank 11 Cleaning Maintenance and Storing the appliance 12 Troubleshooting 13 14 INDEX ...

Page 4: ...enance or when not in use The appliance must not be placed or used where the atmosphere may contain combustible gasses oil or sulphur or solvent or near heat sources such as heaters or in server rooms or excessive dust Do not place or rest any objects on the appliance and do not cover while in use Always observe the minimum room size for storing and operating the appliance Allow a minimum of 40 cm...

Page 5: ...ore these appliances in a well ventilated area with a minimum size shown in the above table 4 Keep any required ventilation openings clear of obstructions 5 Never attempt to service or repair the appliances yourself always ensure it is only serviced by a EcoAir approved engineer using original EcoAir parts 6 If these appliances are installed operated or stored in a non ventilated area then the roo...

Page 6: ...be connected to the terminal which is marked with the letter N or coloured BLACK 2 The BROWN wire is LIVE and must be connected to the terminal which is marked with the letter L or coloured RED 3 The GREEN YELLOW is EARTH and must be connected to the terminal which is marked with the letter E or or coloured GREEN or GREEN YELLOW 4 Always ensure that the cord grip is positioned and fastened correct...

Page 7: ...es List B1 B2 B3 A1 A2 DESCRIPTION Key Description Key Description A1 Control Panel B1 Continuous Drainage Hose A2 Air Outlet B2 Carbon Filter A3 Castors B3 User Manual A4 Air Inlet Air Filter A5 Continuous Drainage Outlet A6 Water Tank A7 Tank Handle BACK FRONT A1 A2 A4 B1 A3 A5 A6 A7 ...

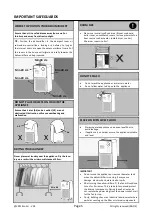
Page 8: ...industrial environment where particles can clog up the filter or internal components DO NOT SPLASH Do not wash the appliance or immerse in water Do not allow water to drip on to the appliance IMPORTANT SAFEGUARDS WHERE TO POSITION YOUR DEHUMIDIFIER Ensure the unit is a safe distance away from a wall or furniture and away from direct sunlight TIP Position the dehumidifier in the dampest room or som...

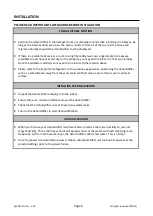
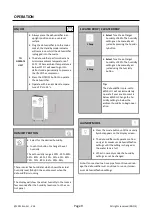
Page 9: ...en positioning the dehumidifier such as a safe distance away from the wall avoid confined areas ensure floor is even and level surface INSTALLING THE DEHUMIDIFIER Unpack the dehumidifier and plug in to the socket Ensure there is a minimum distance around the dehumidifier Check that the dehumidifier is level to avoid any water leaks Turn on the dehumidifier to start dehumidification INITIAL OPERATI...

Page 10: ...a downward slope with no sharp bends Step 2 3 Position the Water Tank Back into position A6 Step 3 NOTE Ensure the water tank and continuous drainage hose are well fitted in position be fore commencing operation Never leave the end of continuous drainage hose outside when the temperature is below 1 C to avoid leakage When the outdoor temperature is at freezing point the water will not flow freely ...

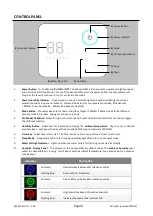
Page 11: ...ildLock Select for High or Low fan speed Press and hold this button for 3 seconds to toggle the child lock function 5 Humidity Button Hold down for 5 seconds to display the ambient temperature Tap to set your desired humidity level each tap will increase the humidity by 5 RH up to maximum of 95 RH 6 Timer key Select timer ON or OFF The timer can be set on hourly intervals from 1 to 24 hours 7 Slee...

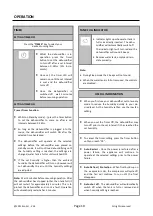
Page 12: ...d using the humidity button Tip The dehumidifier is pre set to 60 RH It will not immediately operate if your environment is below 60 RH Change the hu midity setting to below the ambient humidity to begin oper ation HUMIDITY BUTTON Select for the desired humidity touch this button to change the set humidity The set humidity range is 20 25 30 35 40 45 50 55 60 65 70 75 80 85 90 95 There is an active...

Page 13: ... After the dehumidifier has stopped other than tank full it will not restart for approximately 3 minutes This is to protect the dehumidifier and is not a fault Operation will automatically restart after 3 minutes TANK FULL INDICATOR Indicator lights up when water tank is full or incorrectly inserted The dehu midifier will automatically switch off The indicator light will turn red and the dehumidif...

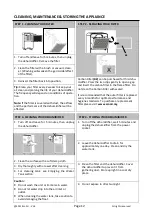
Page 14: ...ay by tilting the water tank see step 3 picture to the right side Clean the water tank if needed 4 Insert the water tank back into to the correct position The Water Full light indicator illuminates if the water tank is not correctly in position If this happens reinsert again NOTE Clean the water tank with mild detergent if necessarily Do not use solvent abrasive or hot water When cleaning the wate...

Page 15: ... For cleaning tank see Emptying the Water Tank section Caution Do not wash the unit or immerse in water Do not let water drip into the air inlet or outlet When cleaning the water tank take caution to avoid damaging the float STEP 2 REPLACING YOUR FILTER Carbon Filter B2 can be purchased for this dehu midifier Press the two clips gently to open a gap and insert the carbon filter in the frame filter...

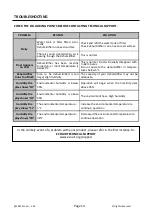
Page 16: ...e air inlet or outlet is blocked or covered Remove obstructions Water Full Light On Water tank is full or installed incorrectly Empty water tank or re install correctly Water float out of position Restore water float back into position Dehumidifier on uneven surface or water tank fitted incorrectly Ensure the dehumidifier is on a flat even sur face use a spirit level to check remove tank and repla...

Page 17: ...has been recently turned on or room temperature is below 5 C This is normal Frost will usually disappear with in 60 minutes Do not operate the dehumidifier in tempera tures below 5 C Dehumidifier Runs Too Much Area to be dehumidified is too large High Humidity The capacity of your dehumidifier may not be adequate Humidity Dis play shows LO Environmental humidity is below 35 Operation will begin wh...

Reviews: