background image

7

Manual CEAG W 276.3 LED

   40071860170_A    June 2016   www.ceag.de

5 Batteriewechsel / Battery replacement

Verschluß unter dem 

Reflektor nach hinten 

schieben und Leuchte 

öffnen.

Push back the lock 

below the reflector and 

open the lamp.

Batterie abklemmen und 

auswechseln.  

Dabei ist darauf zu achten, 

dass sich die Pole der 

Batterie nicht berühren! 

Batteriegehäuse wieder 

schließen.

Disconnect battery and 

replace. 

Pay attention that the 

poles of the battery don´t 

touch each other! 

Close battery housing.

Vorsteckscheiben (inkl.)

Slip-on filters (included)

rot, orange, klar prismiert

red, orange, clear prismatic

Lichttechnik

(Hauptlicht)

Photometric data

(Main beam)

Lichtstärke l max = 3720 cd / Halbwertswinkel = 12,4°

Beleuchtungsstärke: 150 lx @ 5 m, 6 lx @ 25 m, 1,5 lx @ 50 m
Irradiance l max = 3720 cd / Half value angle = 12.4°

Illuminance: 150 lx @ 5 m, 6 lx @ 25 m, 1.5 lx @ 50 m

Gehäusematerial

Housing material

schlagzäher, abriebfester Kunststoff
impact resistant, non-adhesive plastic

Gehäusefarbe / Housing colour

grau / grey

Batteriebetriebszeit

Emergency duration

4  Ah -  Batterie

5,5 h Eco (Hauptlicht)

3,5 h Boost (Hauptlicht)

14,0 h (Nebenlicht)
4  Ah -  battery

5.5 h Eco (main beam)

3.5 h Boost (main beam)

14.0 h (ancillary light)

7  Ah -  Batterie

9,0 h Eco (Hauptlicht)

6,0 h Boost (Hauptlicht)

27,5 h (Nebenlicht)
7  Ah -  battery

9.0 h Eco (main beam)

6.0 h Boost (main beam)

27.5 h (ancillary light)

Batterie

Battery

wiederaufladbarer, wartungsfreier und gasdichter NiCd-Akku

4,8 V / 4 Ah, 4,8 V / 7 Ah

rechargeable, maintenance free and gastight NiCd-accumulator

4.8 V / 4 Ah, 4.8 V / 7 Ah

Hauptlicht / Main beam

Nebenlicht / Ancillary light

3 x HighPower LED

3,0 W - 240 Im (Eco) / 4,5 W - 330 Im (Boost)

6 x MidPower LED

1,5 W - 65 Im

Anschlussspannung 

Connection volgage

230 V 50/60 Hz

Netzanschlussleistung

Power consumption

10 VA

Schutzart / Degree of protection

IP54

Schaltfunktion

Switch functions

Blinklicht, Dauerlicht und Nebenlicht

Flashing light, main beam and ancillary light

Überwachungsfunktion

Monitoring function

Ladekontrollanzeige mit grüner Leuchtdiode

Charging indication by green LED

6 Technische Daten

6 Technical Data

Summary of Contents for CEAG W 276.3 LED

Page 1: ...sanleitung Mounting and Operating Instructions Zielgruppe Elektrofachkraft Target group Skilled electricians Verwendungszweck Notbeleuchtung nicht für privaten Gebrauch Intended Application Emergency Lighting not suitable for private use ...

Page 2: ...6 www ceag de Inhalt 1Normenkonformität 3 2Inbetriebnahme 4 3Funktion 5 4LED Upgrade 6 5Batteriewechsel 7 6Technische Daten 7 Contents 1Conformity with standards 3 2Commissioning 4 3Operation 5 4LED Upgrade 6 5Battery replacement 7 6Technical Data 7 ...

Page 3: ...ung Alle Fremdkörper müssen vor der ersten Inbetriebnahme aus dem Gerät entfernt werden Beachten Sie bei allen Ar beiten an dem Gerät die nationalen Sicherheits und Unfallverhütungsvorschriften und die nachfolgenden Sicherheitshinweise in der Betriebsanleitung die mit einem ver sehen sind Safety Instructions The device shall only be used for its intended purpose and in undamaged and flawless condi...

Page 4: ...ing of the charging circuit If the accumulator is deep discharged first com missioning and after long operation the charger needs 20 hours for the complete charging of the accumulator 1 5 m Euro Flachstecker Euro two pin plug Schalter Switch Ladekontroll LED Netz und Ladekreis OK Charging indicator mains and charging circuit OK ACHTUNG Möglicherweise gefährliche optische Strahlung Bei Betrieb nich...

Page 5: ...Nebenlicht besitzt aus Sicherheitsgründen keinen Tiefentladeschutz Hat der Tiefentladeschutz des Hauptlichts angespro chen kann das Nebenlicht noch ca 30 min weiter betrieben werden ohne dass die Batterie Schaden nimmt Wird das Nebenlicht darüber hinaus weiter betrieben kann es zu irreparablen Schäden an der Batterie kommen die ihren Austausch notwendig machen With battery voltage of approx 4 20 v...

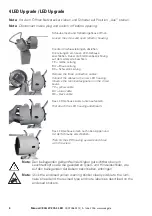
Page 6: ...hree connection cables Connect the cables to the new LED housing Observe the terminal designation on the circuit board YE yellow cable BU blue cable BK black cable Das LED Gehäuse zuerst unten aufsetzen First attach the LED housing underneath Das LED Gehäuse dann nach oben kippen und mit der Schraube verschließen Then tilt the LED housing upwards and close with the screw Note N Den beiliegenden ge...

Page 7: ... non adhesive plastic Gehäusefarbe Housing colour grau grey Batteriebetriebszeit Emergency duration 4 Ah Batterie 5 5 h Eco Hauptlicht 3 5 h Boost Hauptlicht 14 0 h Nebenlicht 4 Ah battery 5 5 h Eco main beam 3 5 h Boost main beam 14 0 h ancillary light 7 Ah Batterie 9 0 h Eco Hauptlicht 6 0 h Boost Hauptlicht 27 5 h Nebenlicht 7 Ah battery 9 0 h Eco main beam 6 0 h Boost main beam 27 5 h ancillar...

Page 8: ... Eaton we re energized by the challenge of powering a world that demands more With over 100 years experience in electrical power management we have the expertise to see beyond today From groundbreaking products to turnkey design and engineering services critical industries around the globe count on Eaton We power businesses with reliable efficient and safe electrical power management solutions Com...

Reviews: