Easee Plug & Play
User / installation guide
Page 1: ...Easee Plug Play User installation guide...
Page 2: ...ty Safety instructions Installation Installation instructions Daily use and operation How do I charge Apps and interfaces Charging Robot interface Maintenance Practical details 3 3 4 5 6 7 10 10 11 12...
Page 3: ...t load bearing capacity It may only be operated with the approved operating parameters and under the specified environmental conditions see page 5 Uses other than those specified here are not permitte...
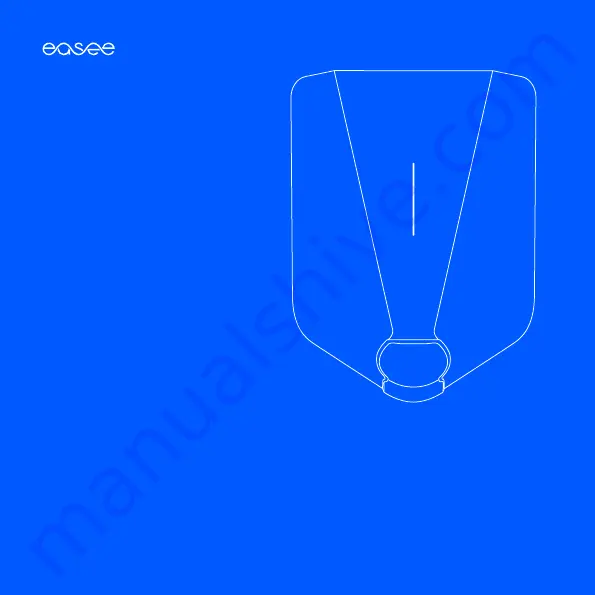
Page 4: ...ons 2 Light strip The light strip communicates the status of the Charging Robot at all times Read more about this on page 11 3 RFID area The integrated RFID reader enables access control of the Chargi...
Page 5: ...meter 2 Easee Home Load balancing of up to 3 units per circuit Easee Charge Load balancing of up to 101 units per circuit Sensors and indicators Light strip with LEDs showing the status of the charge...
Page 6: ...n the product lights up red there is a fault For more information see page 11 Make sure that children do not play with the product Never touch the contacts of the Type 2 socket and never insert foreig...
Page 7: ...careful and follow the instructions Installation instructions 1 Unscrew the locking screw at the bottom of the Easee Ready 2 Insert the two ends of the included tool into the two openings at the bott...
Page 8: ...e 3 When the Chargeberry is in the track press it forcefully down until you hear a click 4 Paste the PIN code sticker on the back of the manual or in another safe location e g inside of the fuse cabin...
Page 9: ...1 Hang the front cover at the top of the backplate and let it fall into place 2 Press the bottom of the front cover until you hear a click 3 Bend the lower part of the rubber cover down 4 Screw in the...
Page 10: ...might be the cause on page 11 Smart charging Some operators offer smart charging which will delay charging to a suitable point in time often tied to electricity price or similar mechanisms When Smart...
Page 11: ...nst the RFID area of the Charging Robot in order to authenticate and initiate the charging White fast flashing light RFID tag received awaiting key verification Red constant light General error Unplug...
Page 12: ...uit insulation with the Chargeberry installed in the backplate may damage the electronics or impact the reading negatively Maintenance Practical details Warranty The device is free from material defec...
Page 13: ...be isolated before dismounting starts Use the installation guide and follow the steps in reverse in order to dismount the Charging Robot in the correct order Disposal This electronic equipment must no...
Page 14: ...ding retrieving data or computer networks without the written permission of Easee AS Easee and all other Easee product names and slogans are trademarks or registered trademarks of Easee AS Easee produ...
Page 15: ...15...
Page 16: ...16 Easee AS Grenseveien 19 4313 Sandnes Norway easee com...