


CHAR
T 1
BAG COVERAGE IN
SQUARE FEET
5,000
10,000
15,000
LBS/1,000 SQ FT
B
A
G
W
E
I
G
H
T
5 LBS.
1.0
0.5
0.3
10 LBS.
2.0
1.0
0.7
15 LBS.
3.0
1.5
1.0
18 LBS.
3.6
1.8
1.2
20 LBS.
4.0
2.0
1.3
25 LBS.
5.0
2.5
1.7
30 LBS.
6.0
3.0
2.0
35 LBS.
7.0
3.5
2.3
40 LBS.
8.0
4.0
2.7
45 LBS.
9.0
4.5
3.0
50 LBS.
10.0
5.0
3.3
S
P
R
E
A
D W
ID
T
H
S F
O
R D
IF
FE
R
E
N
T
P
A
R
T
IC
LE
S
IZ
ES
P
ar
tic
le Si
ze
E
ng
lish
M
etr
ic
S
ma
ll/
Fi
ne
(S
an
d
)
5-7
ft
.
1.
5-
2.1
m
M
ed
iu
m
(H
al
f B
B)
7-
9f
t.
2.
1-
2.
7m
La
rg
e
(Fu
ll B
B
)
9-1
2f
t.
2.7
-3
.7
m
S
P
R
E
A
D W
ID
T
H F
O
R D
IF
FE
R
E
N
T
S
IZ
E
G
R
A
S
S
SEED
Se
ed Si
ze
E
ng
lish
M
etr
ic
Fi
ne
5-7
ft
.
1.
5-
2.1
m
Co
ar
se
7-1
0f
t.
2.1
-3
.1
m
E
S
TA
B
LI
S
H
IN
G A S
E
T
T
IN
G R
A
T
E
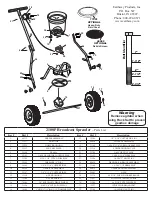
Step 1:
Use
Chart 1
to estimate the number of LBS/1,000 square feet of coverage
(Example: 20 LB. bag with 10,000 square foot coverage = 2.0 LBS/1,000
square feet)
Step 2:
Find the closest LBS/1,000 square feet in
Chart 2
that you estimated using
Chart 1
(Example: 2.0 LBS/1,000 square feet = Spreader Setting of 13)
Step 3:
Determine the Spread W
idth by evaluating the particle or seed size in
Chart 3
to determine the Spread W
idth between Spread Paths
METRIC RA
TE SETTING
Determining a Setting Rate
Use chart below to determine the
Setting Rate
based on
Grams/Squar
e
Meter
of coverage as directed on the bag.
GRAMS/SQ
METER
LBS./1,000
SQ FT
SPREADER
SETTING
5 Grams
1.0 LBS.
11
10 Grams
2.0 LBS.
13
15 Grams
3.0 LBS.
14
20 Grams
4.0 LBS.
16
25 Grams
5.0 LBS.
17
30 Grams
6.0 LBS.
18
35 Grams
7.0 LBS.
19
40 Grams
8.0 LBS.
20
45 Grams
9.0 LBS.
22
50 Grams
10.0 LBS.
23
The settings fur
nished on the Rate Setting Matrix ar
e intended as a guide only
. V
ariations in physical characteristics of material applied, walking speed, and r
oughness
of gr
ound surface may r
equir
e slightly dif
fer
ent spr
eader settings. Due to the above conditions, EPI makes no warra
nty as to the uniformity of coverage actually
obtained fr
om the settings listed.
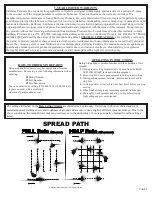
FULL Rate
(one pass
)
HALF Rate
(two passes
)
SPREAD P
A
THS
©
2014 Earthway Products, Inc.
All rights reserved
Maintain a consistent walking
speed of 2-3mph or the
application rate will change.
All spread widths are determined by particle size and weight.