EarthWay 2100P Estate Assembly And Operating Instructions Manual Download Page 6

7

6

24

15

20

23

22

5

4

24

22

23

8

11

21

25

18

1

26

2

19

14

10

13

12

17

9

6

16

27

77001

OPTIONAL

Heavy-Duty

Rain Cover

40002

OPTIONAL

Debris Screen

30

28

31

32

29

3

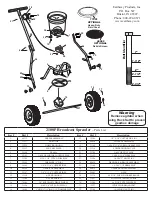
Earthway Products, Inc.

P.O. Box 547

Bristol, IN 46507

Phone: 800-294-0671

www.earthway.com

2100P Broadcast Spreader

 ~ Parts List

Key #

Part #

Description

Key #

Part #

Description

1

60332

HOPPER ASSEMBLY

17

33106

1/8" X 3/4" COTTER PIN ZINC

2

33117

AGITATOR

18

60520

CONTROL ASSEMBLY

3

12220

HOPPER BUSHING 

19

37108

1/4-20 X 1 3/4" CARRIAGE BOLT ZINC

4

12317

SHUT OFF PLATE

20

12318

LOWER HOUSING CLIP

5

25100

FRAME

21

32100

1/4-20 HEX NUT ZINC 

6

32103

1/4-20 NYLON INS LOCKNUT ZINC

22

31121

1/4-20 X 1 1/4" HHCS ZINC

7

31105

#12 X 1 1/4" TYPE A FHPS ZINC

23

31120

1/4-20 X 2" HHCS ZINC

8

12109

IMPELLER (9" DIA)

24

60038

DRAW BAR & BRACE ASSEMBLY

9

36105

1/8" X 1 1/4" COTTER PIN SS

25

31100

1/4-20 X 1 1/2 HHMS ZINC 

10

60190

GEAR BOX ASSEMBLY

26

60036

UPPER HANDLE ASSEMBLY

11

33107

1/8" X 1 3/4" COTTER PIN SS

27

26001

AXLE

12

12150

AXLE BUSHING

28

31138

#8 X 3/8" PMT HD COARSE BLACK

13

12148

AXLE BEARING

29

11927

SHUTOFF SUPPORT- LARGE

14

70106

10" PNEUMATIC DRIVE WHEEL

30

36208

#6 X 3/8" TYPE 25 PHPS SS

15

31124

#10 X 5/8" TYPE A PHPS ZINC

31

12222

INDICATOR-BROADCAST

16

34103

1"OD X 17/32"ID X 1/32" WASHER ZINC

32

32106

10-24 WING NUT ZINC

Bolt Identifier

1-1/2”

1”

2”

2-1/4”

2-3/4”

Warning

Remove agitator when 

using Rock Salt to prevent 

gearbox damage

Summary of Contents for 2100P Estate

Page 1: ...cause the impeller to turn counter clockwise Clean the impeller plate after each use Fertilizer stuck on the impeller blades will cause uneven spreading Your spreader is designed to be pushed at thre...

Page 2: ...FRONT on the gearbox must point to Front of the hopper Follow label instructions on hopper Next slide axle thru the gearbox with the drive wheel hole positioned as shown in the drawings below Axle Be...

Page 3: ...revent pin from falling out 1 Cotter Pin Cotter Pin Flat Washer 10 Install Control Assembly by inserting the bent wire end into the small hole in the shut off plate from the bottom of the spreader as...

Page 4: ...ON TO THE HOPPER With the spreader resting on it s hopper push the Control Handle forward to 30 then push the shut off plate forward until the shut off and the drop holes are fully open Now tighten t...

Page 5: ...tol Indiana 46507 and describe the nature of the manufacturing defect SPECIFIC LIMITATIONS This warranty covers only the part s or product any labor charges associated with repair or replacement of no...

Page 6: ...32103 1 4 20 NYLON INS LOCKNUT ZINC 22 31121 1 4 20 X 1 1 4 HHCS ZINC 7 31105 12 X 1 1 4 TYPE A FHPS ZINC 23 31120 1 4 20 X 2 HHCS ZINC 8 12109 IMPELLER 9 DIA 24 60038 DRAW BAR BRACE ASSEMBLY 9 36105...

Page 7: ...tlined in 1 above B If your shut off is able to open fully as in step 1 but the Control Lever is not at 30 Loosen the top nut a few turns then loosen the lower nut so that it allows you to push the Co...

Page 8: ...e Spread Width by evaluating the particle or seed size in Chart 3 to determine the Spread Width between Spread Paths METRIC RATE SETTING Determining a Setting Rate Use chart below to determine the Set...

Reviews: