


Operator's Manual
Rolling String Trimmer 600050V, 600050B
Check for parts online at
www.getearthquake.com
or call 800-345-6007 M-F 8-5
8
Operator's Manual
Rolling String Trimmer 600050V, 600050B
Check for parts online at
www.getearthquake.com
or call 800-345-6007 M-F 8-5
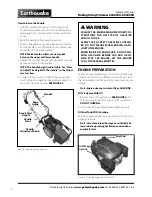
EnginE PREPARAtion
waRning
foLLoW thE EnginE mAnufACtuRER’S in-
StRuCtionS foR thE tYPE of gASoLinE
And oiL to uSE.
ALWAYS uSE A SAfEtY gASoLinE ContAin-
ER. do not SmokE WhEn Adding gASo-
LinE to thE EnginE.
WhEn inSidE An EnCLoSuRE, do not fiLL
With gASoLinE. bEfoRE You Add gASo-
LinE, StoP thE EnginE. LEt thE EnginE
CooL foR SEVERAL minutES.
See the engine manufacturer’s instructions for the type
of gasoline and oil to use. Before you use the unit, read
the information on safety, operation, maintenance, and
storage.
Note: Engine does not contain OIL or GASOLINE.
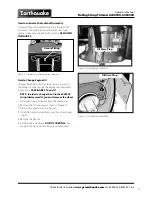
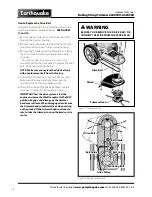
fill Crankcase With oil
1. Remove the oil fill cap/dipstick.
SEE figuRE 4.
Fill
the crankcase to the FULL line on oil fill cap/dipstick.
do not oVERfiLL.
. Install the oil fill cap/dipstick and tighten securely.
fill fuel tank With gasoline
See the engine manufacturer’s instructions for the Type
of gasoline to use.
Note: Actual sustained horsepower will likely be
lower due to operating limitations and environ-
mental factors.
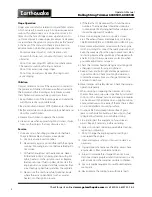
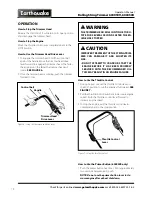
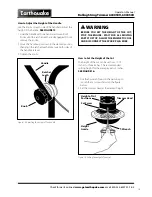
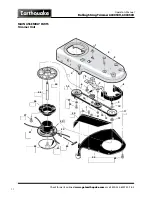
how to Raise the handle
1. Hold the handle with one hand and loosen both
handle adjustment knobs until the ratchet teeth are
disengaged. Do not remove the handle adjustment
knobs.
. Raise the handle to the operating position.
3. Stand in the operator’s position behind the trimmer.
Put the handle in a comfortable position. Make sure
both sides of the handle are level.
NOTE: Make sure the cables are not caught
between the upper and lower handle.
4. Tighten the handle adjustment knobs. Make sure the
handle pivots are locked in place.
NOTE: The handle height is adjustable. See “How
To Adjust The Height Of The Handle” in the Adjust-
ment section.
5. To attach the recoil start handle to the rope guide,
twist the rope through the rope guide mounted on
the right side of the handle.
SEE figuRE 3
.
Figure 3: Adjusting the handle bars.
handle
Rope
guide
Recoil Start
handle
handle
Pivot
handle
Adjustment knob
Figure 4: Filling the engine with fuel and oil.
fuel Cap
oil fill Cap/
dipstick