background image

1

INTRODUCTION
Welcome to the exciting world of GPS! Whether you’re a first-time user or
a professional navigator, you’ll find the Expedition II is a full-featured GPS
receiver at a price that was impossible just a few years ago. The Rock-
well

®

 receiver built inside has 12 channels that will track all of the satel-

lites that are in view of your location. It’s acquisition time and tracking
ability are second to none in its class.

The Global Positioning System (GPS) was developed by the United States
Department of Defense as a 24-hour a day, 365 days a year global navi-
gation system for the military. Civilian availability was added with less
accuracy using the same satellites. Twenty-four satellites orbit the Earth.
Three of these satellites are spares, unused until needed. The rest virtu-
ally guarantee that at least four satellites are in view of anyplace on Earth
at all times.

The system requires three satellites in order to determine a position. This
is called a 2D fix. It takes four satellites to determine both position and
elevation, (your height above sea level - also called altitude.) called a 3D
fix.

Remember, the unit must have a clear view of the satellites in order to
receiver their signals. Unlike radio or television, GPS works at very high
frequencies. The signals can be blocked easily by trees, buildings, even
your body. Fortunately, they do travel through glass and plastic, so your
receiver will work in the car, if it has a clear view of the satellites through
the windshield or side windows. Let someone else drive if you use it in a
car or other vehicle.

Never use this GPS receiver while operating a vehicle!

The first time you use this unit, walk outside and turn it on in your back-
yard, an open field or park. Once it locks onto the satellites, you can ex-
periment with it around buildings and trees. This will give you some idea
of its sensitivity to blockage.

Like most GPS receivers, this unit doesn’t have a compass or any other
navigation aid built inside. It relies solely on the signals from the satellites
to calculate a position. Speed, direction of travel, and distance are all
calculated from position information. Therefore, in order for it to determine
direction of travel, you must be moving and the faster, the better. This is
not to say that it won’t work at walking speeds - it will. There will simply be
more “wandering” of the data shown on the display.

Summary of Contents for EAGLE EXPEDITION 2

Page 1: ...INSTALLATION AND OPERATION INSTRUCTIONS Expedition II TM ...

Page 2: ... of all available navigation tools when trav elling to a waypoint but will also visually check to make certain a clear safe path to the waypoint is always available The operating and storage temperature for your unit is from 4 degrees to 167 degrees Fahrenheit 20 to 75 degrees Celsius Extended storage temperatures higher or lower than specified will cause the liquid crystal display to fail Neither...

Page 3: ...n Indicator CDI 10 Plotter 11 Cursor 12 Plotter Options 12 Update Options 12 Plotter Orientation 13 Plot Trails 14 Save Trail 14 View Recall Trail 14 Clear Trail 14 Range Rings Grid Lines 14 GRIDS 15 ICONS 15 Place Icon Present Position 15 Place Icon Cursor Position 16 Icon Options 16 WINDOWS 17 Reprogram Boxes 22 RESET GROUPS 22 WAYPOINTS 23 Waypoint Menu 23 Saving Your Present Position as a Wayp...

Page 4: ...ute 32 Delete a Waypoint 33 Waypoint Detail 33 Following a Route 34 Delete a Route 35 CANCEL NAVIGATION 35 Navigation Notes 35 SYSTEM SETUP 35 Backlight 35 Sound 36 Contrast 36 Units of Measure 36 NMEA DGPS 36 NMEA Output 37 Configure NMEA Output 37 DGPS 37 Serial Communication Setup 39 Reset Options 39 Reset Groups 39 System Info 40 GPS SETUP 40 Position Format 40 DATUM 41 PCF Position Correction...

Page 5: ...titude called a 3D fix Remember the unit must have a clear view of the satellites in order to receiver their signals Unlike radio or television GPS works at very high frequencies The signals can be blocked easily by trees buildings even your body Fortunately they do travel through glass and plastic so your receiver will work in the car if it has a clear view of the satellites through the windshiel...

Page 6: ...transmitters and gives them to the GPS receiver which then uses them to show a more accurate position The ironic part is the federal government implemented SA and is also operat ing many DGPS transmitters You can use the signals from all of the Coast Guard DGPS stations for free by the way The downside to this is it requires another piece of electronic gear the DGPS receiver which usually isn t sm...

Page 7: ...e ones listed above Do not mix different types of batteries For example don t use both alkaline and ni cad batteries at the same time Battery Installation First turn the unit so that its back is facing you Push the two tabs to the left and re move the battery cover as shown at right Install the batteries according to this dia gram There s a decal in the battery com partment showing the correct pol...

Page 8: ...s unit does not supply power to the antenna OPERATION Keyboard There are 12 keys on the keyboard You navi gate through the menus adjust the chart s cursor and enter data using the arrow keys The five major modes of operation are ac cessed using the PAGES key Press the MENU key to select or adjust a feature from a list The Z IN and Z OUT keys zoom in or zoom out the view on the plotter screen The E...

Page 9: ...if you hold the unit facing north The GPS receiver is tracking satellites that are sur rounded by a black box If the satellite number is not surrounded by a box then the receiver hasn t locked onto that satellite and it isn t being used to solve the position Beneath the graph are the bar graphs one for each satellite in view Al though the unit has twelve channels it dedicates one channel per visib...

Page 10: ...ur position or elevation altitude is It does know the current UTC time and date since these were programmed into it at the factory and an internal clock keeps the time while the unit is turned off It begins searching for the satellites using the above data that it ac quired the last time it was turned on This probably was at the Eagle fac tory Since it s almost certain that you re not at the Eagle...

Page 11: ... the data it needs to determine which satellites are in view Once the satellites are known the receiver searches for only those satellites making a lock much faster than an auto search method Full Initialization There are occasions when you will want or need to manually initialize the unit by entering the position elevation time and date To do this press the MENU key Now press the down arrow key u...

Page 12: ...ata flashes until the unit acquires a position Do not rely on any data that is flashing When the numbers are flashing they represent the last known values when the unit lost it s lock on the satellites Note The altitude data may still flash even if the unit shows a Position Acquired message and all other data is not flashing The unit must be locked onto at least four satellites to determine altitu...

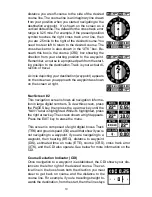
Page 13: ...navigation screen looks like the one at right when you re not navigating to a waypoint Your position is shown by an arrow in the center of the screen Your trail history or path you ve taken is de picted by the line extending from the arrow The arrow pointing down at the top of the compass rose indicates the current track direction of travel you are taking This is also shown in the TRK track box in...

Page 14: ...t as shown on the screen at right Nav Screen 2 This navigation screen shows all navigation informa tion in large digital numbers To view this screen press the PAGES key then press the up arrow key until the NAV1 label is highlighted While it s highlighted press the right arrow key The screen shown at right appears Press the EXIT key to erase the menu This screen is composed of eight digital boxes ...

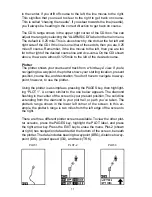
Page 15: ...a birds eye view If you re navigating to a waypoint the plotter shows your starting location present position course line and destination You don t have to navigate to a way point however to use the plotter Using the plotter is as simple as pressing the PAGES key then highlight ing PLOT 1 A screen similar to the one below appears The diamond flashing in the center of the screen is your present pos...

Page 16: ...iety of uses To turn the cursor on simply press the arrow key in the direction you want the cursor to move This lets you view areas on the plotter that are away from your present position The cursor s latitude and longitude show at the top of plot 1 s screen The zoom in and zoom out keys work from the cursor s position when it s active not the present position You can zoom in on any detail anywher...

Page 17: ...u see on the left side of the plotter should always be on your left The unit also has a course up mode that locks the course to the top of the display On the example screens shown below we re travelling southward about 150 In the north up view the present position indicator appears to move toward the lower right corner of the screen The anchor icon shown on the right side of the screen is actually...

Page 18: ... right arrow key Your current trail is saved Press the EXIT key to erase this menu View Recall Trail Your current plot trail shows on the plotter by default To place a saved trail onto the plotter choose TRAILS SHOWN from the Plotter Options menu The screen shown at right appears Highlight the desired trail on this screen then press the right arrow key to select it Press the EXIT key to erase this...

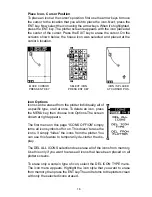
Page 19: ... position or at the cursor s location Place Icon Present Position To place an icon at your present position simply press the ENT key The screen shown at right appears Use the arrow keys to highlight the desired icon Now press the ENT key again The plotter screen reappears with the icon showing at the position you were at when the ENT key was pressed GRIDS RINGS BOTH PLOT 1 SCREEN PRESS ENT KEY SEL...

Page 20: ...ed from the plotter individually all of a specific type or all at once To delete an icon press the MENU key then choose Icon Options The screen shown at right appears The first menu on this page ICONS OFF ON simply turns all icon symbols off or on This doesn t erase the icons it simply hides the icons from the plotter You can use this feature to temporarily de clutter the dis play The DEL ALL ICON...

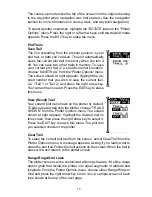
Page 21: ...he groups When the desired group appears press the EXIT key to erase the Pages menu A summary of the groups follows Note that many of the groups have navigation data that re quire navigation to a waypoint in order to show data See the waypoint section for information on setting up the unit for waypoint navigation Group A This screen has bearing BRG track TRK a trip meter distance to go DIS and gro...

Page 22: ...nd CDI show on this screen Velocity made good is the speed you re making towards the waypoint For example if you re in a boat and travelling directly towards a waypoint at 30 miles per hour but you re going against a 5 m p h cur rent then your velocity made good is 25 miles per hour Group E This screen has bearing track distance to go and velocity made good Group F A repeat of group E except veloc...

Page 23: ...mall CDI The clock shows the time based upon the setting in the initialization It s an offset from UTC which is the time the GPS system uses If this time is incorrect you can reset it by press ing the MENU key then highlight System Setup and press the right arrow key Now highlight the Set Local Time label and press the right arrow key The screen shown below appears Use the left and right arrow key...

Page 24: ...u put in until it reaches zero To set either timer first press the MENU key then high light the desired timer set menu In this example we re setting the countdown timer so the DWN TIMER SET label was selected Now press the right arrow key A screen similar to the one shown below appears Using the right and left arrow keys highlight the first number in the time that you want to set The time is in ho...

Page 25: ...sed to be called GMT Group M and N The group M and N screens show DGPS information Other than the altitude and course information on group M shown at right in order to use these screens there must be a DGPS receiver connected to the unit The DGPS corrections at the top of the screen show the corrections the GPS receiver is using The satellite s number is follow by an identifier showing its status ...

Page 26: ...press the left or right arrow key while the box is flashing The box changes each time the arrow key is pressed When the desired box appears then you can change another box or save your changes by pressing the ENT key If you want to leave this screen without saving the changes simply press the EXIT key In this example we sim ply changed the BRG to ALT then pressed the ENT key The screen on the far ...

Page 27: ...n Beneath this is the dis tance and bearing from your present position to the waypoint It s icon shows just to the right of the dis tance and bearing The date and time the waypoint was saved is at the bottom of this screen In short all of the detail about the waypoint shows on this screen SavingYour Present Position as a Waypoint Quick Save Method To save your present position simply press the WPT...

Page 28: ...t Position as a Waypoint Select Number Method The method shown previously doesn t let you choose the waypoint number You can pick the waypoint num ber see below on waypoint selection then save your present or cursor position To do this first press the WPT key once A screen similar to the one at right ap pears Highlight the WPT label at the top of the screen Press the right or left arrow keys until...

Page 29: ...ypoint and press the right arrow key to select it The waypoint list screen is erased and the waypoint menu reappears NearestWaypoint You can select the nearest waypoint to your present position by choosing Nearest from the waypoint menu The screen shown below right appears Up to five way points show on this screen The highlighted waypoint at the top of the screen is nearest to your present posi ti...

Page 30: ... want to save a posi tion under from the waypoint menu Next highlight the Options menu and press the right arrow key Now high light the Position Edit menu and press the right arrow key The screen shown at right appears Using the left and right arrow keys highlight each number in the po sition and change it using the up and down arrow keys When you re ready to save this position and return to the w...

Page 31: ...hown at right shows the starting location S the recalled waypoint 5 the plot trail from the starting location to the present position and the present position Navigating to a cursor location This unit lets you navigation to a location without storing it in the waypoint database by using the plotter and cursor To do this first switch to a plotter screen Now move the cursor to the location that you ...

Page 32: ...ake land features restricted or prohibited areas or any other feature into account when it projects the track line on the screen Use caution when navigating to a location Make certain there are no obstructions in your path OTHER WAYPOINT OPTIONS Move a Waypoint You can move all information from one waypoint num ber to another to help organize the waypoints In this example we ll move all of the inf...

Page 33: ... select the first waypoint which is called waypoint A on this screen Highlight the Set WPT A label and press the right arrow key A screen similar to the one shown at right appears This screen is virtually identical to the waypoint screen Select a waypoint using the waypoint number from the waypoint list or the nearest waypoint list After select ing the waypoint highlight the SET WPT A label and pr...

Page 34: ...enu and press the right arrow key The screen at the top of the next page appears Select a waypoint from either the waypoint number newest or waypoint list When you ve chosen the waypoint high light the USE REF label and press the right arrow key The unit returns to the Project WPT screen The starting waypoint you chose shows in the middle of this screen Now set the distance from the starting waypo...

Page 35: ...ve the waypoint press the ENT key The position is saved under the waypoint number you selected Delete a Waypoint To erase all of the information in a waypoint first press the WPT key then select the waypoint you want to erase Now highlight the Options label and press the right arrow key Finally highlight the Delete WPT label and press the right arrow key A message appears asking if you really want...

Page 36: ...t list screen This shows all of the waypoints that form the route The first waypoint is highlighted at the top of the screen To se lect the first waypoint in the route simply press the right arrow key A new menu appears as shown below This menu lets you go to the waypoint selection menu delete a waypoint from the route or see details about any waypoint in the route Since we want to add a way point...

Page 37: ...om the route list that you want to delete and press the right arrow key Highlight the Delete label on this menu and press the right arrow key The unit returns to the route list with the waypoint removed from the list Note This doesn t delete the waypoint from the database it only removes it from the route Waypoint Detail To view the position bearing distance and other infor mation about a waypoint...

Page 38: ...his starts the navigation along the leg of the route that is closest to your present position On the screen shown at right waypoint number 7 is the closest to the present posi tion If you want to start the route with a different way point press the right arrow key until the desired way point number appears If you want to see details about the highlighted way point press the WPT key When you have e...

Page 39: ...tion label is highlighted Press the right arrow key The unit stops showing navigation information Navigation Notes If you are navigating with this unit either to a waypoint or in a route and shut it off it will preserve the current waypoint number that it is navigating to It also saves the current route if it is in use and the route s forward or reverse order When you turn the unit on it will show...

Page 40: ... three different formats statute nautical and metric The default is statute The chart below shows the settings for each Statute Nautical Metric Distance miles nautical miles kilometers Speed miles per hour knots kilometers per hour Altitude feet feet meters The unit will also show bearing in degrees true or mag netic and the clock in 12 hour a m p m or 24 hour formats To change a unit of measure f...

Page 41: ...ing sent by the Expedi tion II and the wiring is correct then you may need to change the NMEA or the serial communication settings Configure NMEA Output Highlight the Configure NMEA Output menu then press the right arrow key The screen shown below ap pears NMEA 0183 Version There are two versions of the NMEA data 1 5 and 2 0 If your other equipment requires 2 0 press the right arrow key to select ...

Page 42: ...N II WIRES OTHER DEVICE S WIRES EXPEDITION II TRANSMITTING NMEA DATA TO ANOTHER DEVICE TO EXPEDITION II DGPS RECEIVER 12 VDC BATTERY BLACK WIRE GROUND WIRES WHITE WIRE RED WIRE TO 12V DGPS RECEIVER S RECEIVE DATA WIRE IF NEEDED EXPEDITION II WIRES EXPEDITION II RECEIVING DATA FROM A DGPS RECEIVER GREEN WIRE DGPS RECEIVER S TRANSMIT DATA WIRE ...

Page 43: ...Press the right arrow key The screen shown at right appears Check your DGPS receiver s manual for the proper data settings Highlight the menu item you need to change Press the left or right arrow keys to change them The serial port defaults are 4800 baud no parity and 8 data bits Press the EXIT key to erase this menu Reset Options To return the unit to the original factory settings highlight the P...

Page 44: ...Zealand and Mili tary Grid UTM s are marked on USGS topographic charts This system divides the Earth into 60 zones each 6 degrees wide in longitude British Irish Swedish Swiss New Zealand and Finnish grid systems are the national coordinate system used only in their respective coun tries In order to use these grid systems you must be in the respective country This unit will pick the matching datum...

Page 45: ... A screen similar to the one at right appears The WGS 84 label is highlighted To change it simply press the up or down arrow keys to highlight the de sired datum then press the ENT key This selects the datum and erases the select datum menu To erase the menu without changing the datum simply press the EXIT key A list of the datums used by the Expedition II is in the back of this manual PCF Positio...

Page 46: ...sent position display and the position shown on the chart In this example we entered 0 degrees 0 047 minutes north latitude and 0 degrees 0 244 minutes east longitude That is the difference between the present position shown by the Expedition II and the one on our chart After you ve entered the latitude longitude correction press the ENT key to accept it The Expedition II erases the PCF entry scre...

Page 47: ...ature in known surroundings and determine its capabilities before venturing into unknown territory To turn the power save feature on press the MENU key then highlight the GPS SETUP label and press the right arrow key Now highlight the PWR SAVE label and press the right arrow key to turn it on Press the EXIT key to erase the menu The letters PS for Power Save show on the satellite status screen whe...

Page 48: ... ting still This typically happens when using small less than 05 mile anchor alarm ranges If you have a DGPS beacon receiver connected to the Expedition II smaller ranges may be usable Arrival Alarm If you set the arrival alarm s distance to a small number and you run a route see the routes section the Expedition II may not show navigation data to the next waypoint once you arrive at the first one...

Page 49: ...set show for your present position If you move the plotter s cursor to a different position before using this calculator it will show the sunrise sunset for the cursor s location The moonrise moonset calculator works identically to the sunrise sunset calculator It looks like the screen at right A moon symbol shows near the bottom of the screen showing the approximate phase of the moon The arrow ne...

Page 50: ...rs Now highlight the Start At label and press the right arrow key The Expedition II returns to the Simu lator Setup menu using the waypoint you specified as the starting way point Use Arrow Keys to Steer This option lets you change both the course and speed on the screen as the simulator is running To do this highlight the Steer With Arrows label on the Simula tor Setup screen then press the right...

Page 51: ...imer UPT ETE Estimated Time En route FIX A measure of your receiver s position quality A fix of 1 is bad 9 is the best ICON A symbol you can place on the map representing a land mark POSITION Your present position GS Ground Speed Your actual speed TTG Time To Go Time remaining at your present speed until you reach a waypoint UTC Coordinated Universal Time Time at the prime meridian at Greenwich En...

Page 52: ...ARC 1960 MEAN ASCENSION ISLAND 1958 ASTRO BEACON E 1945 IWO JIMA ASTRO DOS 714 ST HELENA ISLAND ASTRO TERN ISLAND 1961 ASTRONOMICAL STATION 52 MARCUS ISLE AUSTRALIAN GEODETIC 1966 AUSTRALIAN GEODETIC 1984 AYABELLE LIGHTHOUSE DJIBOUTI BELLEVUE IGN EFATE ERRAOMANGO BERMUDA 1957 BISSAU GUINEA BOGOTA OBSERVATORY COLOMBIA BUKIT RIMPAH INDONESIA CAMP AREA ASTRO ANTARCTICA CAMPO INCHAUSPE ARGENTINA CANTO...

Page 53: ...ean 1950 England Channel Islands Ireland Scotland Shetland Islands European 1950 Finland Norway European 1950 Greece European 1950 Iran EUROPEAN 1950 ITALY SARDINIA EUROPEAN 1950 ITALY SICILY EUROPEAN 1950 MALTA EUROPEAN 1950 SPAIN PORTUGAL EUROPEAN 1979 MEAN FORT THOMAS 1955 NEVIS ST KITTS GAN 1970 REPUBLIC OF MALDIVES GEODETIC DATUM 1949 NEW ZEALAND GRACIOSA BASE SW 1948 AZORES GUAM 1963 GUNUNG ...

Page 54: ...A 1927 MEAN CARRIBEAN N AMERICA 1927 MEAN CENTRAL AMER N AMERICA 1927 MEAN CANADA N AMERICA 1927 MEAN CONUS N AMERICA 1927 MEAN CONUS EAST N AMERICA 1927 MEAN CONUS WEST N AMERICA 1927 ALASKA N AMERICA 1927 BAHAMAS NO SAN SALV N AMERICA 1927 BAHAMAS N AMERICAN 1927 CANADA WEST N AMERICAN 1927 CANADA CENTRAL N AMERICAN 1927 CANADA EAST N AMERICAN 1927 CANADA NORTH N AMERICAN 1927 CANADA YUKON Nahrw...

Page 55: ...n 1927 Mexico North American 1983 Alaska Canada CONUS North American 1983 Central America Mexico Observaorio Metereo 1939 Azores Corvo Flores Islands Old Egyptian 1907 Egypt Old Hawaiian Mean for Hawaii Kauai Maui Oahu Old Hawaiian Hawaii Old Hawaiian Kauai Old Hawaiian Maui Old Hawaiian Oahu Oman Oman Ordinance Survey Great Britain 1936 Mean for England Isle of Man Scotland Shetland Islands Wales...

Page 56: ...th American 1969 Argentina South American 1969 Bolivia South American 1969 Brazil South American 1969 Chile South American 1969 Colombia South American 1969 Ecuador South American 1969 Ecuador Baltra Galapagos South American 1969 Guyana South American 1969 Paraguay South American 1969 Peru South American 1969 Trinidad Tobago South American 1969 Venezuela SOUTH ASIA SINGAPORE TANANARIVE OBSERVATORY...

Page 57: ...PLACEMENT OR REFUND AS JUST DESCRIBED IS THE EXCLUSIVE REMEDY AVAILABLE TO YOU AGAINST US FOR ANY DEFECT MALFUNCTION OR NON CON FORMITY CONCERNING THE PRODUCT OR FOR ANY LOSS OR DAMAGE RESULT ING FROM ANY OTHER CAUSE WHATSOEVER WE WILL NOT UNDER ANY CIR CUMSTANCES BE LIABLE TO ANYONE FOR ANY SPECIAL CONSEQUENTIAL INCI DENTAL OR OTHER INDIRECT DAMAGE OF ANY KIND Some states do not allow the exclusi...

Page 58: ...ef note detailing the problem you re having with the unit Please include your name address and daytime telephone number 4 Please include payment for non warranty repairs Check money order Visa or MasterCard may be used 5 Fill in your name address zip code date and RA number in the blanks provided on the UPS form included with your unit 6 Attach the label to the shipping box tear off the tab for yo...

Page 59: ...Most quality dealers that handle marine elec tronic equipment should be able to assist you with these items Consult your local telephone directory for listings 2 LEI Extras Inc P O Box 129 Catoosa OK 74015 0129 or call 800 324 0045 USA orders only Eagle Electronics may find it necessary to change or end our shipping policies regulations and special offers at any time We reserve the right to do so ...

Page 60: ...56 ...
Page 61: ... brief note with the product describing the problem Be sure to include your name return shipping address and a daytime telephone number How to Obtain Service International Customers Only Except Canada If you need service or repairs contact the dealer in the country you purchased your unit WARRANTY REPAIR WILL BE HONORED ONLY IN THE COUNTRY UNIT WAS PURCHASED Please follow the shipping instructions...

Page 62: ... See page 53 inside this manual for complete warranty details If your unit fails and the failure is not covered by the original warranty Eagle has a flat rate repair policy that covers your unit and accessories packed with the unit at the factory There is a 180 day warranty on all non warranty repairs from the factory which is similar to the original warranty but is for 180 days rather than one ye...

Reviews: