background image

4

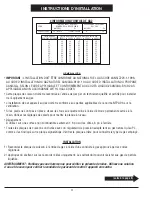
INSTALLATION INSTRUCTIONS

GENERAL NOTES

IMPORTANT:

INSTALLATION MUST CONFORM TO THE NATIONAL FUEL GAS CODE #ANSI Z223.1-1996,

THE NATIONAL GAS INSTALLATION CODE #CAN/CGA-B149.1, OR THE PROPANE INSTALLATION CODE

#CAN/CGA-B149.2 AS APPLICABLE AND IN ACCORDANCE WITH LOCAL CODES.

• Gas connection to the hot plate must be performed by a technician certified or licensed to install gas-fired

equipment.

• Installation of this gas-fired appliance must comply with applicable portions of NFPA 96 for ventilation.

• If legs are not in place, screw all legs into permanently fastened nuts on all corners and tighten by hand. Use

leg adjustment to level the hot plate.

• Clearances:

For use on noncombustible surface only: 6˝ sides, 6˝ rear

• All gas hot plates are supplied with a gas pressure regulator suitable for use with natural gas or LP gas as noted

on the name plate. Check rear mounted plate to verify type of gas.

INSTALLATION

1) Connect hot plate to gas supply by pipe material that’s approved by local ordinance for gas piping.

2) Apply sealant to male threads only. Sealant must be resistant to the action of liquefied petroleum gases.

CAUTION: Do not use an open flame to check for leaks. Check all gas piping for leaks with a soap and water

solution before operating unit.

(continued on Page 5)

SERIES

ORIFICE DRILL SIZE / EAGLE PART #

INCHES IN WATER COLUMN

NATURAL

LP

NATURAL

LP

CLHP and CLUHP

43 / 335076

1.55mm / 368018

10˝

GAS ORIFICE INFORMATION

ORIFICE SIZE

ORIFICE SIZE REQUIRED AT OTHER ELEVATIONS

AT SEA LEVEL

2000 ft

3000 ft

4000 ft

5000 ft

9000 ft

32

33

34

35

35

38

39

40

41

41

42

44

41

42

42

42

43

45

50

51

51

51

51

53

51

51

52

52

52

53

52

52

53

53

53

54

60

64

64

65

65

67

67

68

68

68

69

70

73

73

77

77

78

78

77

77

77

77

78

78

1.55mm

54

54

54

54

55

Summary of Contents for 358983

Page 1: ...GE SAVE YOUR BOX AND ALL PACKING MATERIALS YOU ARE RESPONSIBLE FOR DAMAGE TO YOUR UNIT IF RETURNED IMPROPERLY PACKED IMPORTANT KEEP THIS MANUAL WITH THE APPLIANCE ALL THE TIME THIS MANUAL IS TO BE REA...

Page 2: ...be operated with the supplied legs properly installed NOTE Appliance must be installed under a ventilation hood CAUTION DO NOT USE THE HOT PLATE AS A STOOL OR LADDER DO NOT STAND OR SIT ON THE HOT PLA...

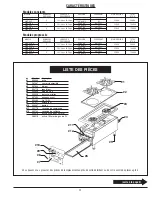
Page 3: ...34713 regulator 5 354609 4 leg 6 355426 crumb tray 7 357459 front panel 8 354094 10 32 screw 9 357417 decal 10 349397 knob 11 332778 control valve 12 333142 pilot light valve 335076 natural gas orific...

Page 4: ...egulator suitable for use with natural gas or LP gas as noted on the name plate Check rear mounted plate to verify type of gas INSTALLATION 1 Connect hot plate to gas supply by pipe material that s ap...

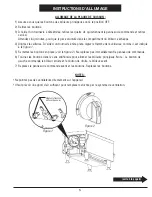
Page 5: ...de screwdriver adjust pilot flame as shown in figure 1 5 Reinstall control knobs see figure 2 Do not reinstall front control panel at this point 6 Turn knobs counterclockwise to light main burners Not...

Page 6: ...t off valve to OFF before cleaning Allow hot plate to cool completely before cleaning Remove grates Clean food particles from grate drip burner heads and crumb tray with warm water and mild detergent...

Page 7: ...ront control panel 3 Loosen compression nut holding aluminum tube at the burner 4 Unscrew fitting and 43 orifice from the mixing chamber 5 Replace orifice with the 1 55mm colored orifice included with...

Page 8: ...tail Display are divisions of Eagle Group 2010 by the Eagle Group 100 Industrial Boulevard Clayton Delaware 19938 9905 U S A www eaglegrp com Phone 302 653 3000 Foodservice 800 441 8440 MHC Retail 800...

Page 9: ...RVEZ LA BO TE ET TOUT LE MAT RIEL D EMBALLAGE VOUS SEREZ RESPONSABLE DES DOMMAGES L APPAREIL SI CELUI CI EST MAL EMBALL LORS DE SON RETOUR IMPORTANT GARDEZ TOUJOURS LE PR SENT MANUEL PR S DE L APPAREI...

Page 10: ...E Il faut installer l appareil sous une hotte AVERTISSEMENT N UTILISEZ PAS LA PLAQUE DE CUISSON COMME UN TABOURET OU UNE CHELLE NE MONTEZ PAS SUR LA PLAQUE DE CUISSON ET NE VOUS ASSOYEZ PAS SUR CELLE...

Page 11: ...609 pied de 4 po 6 355426 ramasse miettes 7 357459 panneau avant 8 354094 Vis 10 32 9 357417 autocollant 10 349397 bouton 11 332778 soupape de commande 12 333142 soupape de veilleuse 335076 orifice 43...

Page 12: ...ateur de pression adapt tant au gaz naturel qu au PL comme il est indiqu sur la plaque signal tique V rifiez la plaque arri re pour conna tre le type de gaz employ INSTALLATION 1 Raccordez la plaque d...

Page 13: ...e la veilleuse comme il est indiqu la figure 1 5 Remettez les boutons en place voir la figure 2 Ne replacez pas imm diatement le panneau de commande 6 Tournez les boutons dans le sens antihoraire pour...

Page 14: ...ion OFF Attendez que la plaque de cuisson a enti rement refroidi avant de la nettoyer Retirez les grilles Utilisez de l eau ti de et un d tergent doux pour enlever les particules de nourriture sur les...

Page 15: ...neau de commande avant 3 Desserrez l crou de compression qui retient le tube d aluminium sur le br leur 4 Desserrez le raccord et l ouverture 43 de la chambre de m lange 5 Remplacez l orifice par l 1...

Page 16: ...divisions du Eagle Group 2010 Eagle Group 100 Industrial Boulevard Clayton Delaware 19938 9905 U S A www eaglegrp com T l phone 302 653 3000 service alimentaire 1 800 441 8440 SC Vente au d tail 1 800...

Reviews: