background image

22 

  E-MU Systems

XL-7 / MP-7 Operation Manual Addendum

Event Timing

The following information is intended for advanced users. If you are just 
getting started you can skip this section for now.

Songs and patterns both contain 

pre-sequence setup

 information that is 

loaded just before a song or sequence plays. This pre-sequence information 
is not reloaded when a pattern loops. Reloading this setup information 
each time a pattern looped would cause data clogging and possible timing 
errors in the sequence.

The first two ticks (0 & 1) are reserved for pre-sequence setup informa-
tion. Tick 0 is reserved for the internal pre-sequence setup information. 

Tick 1 is used to place your own pre-sequence setup information so 
that it won’t loop and cause timing errors.

Events (controller data, program changes, sysex, etc.) are played before 
Notes, even if they are located on the same numbered Tick. This is done 
so that volume changes and other programming information will be in 
place when the notes turn on.

Track Priority

The sequencer handles lower numbered tracks first. Therefore, you should 
put your most timing-critical data on low numbered tracks. Normally this 
will not be important since the sequencer timing is so good, but if you 
create very dense sequences, this information might be useful.
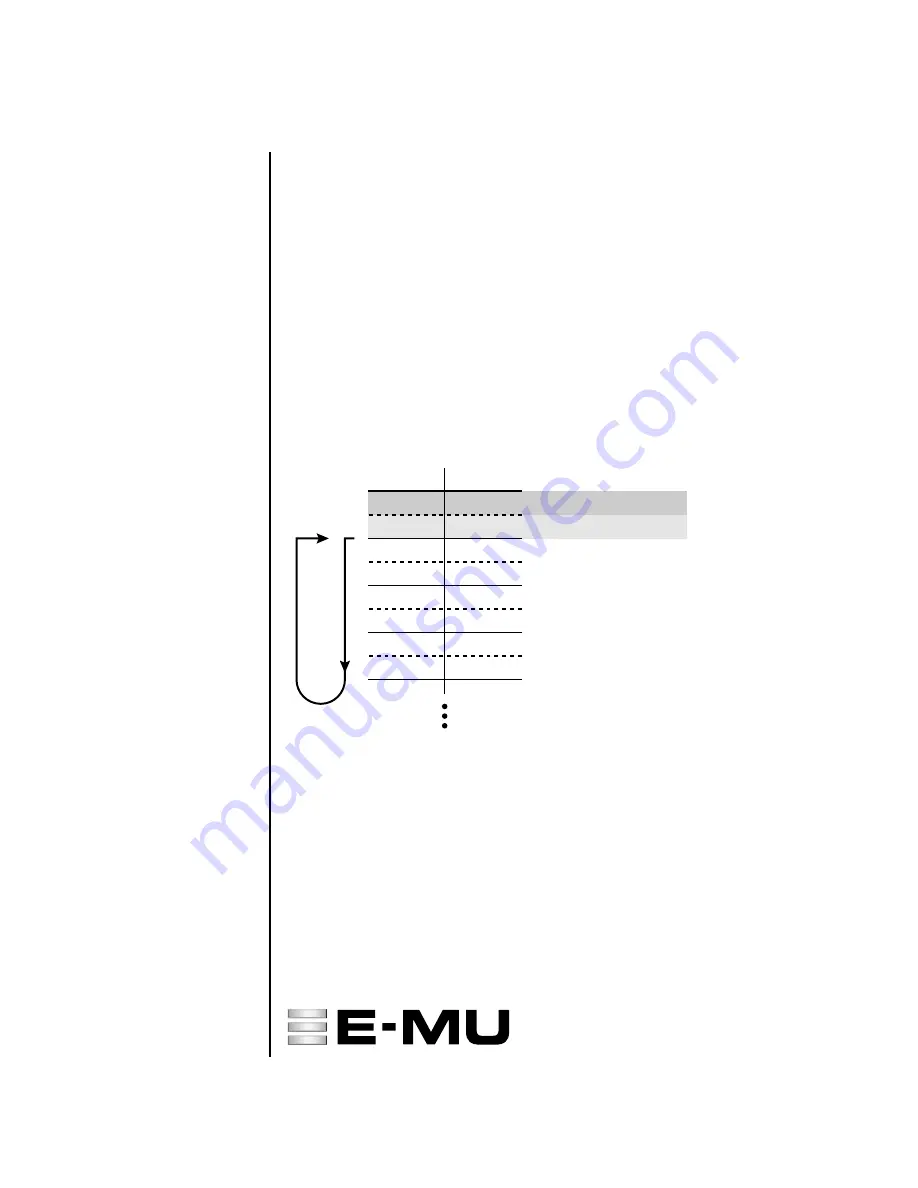
Notes

tick 0

tick 1

tick 2

tick 3

Events

tick 0

tick 1

tick 2

tick 3

Loop

Pre-Sequence

Setup Info

Pattern/Song Setup Info

Reserved for User Events

This chart shows how notes and other MIDI events are recorded at the beginning of 
a pattern or song. 

Notes are played after other MIDI events. Ticks 0 and 1 are reserved for 

pre-sequence 

setup

 information which does not loop. Beginning at tick 2 of the pattern or song, 

information is recorded normally (events first, then notes).

Europe, Africa, Middle East
E-MU / ENSONIQ

Suite 6, Adam Ferguson House
Eskmills Industrial Park
Musselburgh, East Lothian
Scotland, EH21 7PQ
Tel: +44 (0) 131-653-6556
Fax: +44 (0) 131-665-0473

E-MU World Headquarters
E-MU / ENSONIQ

P.O. Box 660015
Scotts Valley, CA  USA
95067-0015
Telephone: 831-438-1921
Fax: 831-438-8612
Internet: www.emu.com

Summary of Contents for XL-7 Command Station

Page 1: ...6 Extend Sequence Data To Located in the Pattern Edit menu this new feature allows you to extend an existing pattern by looping the existing data Page 7 The Asterisk An asterisk now appears in the pre...

Page 2: ...urves to tailor the aftertouch response to your playing style Page 18 Local Control On Off This Controllers menu function facil itates use of the keypads with an external sequencer Page 18 Footswitch...

Page 3: ...s the initial setup information for the Pattern or Song To select another pattern while one is already playing Turn the data entry control in Pattern Mode View The lower line of the display changes to...

Page 4: ...rter notes and ticks to note on events in the selected tracks To Scale or Shift Note Duration 1 Select the pattern you wish to edit 2 Select the Track s you wish to Scale or Shift using the Track Enab...

Page 5: ...to edit 2 Select the Track s you wish to Scale or Shift using the Track Enable Mute buttons 3 Press the Pattern Edit button 4 Scroll to the Scale Shift Velocity screen shown below using the data entr...

Page 6: ...2 Press the Pattern Edit button from pattern mode 3 Scroll to the Pattern Length screen and set the length to the measures you wish to extend For example if you want to copy the first measure set the...

Page 7: ...lled just before the pattern is played Important Pattern and Song Setup information is saved as it was set at the moment you saved the pattern or song Pattern Song Name Number Track Events patterns on...

Page 8: ...and patterns 1 Select the pattern you wish to edit 2 Press the Pattern Edit button 3 Scroll to the Cut Copy Track to Clipboard screen using the data entry control 4 Select the track to be cut or copi...

Page 9: ...oll to the Song Channel Assign screen shown above using the Data Entry control 3 Select MultiA if you want the song track to go to channels 1A 16A or MIDI port A Select MultiB if you want the song tra...

Page 10: ...l to the Paste Clipboard to Track screen shown below using the data entry control 4 Select the track where you want the clipboard data to be pasted The Home Enter LED will be flashing once the cursor...

Page 11: ...exit the screen To Edit a MIDI Note 1 Select the pattern you wish to edit 2 Press the Pattern Edit button 3 Scroll to the Note List Editor screen shown below using the data entry control 4 Press the E...

Page 12: ...es the currently selected event allowing you to edit and create a new event 1 Press Repeat 2 Change the time channel or MIDI event type Note You cannot have two events with the exact same time and dat...

Page 13: ...send program changes to external devices the Track must be assigned to an external channel To Edit a MIDI Event 1 Select the pattern you wish to edit 2 Press the Pattern Edit button 3 Scroll to the E...

Page 14: ...rn Select the track below track 1 and the first screen shown below will appear To Insert a Tempo Change into the Conductor Track 1 Select the pattern you wish to edit 2 Press the Pattern Edit button 3...

Page 15: ...through the event list and locate the tempo change you want to edit 7 Press the front panel Erase button to erase the tempo event 8 Simply change the Tempo or Location fields to modify the tempo or t...

Page 16: ...mands MIDI Song Position Pointer Start Continue Stop commands are now received by XL 7 and MP 7 Start Continue Stop commands are always received Song Position Pointer commands are received only when s...

Page 17: ...og the MIDI cable XL 7 and MP 7 do not use poly aftertouch even though it can be transmitted out over MIDI Aftertouch is also called Pressure in the Preset Edit Cords menu To Change the Aftertouch Cur...

Page 18: ...om the rubber keypads without playing internal sounds Turning Local Control Off allows you to use the Echo Thru feature on your sequencer while sequencing In conjunction with Echo Thru Local Control O...

Page 19: ...e footswitch again will punch out of record When the sequencer is stopped repeatedly pressing the footswitch cycles through the three record modes realtime grid step record Tap Tempo Pressing the foot...

Page 20: ...n a drum map The transpose range is 36 semitones Recording Realtime Controller Data into a Pattern The instructions in the Revision A operation manual are incorrect because they leave out the all impo...

Page 21: ...vents function to erase controller data from the pattern 14 Press the Play button to begin recording The controller knobs now adjust the volumes of all 16 channels 15 Press Stop when you re finished r...

Page 22: ...formation will be in place when the notes turn on Track Priority The sequencer handles lower numbered tracks first Therefore you should put your most timing critical data on low numbered tracks Normal...

Reviews: