background image

18

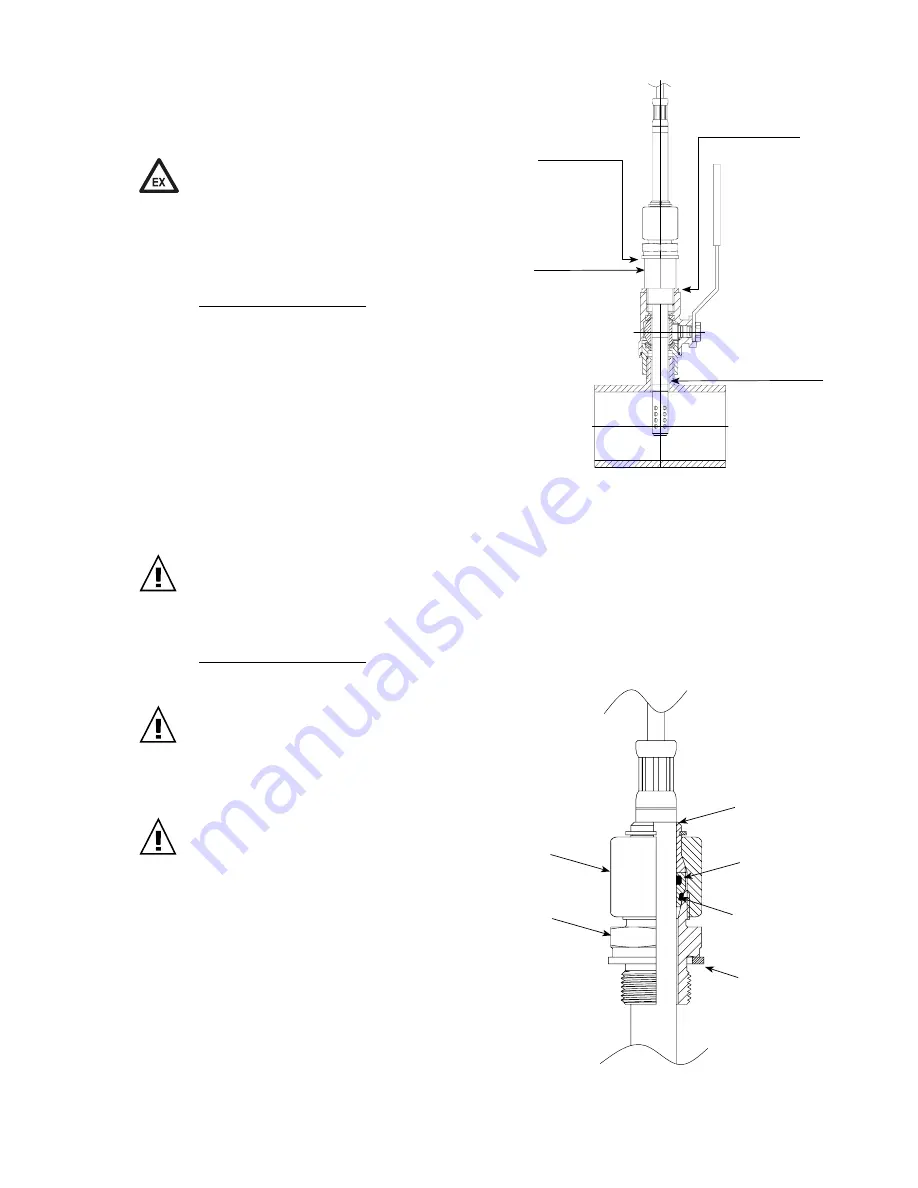
3.5.3  Mounting the probe using ball valve (optional)

With ball valve mounting, the system being meas-

ured does not need to be emptied or brought to a 

standstill to mount or remove the probe. 

Install the sensor head against the flow direction.

It is only permitted to use one ball valve that is 

approved for use in explosion hazard areas.

The process pressure must be below 10bar 

(145psi).

The two metal sealing rings (see figure) should be 

replaced each time after being screwed on.

MOUNTING THE PROBE:

The mounting temperature is not permitted to 

deviate from the usage temperature by more than 

±40°C 

(104°F)

.

• 

Mount the probe with the ball valve closed.

• 

Open the ball valve.

• 

Insert the sensor head through the ball valve 

into the process. A manual pressing tool is 

recommended at high pressure.

• 

To ensure that the probe is securely installed, the closing nut must be tightened at a 

defined torque of 30Nm. 

If there is no torque wrench present, tighten the closing nut by hand as far as possible. 

Turn another ~50° using a suitable open-ended spanner. 

A tightening torque that is too low results in a lower clamping force (fixing force) of the 

clamp sleeve. There is therefore a risk of injury due to the probe tube being driven out. 

An excessively high tightening torque can result in the permanent deformation of the 

clamping sleeve and the probe tube. This makes the removal and re-mounting process 

more difficult or impossible.

REMOVING THE PROBE:

• 

Hold the probe tube tight. (Caution: Do not 

bend the connection cable)

• 

Slowly unfasten the closing nut using a 

spanner (spanner size 24) until the drive-

out force affects the tube. Never fully 

remove the closing nut when installed, and 

instead screw on only as far as possible!

• 

After the sensor head has been removed 

from the process as far as it will go, close 

the ball valve. 

• 

The probe can be fully removed.

Both for mounting and removal, ensure that 

O-ring 1 is correctly installed.

If damaged, O-ring 1 can be replaced by the 

user.

O-ring type: 13x1.5mm 

(0.5"x 0.06")

 - FKM-60

Spare part order no. HA050308

Metal sealing ring

(included with the ball 

valve set as standard)

Internal diameter:

≥ 

13.1 mm (0.51")

Extension 

(not provided with an NPT 

thread)

Metal sealing ring

(as standard 

with probe)

Clamp sleeve

Sealing

nut

Fitting body

O-ring 2

O-ring 1

no aluminium 

is permitted

Summary of Contents for EE300E Series

Page 1: ...Operating instructions EE300Ex Series HUMIDITY TEMPERATURE TRANSMITTER For Intrinsically Safe Applications BA_EE300EX_e v1 7 Technical data subject to change 302484...

Page 2: ...we request that you contact our customer service department quot ing the device number designation and type given on the nameplate Copyright E E Elektronik Ges m b H All rights reserved USA FCC notice...

Page 3: ...g flange optional 17 3 5 3 Mounting the probe using ball valve optional 18 3 5 4 Mounting the probe using sensor retraction tool optional 19 3 6 Calculation of the maximum cable length 20 3 7 Selectin...

Page 4: ...ions must always be available to all persons carrying out mounting commissioning operation and servicing It is essential that the device is only operated when in perfect operating condition Any faults...

Page 5: ...activity aw Water content in mineral transformer oil x ppm Water content in customer specific oil x ppm The EE300Ex HT humidity temperature transmitter is available in the following designs The EE300...

Page 6: ...number is printed on the Hazardous label Ex marking EE300Ex with IECEx USA or Canada labeling must not be installed in the European Union Hazardous Label Ex marking Product Label ATEX product label E...

Page 7: ...39 1 5 Oil filter 32 1 26 Wall mounting humidity and temperature Model A Remote sensing probe humidity temperature up to 20bar 300psi or 300 bar 4351 psi Model E and M Remote sensing probe humidity te...

Page 8: ...hum Temperature C 179 7 60 2 4 151 5 9 98 3 9 6 0 24 150 6 2 6 Dewpoint measurement in natural gas Valid only for EE300Ex HT6S Gx Special option for natural Gas application The accuracy of the dewpoi...

Page 9: ...EN60079 25 and IEC60079 14 IEC60079 25 proof of intrinsic safety in the system description and national requirements should be followed For the U S Canada see Controll Drawing M1_1309080 and ANSI ISA...

Page 10: ...sing part Upper housing part 70 2 8 4 5 0 18 The lower housing section is mounted using 4 screws Screw diameter 4 5mm 0 18 3 2 1 Drilling plan for the housing If the upper housing section is removed f...

Page 11: ...ion 1 group A B and in the dust hazard area for groups IIIA IIIB and IIIC or Class II III The probe for wall mounting is not permitted to be used for Zone or Division bushing EE300Ex wall mounting 1 c...

Page 12: ...intrinsically safe power supply device EE300Ex with remote sensing probe 2 channels via intrinsically safe power supply device L L CH2 CH1 4 20mA ia Zone 1 2 21 22 Division 2 Class I II III Group A B...

Page 13: ...g ring screw connection The clamping ring screw connection can be used as Zone or Division bushing To do this the screw connection is screwed into the isolating wall and must have a seal tightness of...

Page 14: ...crew connection body tight and tighten the union nuts with 1 turns to the 9 o clock position Re mounting Slide measurement sensor with clamping rings into the fitting as far as it will go Tighten the...

Page 15: ...ening torque that is too low results in a lower clamping force fixing force of the clamp sleeve There is therefore a risk of injury due to the probe tube being driven out An excessively high tightenin...

Page 16: ...ed for that purpose Insert the sensor with copper sealing Swagelok and pro tective cover into the sensor retraction tool until the stop position Fasten the Swagelok screw conneciton in the sensor retr...

Page 17: ...2A 2 0 0267 m Ltotal 2800m maximum cable length Caution this is the max length without allowing for the intrinsic safety cable capacity and inductivity may reduce the length even further 3 7 Selecting...

Page 18: ...intrinsic safety in accordance with EN60079 11 2012 EN60079 25 2010 Appendix A U0 27V Ui 28V ok I0 88mA Ii 100mA ok P0 576mW Pi 700mW ok C0 90nF 2 2nF 33nF ok L0 2 3mH 0mH 0 195mH ok Protection level...

Page 19: ...trained specialist personnel authorised to do so by the system operator Installation in accordance with NEC or CEC with consideration of the Control Drawing M1_1309080 For installation in an explosio...

Page 20: ...nication RS232 the external power supply required is included as standard with the configuration adapter USB If the upper housing section of the EE300Ex with the electronics and measurement probe is r...

Page 21: ...tion with a maximum of 1 M in the potential equalization The ground conductor or the potential equalization connection must have a cross section of 4mm 0 06in for the external earthing With stranded w...

Page 22: ...2 or Division 2 There is no display permitted in the gas hazard area for EPL Ga IIC or Class I Division 1 Group A B and in the dust hazard area for IIIA IIIB and IIIC or Class II III 4 20mA ia 4 20mA...

Page 23: ...not be more than 2 mins To avoid damaging the sensor layer the use of mechanical equipment is not permitted When screwing on the filter cap ensure that the sensor is NOT touching the metallic filter c...

Page 24: ...ppm Outputs freely selectable and scalable outputs 2 x 4 20 mA 2 wire galvanically isolated RL Vcc 9V 20mA Output 1 CH1 must be connected General Supply voltage Class III Vcc min 9 RL 0 02 VDC Vcc max...

Page 25: ...le gland M16 for cable diameter 5 10 mm 0 2 0 4 Electrical connection screw terminals max 1 5 mm AWG 16 Temperature range sensor head according measuring range electronic 40 60 C 40 140 F electronic w...

Page 26: ...34 10 EC Declaration of Conformity...

Page 27: ...35 11 IECEX CERTIFICATE OF CONFORMITY COC...

Page 28: ...36...

Page 29: ...37...

Page 30: ...38...

Reviews: