background image

See3CAM_81    

                Application User Manual 

                    29-May-2017


www.e-consystems.com

 | Subject to change without notice


Page 19 of 22 

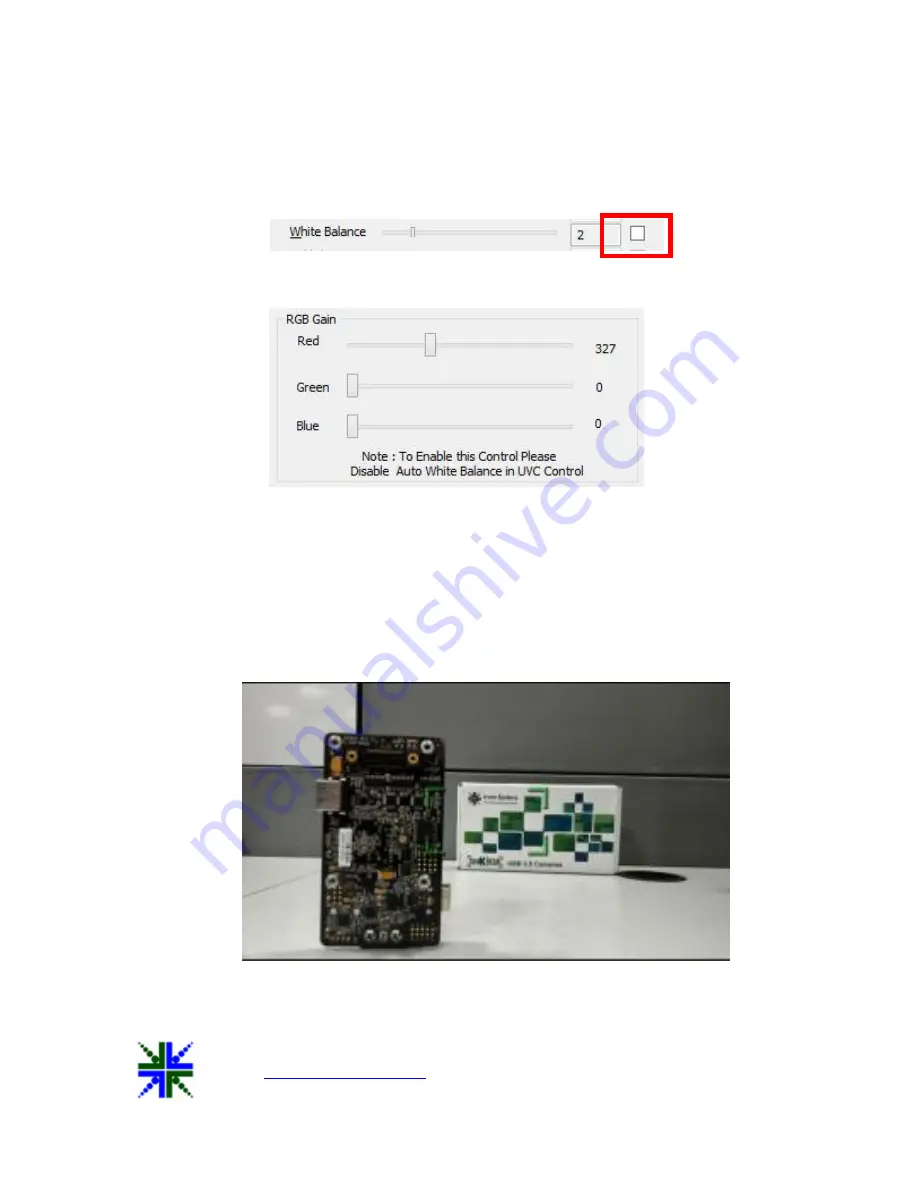
6.4.8 RGB Gain Control 

To control the RGB Sliders, 

it’s necessary to Disable the AWB (Auto White Balance) from 

UVC Control Tab. To do this, go  to Options->Video Capture Filter->Video  Proc  Amp-> Uncheck 
White Balance auto Box(Figure 17). After doing this RGB Silders are enabled and it be changed 
by moving the silders. 


Figure 17: Disable AWB 


Figure 18: Disable AWB 

6.4.9 Focus ROI Control 

To Control the Auto Focus ROI, 

it’s necessary to enable the Continuous Focus or Single 

Trigger Focus from Extension Unit. By default Centered is Enabled which means that Auto Focus 
ROI  is  always  at  a  center  region  of  a  preview.  When  Manual  is  selected,  region  of  focus  is 
selected manually by clicking the preview area by mouse (Left Click). Focus Window size is also 
can be selected from Window Size drop down Box. Window Size will vary for different resolution 
(see Table 4). 


Figure 19: Auto Focus ROI - Centered 


Summary of Contents for See3CAM-81

Page 1: ...m Subject to change without notice Page 1 of 22 e con Systems India Pvt Ltd RISHABH INFO PARK RR Tower IV 7th Floor Super A 16 A 17 Thiru Vi Ka Industrial Estate Guindy Chennai 600 032 www e consystem...

Page 2: ...ol 10 6 2 1 3 Saturation Control 10 6 2 1 4 Sharpness Control 10 6 2 1 5 White balance Control 10 6 2 2 Video Capture Pin 10 6 2 3 Still Capture Pin 11 6 2 4 Freeze Frame 12 6 2 5 Fit to Window 12 6 3...

Page 3: ...13 Decemeber 2016 Initial Draft Sathish Kumar R Revision 1 0 15 December 2016 Reviewed and added changes Arun A Revision 1 1 28 December 2016 Added Changes Sathish Kumar R Revision 1 2 03 March 2017...

Page 4: ...res of this camera However this camera can be utilized any DirectShow application such as Skype etc 3 Scope e con provides a sample DirectShow application called e CAMView along with the See3CAM_81 ca...

Page 5: ...he See3CAM_81 and Drivers Follow the following steps to initialize the device with the host computer Connect the one end of the USB 3 0 cable to the USB 3 0 connector provided at the back of See3CAM_8...

Page 6: ...AMView This version of e CAMView comes with a set of features that can be used to attain the full functionality of See3CAM_81 The Menu bar at the top contains few menu items and the lower status bar s...

Page 7: ...e video device which is currently streaming By default See3CAM_81 device will be indicated by the name See3CAM_81 In case any other video device is connected such as on board webcam etc the e CAMView...

Page 8: ...ear as shown in the snapshot below Figure 3 Options Menu From this Options menu the following options can be selected Video Capture Filter to change brightness and focus values Video Capture Pin to se...

Page 9: ...of the Options Menu can be used to configure some of the camera parameters of See3CAM_81 Camera Brightness Contrast Saturation Sharpness White Balance both manual and automatic These controls are avai...

Page 10: ...of See3CAM_81 6 2 1 4 Sharpness Control The Sharpness values can be changed from a minimum value of 1 to 5 by moving the slider and the exact changes will be reflected immediately in the preview This...

Page 11: ...1080p 1920x1080 5 fps HD 720p 1280x720 16 fps VGA 640x480 30 fps Table 3 Resolution and Frame Rates Figure 5 Video Capture Pin 6 2 3 Still Capture Pin The Still Capture Pin submenu of the Options Men...

Page 12: ...eaming preview is re sized to fit into the streaming window to maintain the aspect ratio If disabled then a cropped version of the preview will be displayed in the streaming window 6 3 Capture Menu Th...

Page 13: ...7 Capture menu 6 4 Extension Unit Menu The See3CAM_81 camera has some additional controls and features These are not quite common controls and hence they are not included in the standard UVC controls...

Page 14: ...re 8 Extension Unit Menu The controls supported in this are listed below 6 4 1 Focus Mode control See3CAM_81 supports two modes They are the following Auto Mode In Auto Mode it has Single Shot Mode an...

Page 15: ...a scene change Manual Mode In Manual Mode Focus can be adjusted manually with help of slider which moves from the range of 0 infinite to 1022 macro and the exact changes will be reflected immediately...

Page 16: ...age stream is composed of shades of gray in this mode Figure 11 Grayscale mode Note If there is any change in saturation under UVC Control tab then Grayscale is changed to Normal Effect 6 4 3 Flip Mir...

Page 17: ...t like a torch OFF It disables the all Strobe controls Figure 13 Strobe Controls 6 4 5 GPIO controls In See3Cam_81 has two output GPIO S and two Input GPIO S General Purpose Output For General Purpose...

Page 18: ...the status of the Focus User can press the Focus Status button if camera finished focusing means it will display Focus Succeeded otherwise it will display Focus busy Figure 15 Focus Status 6 4 7 Focu...

Page 19: ...nged by moving the silders Figure 17 Disable AWB Figure 18 Disable AWB 6 4 9 Focus ROI Control To Control the Auto Focus ROI it s necessary to enable the Continuous Focus or Single Trigger Focus from...

Page 20: ...e consystems com Subject to change without notice Page 20 of 22 Figure 20 Auto Focus ROI Manual Figure 21 Auto Focus ROI Manual Note The Green Window shown in the images are just for representation in...

Page 21: ...To get the Unique ID that has been assigned to the See3CAM range of cameras the user has to press the F W Version button available in the Extension Unit dialog The camera serial number will be displa...

Page 22: ...ange without notice Page 22 of 22 Figure 24 Help menu 7 Conclusion This document provides the basic steps involved in using the e CAMView application and See3CAM_81 in the appropriate modes For additi...

Reviews: