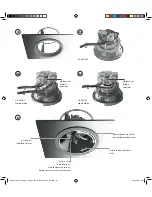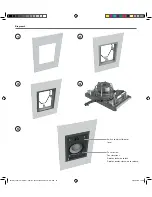
Diagram 5
1
2
Note:
To remove the Speaker Unit from the Installation Frame turn
the locking tabs 90° counter-clockwise. Take care to support the
speaker as the locking tabs are released.
With the speaker connected and secured into the Installation
Frame, its bass/mid driver orientation and tweeter angle can
be adjusted. In most installations, the orientation and angle
should be adjusted so that the drivers face towards the
listening position. To adjust the bass/mid driver orientation,
grip the tweeter mounting arm and rotate the entire Speaker
Unit as necessary. To adjust the tweeter tilt, grip the tweeter
body and angle it to one of the three positions.
The high frequency tonal balance of Studio Series speakers
can be adjusted to suit different installation environments. A
tweeter level switch located on the front bezel 3 dB,
0 dB and -3 dB options on the S4-C65 or S4-C80, and
0 dB dB or -3 dB options on the S4-DVC65.
Note:
Different tweeter levels may be appropriate to suit different
listening environments. An environment dominated by carpets, soft
furnishings and curtains for example might require a higher tweeter
level than an environment where tiled floors and glass predominate.
5
5
•
In-ceiling speaker installation is completed by fitting the
grille. The grille is secured magnetically and requires no
more than placing into position.
Note:
Square Studio Series in-ceiling speaker grilles are optionally
available. Magnetic attachment enables square grilles to be rotated
as required to align perfectly with ceiling or wall lines.
Note:
If the ceiling is to be painted following speaker installation,
the supplied paint mask must be used to protect the speaker
hardware from paint ingress. Speaker grilles should not be fitted
during painting. They should be painted separately.
Diagram 5 illustrates the in-ceiling speaker installation procedure.
2018 Dynaudio CI manual - Item No. 307001016932 Rev N - EN.indd 12
05/01/2018 12.39

