Dynalink RTA1320 User Manual Download Page 85

Chapter 4: Web Configuration 

IP over ATM   

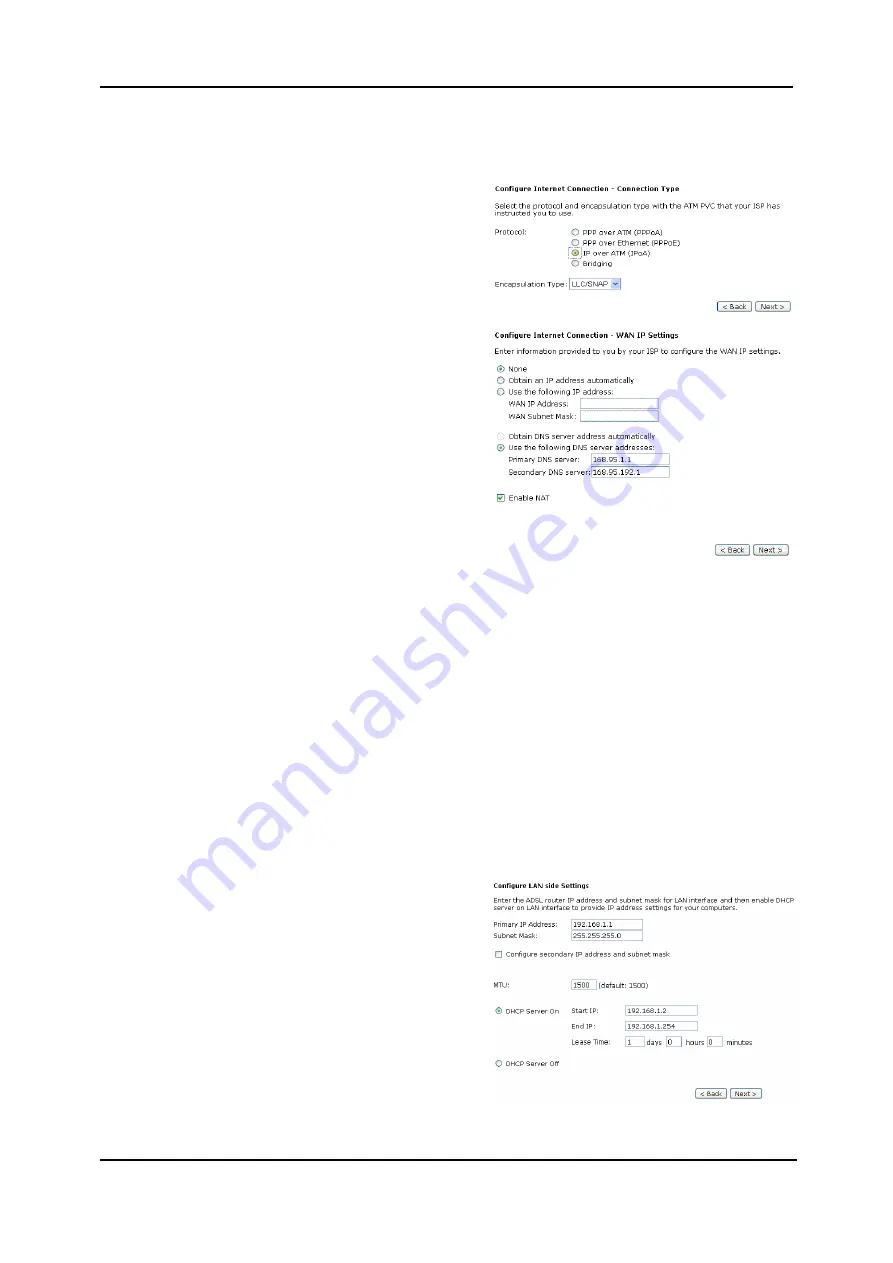
If the type you have to choose is IP
information. 

 over ATM, please refer to the following 

 to 

 uses ATM 

uality of service’s features. 

hoose

 IPoA

 and click 

Next.


IPoA is an alternative of LAN 
emulation. It allows TCP/IP network
access ATM network and
q

C

None:  

If it is not necessary to set the WAN IP 
address, please click this button.


Obtain an IP address automatically

Click this button to allow the s

ystem to 

get an IP address automatically.


WAN IP Address 

WAN Subnet 

Mask:  

If you choose 

Use the following IP 

address

,


you have to enter the IP 

address and subnet mask information 
that you received from the ISP for the 
WAN interface.


Obtain DNS server address 
automatically:  

Only when you select 

Obtain an IP 

address automatically

 that this 

option is available. You may click this 
button to allow the system to get DNS 
server address automatically. 

Use the following DNS server 
addresses:  

Select this item to set the DNS server 
addresses manually, type the 
information provided by your ISP in 
the following 

Primary DNS 

and


Secondary DNS server

 entries, e.g., 

168.95.1.1

 and 

168.95.192.1

.  

Click 

Enable NAT

 if necessary.   

After setting up the WAN IP and 
DNS server information, click 

Next 

to open the following page. 

On the 

Configure LAN side Settings


page, you have to fill in the data 
requested.


Primary IP Address 

&

 Subnet Mask:

Key in the information that offered by 
your ISP for the LAN connection, e.g., 

192.168.1.1

 for the primary IP address 

and 

255.255.255.0

 for the subnet 

mask.


MTU:


(Please refer to the PPPoA/ PPPoE 
section.) The default 

MTU

 setting here 

is 1500. You may modify it if 
necessary. 


73

Summary of Contents for RTA1320

Page 1: ...User Manual RTA1320 ADSL2 Modem Router ...

Page 2: ... or use of this document or the material contained herein S St ta at te em me en nt t o of f C Co on nd di it ti io on ns s In the interest of improving internal design operational function and or reliability the seller reserves the right to make changes to the products described in this document without notice The seller does not assume any liability that may occur due to the use or application o...

Page 3: ...s product from the wall outlet when it is not in use or before cleaning Pay attention to the temperature of the power adapter The temperature might be high After powering off the product power on the product at least 15 seconds later Do not block the ventilating openings of this product When the product is expected to be not in use for a period of time unplug the power cord of the product to preve...

Page 4: ...CC Rules These limits are designed to provide reasonable protection against harmful interference in a residential installation This equipment can generate use and radiate radio frequency energy and if not installed and used in accordance with the instructions may cause harmful interference to radio communications However there is no guarantee that interference will not occur in a particular instal...

Page 5: ... Windows 2000 5 For Windows XP 8 For Windows Vista 11 Uninstalling the USB Driver 19 For Windows ME 19 For Windows 2000 19 For Windows XP 23 For Windows Vista 25 Setting up TCP IP 30 For Windows 98 30 For Windows ME 33 For Windows NT 35 For Windows 2000 38 For Windows XP 41 For Windows Vista 44 Renewing IP Address on Client PC 47 For Windows 98 ME 47 For Windows NT 2000 XP 47 For Windows Vista 49 ...

Page 6: ...etwork IGMP Snooping 83 Internet Connections 85 Internet DNS Server 88 Internet IGMP Proxy 88 Internet ADSL 89 IP Routing Static Route 90 IP Routing Dynamic Routing 91 Virtual Server Port Forwarding 92 Virtual Server Port Triggering 94 Virtual Server DMZ Host 95 Virtual Server Dynamic DNS 95 Virtual Server Static DNS 96 NAT ALG Configuration 96 Firewall Bridge Filtering 97 Firewall IP Filtering 98...

Page 7: ...Contents Chapter 5 Troubleshooting 121 Problems with LAN 121 Problems with WAN 121 Problems with Upgrading 122 Chapter 6 Glossary 123 Appendix Specifications 125 VII ...

Page 8: ...ADSL Router User Manual VIII ...

Page 9: ...sly integrated to ADSL service for existing corporate or home users Now users can enjoy various bandwidth consuming applications via RTA1320 ADSL2 Router Unpacking Check the contents of the package against the pack contents checklist below If any of the items is missing contact the dealer from whom the equipment was purchased 9 ADSL Router 9 Power Adapter and Cord 9 RJ 11 ADSL Line Cable 9 RJ 45 E...

Page 10: ...tures NAT Network Address Translation PAT Port Address Translation let multiple users on the LAN to access the internet for the cost of only one IP address ALGs Application Level Gateways such as NetMeeting MSN Messenger FTP Quick Time mIRC Real Player CuSeeMe VPN pass through with multiple sessions RTSP SIP etc Port Forwarding the users can setup multiple virtual servers e g Web FTP Mail servers ...

Page 11: ...ce To use the ADSL Router you have to subscribe for ADSL service from your broadband service provider According to the service type you subscribe you will get various IP addresses Dynamic IP If you apply for dial up connection you will be given an Internet account with username and password You will get a dynamic IP by dialing up to your ISP such as under PPPoA PPPoE or MER mode Static IP address ...

Page 12: ... and Caution in this manual are highlighted with graphics as below to indicate important information Note Contains information that corresponds to a specific topic Caution Represents essential steps actions or messages that should not be ignored XII ...

Page 13: ...f test is in progress The device enters the console mode of the boot loader Solid Red Power on self test is failure if the led always stays solid red Power Flash Red Firmware upgrades in progress Off No DSL signal is detected Slow Flash Green DSL line handshaking is in progress Fast Flash Green DSL line training is in progress DSL Solid Green DSL line connection is up Off No PPPoA or PPPoE connect...

Page 14: ...ustrates the rear panel of your ADSL Router Connector Description DSL RJ 11 connector USB USB connector Ethernet Ethernet RJ 45 connector Power switch 9VAC 9VAC Power connector Note For use only with power supply HON KWANG type A9100 230 Leader type A41090100 2 ...

Page 15: ...the DHCP server is Enable by default the DHCP clients should be able to access the ADSL Ro should be assigned an IP address first for initial configuration You also can manage the ADSL Router through a web browser based manager ADSL ROUTER CONTROL PANEL The ADSL Router manager uses the H protocol via a rectly or through an external hub switch to the LAN port of the device To configure the device v...

Page 16: ... to the DSL wall outlet o Please attach one end of the Ethernet cable with RJ 45 connector to the LAN port of your ADSL Router p Connect the other end of the cable to the Ethernet port of the client PC q Connect the supplied power adapter to the PWR port of your ADSL Router and plug the other end to a power outlet r Turn on the power switch Here is an example for hardware connection 4 ...

Page 17: ...ear Please wait for a moment p When the welcome screen appears click Next for the next step q When the complete window of the InstallShield Wizard appears click Finish r Link your router and the PC with a USB cable s The system will detect the USB driver automatically Then the system will copy the proper files for this router Note If the USB device is not detected automatically check the USB cable...

Page 18: ... window of the InstallShield Wizard appears click Finish r Link your router and the PC with a USB cable s The system will detect the USB driver automatically And then the system will copy the proper files for this router 6 Note If the USB device is not detected automatically check the USB cable between the PC and the device Besides make sure that the device is power on ...

Page 19: ...driver is installed properly You can use the router To make sure that your router is properly installed please do the following steps 1 Right click on My Computer and press Properties 2 On the Hardware tap click Device Manager 3 Confirm that the Askey ADSL Router USB Remote NDIS Device is on the Network adapters list 7 ...

Page 20: ...oment p When the welcome screen appears click Next for the next step q When the complete message of InstallShield Wizard appears click Finish r Link your router and the PC with a USB cable s The system will detect the USB driver automatically Note If the USB device is not detected check the USB cable between the PC and the device Also make sure that the device is power on 8 ...

Page 21: ... router and copy the files automatically u After the file copying finished a completing message will appear v You can use the router now To make sure your router is properly installed please do the following steps 1 Right click on My Computer and press Properties 2 On the Hardware tab click Device Manager 9 ...

Page 22: ...ADSL Router User Manual 3 Confirm that the Askey ADSL Router USB Remote NDIS Device is on the Network adapters list 10 ...

Page 23: ... process see the figure below for example To install the USB driver before connect the router to the PC here provides two methods Method One Use the driver CD came with the product package n Run the USB installation program on the CD provided in your router package o An InstallShield Wizard will appear Please wait for a moment p When the welcome screen appears click Next for the next step 11 ...

Page 24: ...er and the PC with a USB cable s The system will detect the USB driver automatically Note If the USB device is not detected check the USB cable between the PC and the device Also make sure that the device is power on t After the file copying finished a completing message will appear u You can use the router now 12 ...

Page 25: ... Prompt screen appears point to the driver folder on your PC and then enter setup s Press enter to start silent installation q The system will install the driver automatically You can connect your router and the PC with a USB cable now r The system will detect the USB driver automatically Note If the USB device is not detected check the USB cable between the PC and the device Also make sure that t...

Page 26: ... detect the router and then install the driver n Plug the USB cable into the USB port on the PC o A Found New Hardware window will appear Press Locate and install driver software recommended p Then insert the USB driver CD provided in your router package into the PC and press Next 14 q The system will search disc for the USB driver needed and then complete the installation ...

Page 27: ... have a disc but have the driver files on your PC you can follow the steps below p Press I don t have the disc Show me other options q Select Browse my computer for driver software advanced r Press Browse to set the path for the driver file and then press Next 15 ...

Page 28: ...talling the driver t Now the driver software is installed successfully Press Close to start using the router To make sure the USB driver for your router is properly installed please do the following steps 1 Open the Start menu and press Control Panel 16 ...

Page 29: ...Chapter 2 System Requirement and Installation 2 On the Control Panel folder click System and Maintenance 3 Press System 4 Click Device Manager 17 ...

Page 30: ...ADSL Router User Manual 5 Confirm that the Askey ADSL Router USB Remote NDIS Device is on the Network adapters list 18 ...

Page 31: ...een your router and your PC Then click OK o Choose Settings Control Panel from the Start menu Choose Add Remove Programs p A dialog appears to ask you to choose the program that you want to remove Please select Askey ADSL Router USB Driver and click Change Remove q The InstallShield Wizard dialog will appear r When the Maintenance Complete screen appears the USB driver is removed successfully Clic...

Page 32: ...Router USB Driver from the Start menu p The InstallShield Wizard dialog will appear q A dialog appears to confirm whether you want to remove the USB driver or not Please click Ok r When the Maintenance Complete screen appears the USB driver is removed successfully Click Finish 20 ...

Page 33: ...ardware and left click on it 2 Click the dialog for Stop Askey ADSL Router USB Remote NDIS Device 3 The Router is safely removed click OK to continue o Choose Settings Control Panel from the Start menu Choose Add Remove Programs p A dialog appears to ask you to choose the program that you want to remove Please select Askey ADSL Router USB Driver and click Change Remove 21 ...

Page 34: ...l dialog will show up unplug your device from the USB port and click OK r The InstallShield Wizard will guide you till the USB driver is removed s When the Maintenance Complete screen appears the USB driver is removed successfully Click Finish 22 ...

Page 35: ...rams Askey Broadband Uninstall Askey ADSL Router USB Driver from the Start menu p The InstallShield Wizard dialog will appear q A dialog appears to confirm whether you want to remove the USB driver or not Unplug the USB cable from your PC and click Ok r When the Maintenance Complete screen appears the USB driver is removed successfully Click Finish Method Two n Unplug your USB cable between your r...

Page 36: ...at you want to remove Please select Askey ADSL Router USB Driver and click Change Remove q The InstallShield Wizard dialog will appear r A dialog appears to confirm whether you want to remove the USB driver or not Unplug the USB cable from your PC and click Ok s When the Maintenance Complete screen appears the USB driver is removed successfully Click Finish 24 ...

Page 37: ...window asking for permission to continue during USB driver uninstallation process see the figure below for example To uninstall the USB driver there are two ways to do it Please follow the instructions Method One Remove from Device Manager n Choose Start menu and then select Control Panel o Click System and Maintenance 25 ...

Page 38: ...ADSL Router User Manual p Press System q Click Device Manager r Right click Askey ADSL Router USB Remote NDIS Device on the Network adapters list and press Uninstall 26 ...

Page 39: ...the uninstallation or you will see the reminder as follows Unplug and press OK t When the Confirm Device Uninstall screen show up check Delete the driver software for the device and click OK to continue u Wait while the system is uninstalling v When the uninstallation is finished the icon of this router under network adapter list will disappear 27 ...

Page 40: ...l not be shown on the program list n Unplug your USB cable between your router and your PC o Choose Start menu and open Control Panel folder Click Uninstall a program p If the driver name is not on the list click Refresh button or F5 to update the information To remove the driver select it and then press Uninstall Refresh button q Then the system will start to uninstall the USB driver software aut...

Page 41: ...Chapter 2 System Requirement and Installation r When Maintenance Complete window shows up click Finish to exit s The USB driver is successfully removed now 29 ...

Page 42: ...ollow the steps below to set your network adapter If the TCP IP protocol has not been installed yet please follow the steps below for installation In the following illustrations we will set the PC to get an IP address automatically at the same time For Windows 98 1 Open the Start menu point to Settings and click on Control Panel 2 Double click the Network icon 30 ...

Page 43: ...col click Add Option 2 If you have TCP IP protocol skip to Step 6 Your networ interface card Check out if for your NI installed or k TCP IP C is not 4 Highlight Protocol and click Add 5 Highlight Microsoft on the left side of the window and select TCP IP on the right side Then click OK 6 When returning to the Network window highlight TCP IP protocol for your NIC and click Properties 31 ...

Page 44: ...ess tab Enable Obtain an IP address automatically and click OK 8 When returning to the Network window click OK 9 Wait for Windows when copying files 10 When prompted with System Settings Change dialog box click Yes to restart your computer 32 ...

Page 45: ...the Network icon 3 The Network window appears On the Configuration tab check out the list of installed network components Option 1 If there is no TCP IP protocol click Add Option 2 If you have TCP IP protocol skip to Step 6 4 Highlight Protocol and click Add Your networ interface card Check out if for your NI installed or k TCP IP C is not 33 ...

Page 46: ...he left side of the windows and select TCP IP on the right side Then click OK 6 While returning to Network window highlight TCP IP protocol for your NIC and click Properties 7 On IP Address tab Enable Obtain an IP address automatically and click OK 34 ...

Page 47: ...he Network window click OK 9 Wait for Windows when copying files 10 When prompted with the System Settings Change dialog box click Yes to restart your computer For Windows NT 1 Click Start point to Settings and then click Control Panel 2 Double click the Network icon 35 ...

Page 48: ...st of installed network components Option 1 If there is no TCP IP Protocol click Add Option 2 If you have TCP IP Protocol installed skip to Step 7 4 Highlight TCP IP Protocol and click OK 5 Insert the Windows NT CD into your CD ROM drive and type the location of the CD Then click Continue 36 ...

Page 49: ...ation 6 When returning to the Network window Open the Protocols tab then select TCP IP Protocol and click Properties 7 Enable Obtain an IP address from a DHCP server and click OK 8 When prompted with the message below click Yes to continue 37 ...

Page 50: ...urning to Network window click Close 10 When prompted with Network Settings Change dialog box click Yes to restart your computer For Windows 2000 1 From the Start menu point to Settings and then click Network and Dial up Connections 38 ...

Page 51: ...l Area Connection icon and then click Properties 3 On the General tab check out the list of installed network components Option 1 If there is no TCP IP Protocol click Install Option 2 If you have TCP IP Protocol skip to Step 6 4 Highlight Protocol and then click Add 39 ...

Page 52: ... Protocol TCP IP and then click OK 6 When returning to the Local Area Connection Properties window highlight Internet Protocol TCP IP and then click Properties 7 Under the General tab enable Obtain an IP address automatically Then click OK 40 ...

Page 53: ...System Requirement and Installation For Windows XP 1 Open the Start menu point to Control Panel and click it 2 Double click the Network Connection 3 Right click Local Area Connection and then click Properties 41 ...

Page 54: ...omponents Option 1 If there is no TCP IP Protocol click Install Option 2 If you have TCP IP Protocol skip to Step 7 If there is no TCP IP protocol installed on your PC press Install to continue 5 Highlight Protocol and then click Add 6 Click Internet Protocol TCP IP and then click OK 42 ...

Page 55: ...turns to the General Tab on the Local Area Connection Properties window highlight Internet Protocol TCP IP and then click Properties 8 Under the General tab select Obtain an IP address automatically and Obtain DNS server address automatically Then click Ok 43 ...

Page 56: ...ADSL Router User Manual For Windows Vista 1 Open the Start menu point to Control Panel and click it 2 Click Network and Internet 3 Select Network and Sharing Center 44 ...

Page 57: ...ide 5 Right click Local Area Connection and select Properties 6 On the Networking tab you will find Internet Protocol Version 6 and Version 4 Contact your ISP to confirm which one will be used We take TCP IPv4 for example here Select Internet Protocol Version 4 TCP IPv4 and press Properties 45 ...

Page 58: ...ADSL Router User Manual 7 Under the General tab select Obtain an IP address automatically and Obtain DNS server address automatically Then click Ok to exit 46 ...

Page 59: ...e to access the Internet To solve this problem please follow the procedures below to renew PC s IP address For Windows 98 ME 1 Select Run from the Start menu 2 Type winipcfg in the text box and click OK 3 When the figure below appears click Release to let go of the address and then click the Renew button to obtain a new IP address For Windows NT 2000 XP 1 Open the Start menu and click Run on this ...

Page 60: ...rom Start menu point to Programs select Accessories and then click Command Prompt 3 Type ipconfig at the command prompt window and press Enter to view the computer s IP information from DHCP server 4 If the computer is holding a current IP address type ipconfig release to let go of the address then type ipconfig renew to obtain a new one Released IP Address 48 ...

Page 61: ... box then click OK 2 The command prompt window will appear 3 Type ipconfig at the command window and press Enter to view the computer s IP information from DHCP server 4 If the computer is holding a current IP address type ipconfig release to let go of the address then type ipconfig renew to obtain a new one 49 ...

Page 62: ...e message The requested operation requires elevation please go to the Start menu and right click Command Prompt then set Run as administrator Press Continue when a dialog asking for permission to continue prompts After then repeat the above instruction to release and renew the IP address 50 ...

Page 63: ...A Numbered IP over ATM IPoA NAT Unnumbered IP over ATM IPoA Unnumbered IP over ATM IPoA NAT Bridge Mode MER Bridge Mode NAT To ensure your PC accessing the Internet successfully please check the following first A network interface card is installed on your PC The ADSL Router is solidly connected with your computer The TCP IP protocol has been installed and the IP address setting is to obtain IP ad...

Page 64: ...Internet Connection PVC Key in the VCI and VPI value e g VPI 0 VCI 38 Click the Next button 3 On the Configure Internet Connection Connection Type page select PPP over ATM PPPoA then click the Next button 4 On the WAN IP Settings page select Obtain an IP address automatically and check Enable NAT box Click Next 5 On the PPP Username and Password page enter the PPP username and password that you go...

Page 65: ...will be done at this case Configuration 1 Start your browser and type 192 168 1 1 in the URL box to access ADSL web based manager 2 Go to Advanced Internet Connections And click Add 3 Key in the VCI and VPI value e g VPI 0 VCI 38 Click the Next button 4 On the Configure Internet Connection Connection Type page select PPP over ATM PPPoA then click the Next button 5 On the WAN IP Settings page selec...

Page 66: ...n Internet Connection PVC Key in the VCI and VPI value e g VPI 0 VCI 39 Click the Next button 3 On the Configure Internet Connection Connection Type page select PPP over Ethernet PPPoE then click the Next button 4 On the WAN IP Settings page select Obtain an IP address automatically and check Enable NAT box Click Next 5 On the PPP Username and Password page enter the PPP username and password that...

Page 67: ...r no NAT translation will be done at this case Configuration 1 Start your browser and type 192 168 1 1 in the URL box to access ADSL web based manager 2 Go to Advanced Internet Connections And click Add 3 Key in the VCI and VPI value e g VPI 0 VCI 39 Click the Next button 4 On the Configure Internet Connection Connection Type page select PPP over Ethernet PPPoE then click the Next button 5 On the ...

Page 68: ...et mask for WAN is 255 255 255 248 Configuration 1 Start your browser and type 192 168 1 1 in the URL box to access ADSL web based manager 2 Go to Quick Start Quick Setup Uncheck Auto Scan Internet Connection PVC Key in the VCI and VPI value e g VPI 0 VCI 32 Click the Next button 3 On the Configure Internet Connection Connection Type page select IP over ATM IPoA then click Next 4 On the WAN IP Set...

Page 69: ...e the settings match the settings provided by your ISP Click Finish 8 Refer to the TCP IP properties specify an IP Address and fill in other information needed e g IP Address 10 11 80 82 Subnet Mask 255 255 255 248 Gateway 10 11 80 81 Preferred DNS server 168 95 1 1 9 Now the router is well configured You can access the Internet 57 ...

Page 70: ...igned to PCs on the LAN The following example uses the IP address ranging from 10 11 80 81 to 10 11 80 86 and the subnet mask is 255 255 255 248 Configuration 1 Start your browser and type 192 168 1 1 in the URL box to access ADSL web based manager 2 Go to Quick Start Quick Setup Uncheck Auto Scan Internet Connection PVC Key in the VCI and VPI value e g VPI 0 VCI 32 Click the Next button 3 On the ...

Page 71: ...or your LAN e g Primary IP Address 192 168 1 1 Subnet mask 255 255 255 0 Start IP Address 192 168 1 2 End IP Address 192 168 1 254 7 Check the network information Make sure the settings match the settings provided by ISP Click Finish 8 Now the router is well configured You can access into Internet 59 ...

Page 72: ...guration 1 Start your browser and type 192 168 1 1 in the URL box to access ADSL web based manager 2 Go to Quick Start Quick Setup Uncheck Auto Scan Internet Connection PVC Key in the VCI and VPI value e g VPI 0 VCI 32 Click the Next button 3 On the Configure Internet Connection Connection Type page select IP over ATM IPoA then click Next 4 On the WAN IP Settings page select None for WAN IP addres...

Page 73: ...h the settings provided by your ISP Click Finish 8 Refer to the TCP IP properties specify an IP Address and fill in other information needed e g IP Address 10 11 80 82 Subnet Mask 255 255 255 248 Gateway 10 11 80 81 Preferred DNS server 168 95 1 1 9 Now the router is well configured You can access the Internet 61 ...

Page 74: ...n 1 Start your browser and type 192 168 1 1 in the URL box to access ADSL web based manager 2 Go to Quick Start Quick Setup Uncheck Auto Scan Internet Connection PVC Key in the VCI and VPI value e g VPI 0 VCI 32 Click the Next button 3 On the Configure Internet Connection Connection Type page select IP over ATM IPoA then click Next 4 On the WAN IP Settings page select None for WAN IP address setti...

Page 75: ...ce and enter the information needed e g Secondary IP Address 10 11 80 81 Subnet mask 255 255 255 248 Click Next 8 Check the network information on the Summary page Make sure the contents match the settings provided by your ISP Click Finish 9 Now the router is well configured You can access the Internet 63 ...

Page 76: ...rowser and type 192 168 1 1 in the URL box to access ADSL web based manager 3 Go to Quick Start Quick Setup Uncheck Auto Scan Internet Connection PVC Key in the VCI and VPI value e g VPI 0 VCI 35 Then click the Next button 4 On the Configure Internet Connection Connection Type page select Bridging then click the Next button 5 On the WAN IP Settings page select None for WAN IP address settings 6 On...

Page 77: ...type 192 168 1 1 in the URL box to access ADSL web based manager 2 Go to Quick Start Quick Setup Uncheck Auto Scan Internet Connection PVC Key in the VCI and VPI value e g VPI 0 VCI 37 Then click the Next button 4 On the Configure Internet Connection Connection Type page select Bridging and then click the Next button 5 On the WAN IP Settings page select Obtain an IP address automatically then sele...

Page 78: ...ADSL Router User Manual 66 ...

Page 79: ...please proceed as follows 1 Start your web browser and type 192 168 1 1 the private IP address of the ADSL Router in the URL field 2 After connecting to the device you will be prompted to enter username and password By default both the username and the password are admin An example under Windows XP is shown as the left figure If you login successfully the main page will appear From now on the ADSL...

Page 80: ...he web mana r containing configuration or status info Current Version Here provides the ve To Have the New Settings Take Effect After selecting or adjusting the settings according to your needs your customizations will be saved to the flash memory before you restart the router And only after rebooting the router your customizations may take effect Language On the top to the right of this web page ...

Page 81: ...e default setting is checked shown as the figure If there is no any PVC configured in your ADSL router you some s connec Yet different will lead to different settin es Refer to the tailed information PVC can check this item so that it may start to scan internet connection automatically Otherwise please leave this item unchecked you will have to enter VPI and VCI w ATM PVC valid range is from 0 to ...

Page 82: ...you choose is P refer to the following information net PP over ATM or PPP over Ethernet please ISP s configuration can choose PPPoE According to the on the server you or PPPoA modes Choose PPPoA or PPPoE and click Next On this screen you have to make settings for WAN IP To get the IP address automatically click the Obtain an IP address automatically radio button Or click Use the following IP addre...

Page 83: ...e duration for the leased time The default is 1day DHCP Server Off Check this item if DHCP service is not needed on the LAN page you have to fill in the data requested Primary IP Address Key in the information that offered by your ISP for the LAN connection IP Address to connect to your router if they are not included in the range that DHCP server accepts See the nex figure for the secondary IP ad...

Page 84: ... If you find anything incorrect click e settings to Back to modify th If everything is OK click Finish accept these settings Now the system will reboot to activate have set in the new settings that you this section Please wait for 2 minutes before restarting the router 72 ...

Page 85: ...Only when you select Obtain an IP address automatically that this option is available You may click this button to allow the system to get DNS server address automatically Use the following DNS server addresses Select this item to set the DNS server addresses manually type the information provided by your ISP in the following Primary DNS and Secondary DNS server entries e g 168 95 1 1 and 168 95 1...

Page 86: ...LAN side The router will assign IP address and gateway address for each of your PCs Start IP Address End IP Addre Enter the information needed Lease Time Key in the duration for the time The default is 1day DHCP Server Off Check this item if DHCP service is not needed on the L Key in all the necessary settings Click Next for the coming page the r You can check the settings on Summary page If you f...

Page 87: ...k and the default gateway provi for the WAN interface While you choose t address automatically or use specific IP address you have to decide whether to select Obtain DNS serv address automatically or Use the following DNS server a The default setting is none shown as the figure above While selecting Obtain an IP address automatically or Use the following IP address the DNS setting appears shown as...

Page 88: ...s If you find anything incorrect click Back to mod If everything is OK click Finish to accept these settings And the following page will appear Now the system will reboot to activate the new settings that you have done in s before this section Please wait for 2 minute restarting the router 76 ...

Page 89: ...on including system up on about LAN IP address default gateway DNS rsion ADSL driver version Ethernet MAC status will be different according to the pages time ADSL speed and the informati server firmware version boot loader ve address and memory size The system settings that you configured in the web 77 ...

Page 90: ...s the quality of the ADSL connection It is done by transferring idle cells containing a known pattern and comparing the received data with this known pattern to check for errors After selecting the test duration time and click Start the following dialog appears to tell you the test is running You can stop the test by pressing Stop or close this dialog window by clicking Close When the test is over...

Page 91: ...rough the LAN and WAN interface For each interface cumulative totals are displayed for d Received and Transmitte You may click Reset to reset the amount This table shows all DHCP clients who get their IP addresses from your ADSL Router For each DHCP client it shows the Host Name MAC Address IP Address and the Lease Time DHCP Table Routing Table This table shows the routing rules your router uses t...

Page 92: ...ADSL Router User Manual 80 ...

Page 93: ...omain Configure the secondary IP Address and Subnet Mask Check this box to enter another set of IP Address and Subnet Mask to connect to your router if they are not included in the range that DHCP server accepts After checking this box the secondary IP address and subnet mask entries will show up as shown in the right figure Secondary IP Address Subnet Mask Enter the information provided by your I...

Page 94: ...er than the itself you can relay to that specific server and enter the IP addres as 10 11 95 2 in our example Server and Relay Off Check this item if DHCP service isn t needed on the LAN Apply Click this button to activate the settings listed above You can reserve one specific IP address for a certain PC for particular shown in the right column will purpose Simply add a mapping entry of MAC addres...

Page 95: ...raditionally IP packet ooping s are transmitted in one of either two ways Unicast 1 sender nder to everyone on the network Multicast delivers e network ic is treated in the same manner as broadcast With IGMP snooping multicast traffic of a at have members of that group IGMP snooping allowing you to significantly reduce multicast e below shows a simple network connected via the ADSL router There ar...

Page 96: ...es to perform more effectively Check Enable IGMP Snooping and click Apply to invoke this function When IGMP Snooping is enabled you can check the box below to filter out multicast packets which will be sent to your local network if no user plays multimedia movies If the PVC you re using is NAT enabled remember to turn on the IGMP Proxy at the same time Please refer to Internet IGMP Proxy for more ...

Page 97: ...ifies the virtual channel endpoints in an ATM network The valid range is from 32 to 65535 1 to 31 is reserved for well known protocols Please refer to the value that your ISP provides appears VPI Virtual Path Identifier Identifies the virtual path between endpoints in Service Category It decides the size and rate for the packets of the data in different service type There are five categories provi...

Page 98: ...rame If a port has an 802 1Q compliant device attach such as a tagged frames can carry VLAN membership information between switches thus letting a VLAN span multiple switches However it is important for network administrators to ensure ports with non 802 1Q compliant de attached are configured to transmit untagged frames Many NICs for PCs and printers are not 802 1Q compliant If they receive a tag...

Page 99: ... IPoA section for more information Add Default Route Check this item to add a default IP route he you will oA For example after rebooting your router the default route will be s on the Routing Table under Status menu you may check it hown If you choose Bridging from the Connection Type web page you will get a web page as the figure listed at the right side Please refer to Quick Setup for more info...

Page 100: ... IGMP is an Internet protocol that computer to report its multicast group membership to adjacent routers The hosts interact with the system through the exchange of IGMP messages When the system will interact with other routers through ever when acting as the proxy the system ask as follows ing queried the system will send membership reports to the group lticast address group which none of other lo...

Page 101: ...ation the total data rate and the data rate on each latency path is unchanged Check this box to enable the function If not uncheck this box to close the function Seamless Rate Adaptation It enables the ADSL2 It is a mandatory receiver initiated feature to maintain the operating conditions of changing environment conditi reallocates the data bits and p among the allowed carriers without modificatio...

Page 102: ...dress ved from the ISP and click Apply WAN interface Choose one from the drop down menu Adding a New One To add a static route please click Ad subnet mask and gateway that you recei IP Address The destination IP address and netmask of the network indicates where data packets are to be sent You may specify an IP type 0 0 0 0 or leave it blank Gateway IP Address Click this button to forward packets ...

Page 103: ...y isable this function Click Apply to invoke the settings set which the destination is the B The setting would be as follow Destination 192 168 10 0 Netmask 255 255 255 0 Stand Gateway 192 168 1 254 Router B IP Routing Dynami Routing Information Protocol RIP is u information between routers It helps the page allows you to enable disable this RIP Ve It incorporates the rm when receiving and broadca...

Page 104: ... the virtual server Because the firewall protects the router by filter rule you should update the filter rule after you set up the virtual server lid external IP Address re blocked by the firewall in this problems and allows Internet users to low Virtual Server function allows you to make servers on your LAN accessible to Internet users Normally Internet users would not be able to access a server ...

Page 105: ...e type that you select in the first list For example if you choose Aud Video in the first field the io field ke the drop down list corresponding contents of the second would be li shown as the following figure User defined Type a new service name for building a customized service for specific purpose There are three lines that you can enter settings into on this page If you need more lines just ap...

Page 106: ...ound traffic on a specific port it will set up porarily applications require multiple connection the port forwarding rules tem on the port ranges that you specify to allow inbound traffic It is supposed to increase the support for Internet gaming video conferencing and Internet telephony due to the To add a new port triggering rule click Add to open this web page Then choose an application name fr...

Page 107: ...ions and data n the NAT function is enabled NS ame System combines both functions of DNS and a fixed domain name This page allows you to access rvers with a domain name and password lect Choose a provider DynDNS org TZO com ChangeIP com or nnection Select the interface from the drop down list that you want to use for connecting the Internet User Name Type the user name that you d e domain name tha...

Page 108: ...AT Network Address Transla tly access th on such private networks to transparen external global Internet and enables access to selective local hosts fro NAT employed in a computer network A through the security checks of the firewall that would have otherwise restricted t traffic for not meeting its filter criteria ALG application specific translation agents allow an application on a host in one a...

Page 109: ...acket filtering router at the Internet gateway and then configures the filter rule in the router to block or filter protocols and addresses The systems behind the router usually have a direct access to the Internet however some dangerous services such as NIS and NFS are usually blocked For the security of your router set the firewall is an important issue g rovides a way for the users to define ru...

Page 110: ...icking Apply we will see the result as shown in the right You can use Add or Delete button to maintain the bridge filtering rules Firewall IP Filtering This page allows you to specify the IP packet filtering rules to prevent the services accessed from the Internet r hosts or limit the Internet access fo local hosts Choose Disabled to disable the firewall function Click Enabled to invoke the settin...

Page 111: ...ddress to allow or deny data transmission please pull down the drop down menu to choose a proper one The setting All means that all the IP addressed in the network are allowed or denied to pass through in Internet net you y If you choose Single or Sub will have to key in the specific IP address and Netmask for subnet as the start end point to let the router identify for granting or denying passing...

Page 112: ...ease e To click to get ge To delete the into the editing pa setting click to erase it To s another IP filtering click Add again et To add a new Inbound IP Filtering click Inbound traffic in the item of Select the direction to filter packets on the IP Filtering page Use the same way to add a new one as stated above 100 ...

Page 113: ...notions of class each class being the group of DSCP with the same Precedence value Values within a class would offer similar network services but with slight differences Classes were initially defined as DSCP Precedence Pur The fields pose 0 0 Best effort 8 1 Class 1 16 2 Class 2 24 3 Class 3 32 4 Class 4 40 5 Express forwarding 48 6 Control 56 7 Control Now DSCP is what we are using for the QoS c...

Page 114: ...for the traffic according to the traffic priority setting here As for the settings for the DSCP value and the WAN 802 1p value of upstream packets y will be see on the WAN side the the n DiffServ Class DSCP DiffServ is a com etworking architecture that s ifies a simple scalable and coar d mechanism for classifying managi network traffic and ng QoS e puter n pec se graine ng providi quality of serv...

Page 115: ...m traffic by assigning the transmission priority o the data for different users please use IP QoS to prioritize the data transmission ice IP QoS f The IP QoS allows you to set the settings based on layer three IP packets To add a new IP QoS settin Add in the page of Quality of Service IP QoS a page same as the right side will appear Traffic Class Name Type a name as the traffic class for identific...

Page 116: ...According to the example we set four rules for IP QoS In traffic A w the destinatio e set n port as 1 1024 and the nd ource IP is 192 168 1 0 when set simply Delete button the traffic priority is low in traffic B source port is from 201 to 8000 a the priority is medium in traffic C when the s subnet mask is 255 255 255 0 the traffic priority is high in traffic D the traffic is heading to 168 95 1 ...

Page 117: ...e field In our example bridge Available Interfaces The available interfaces such a Ethernet and USB will be displayed in the left side box When you choose i and click Add it will be transferred into the Grouped Interfaces at the right side box Yet if you want to remove the interface from the curre group it will be returned back to the Default group left side box after yo click Remove Now we are go...

Page 118: ...ustrates the port mapping configuration Under this configuration a internet through the bridge mode P will access the internet by the PPPoE c ny PC that connect to Ethernet port will connect to the VC pppoe_0_39_1 while the device using USB onnection br_0_35 106 ...

Page 119: ...nectivity mistakes whenever linking problem occurs Press Run Diagnostic Tests on the Diagnostic Tests page The Result would be shown on the same page For the item which passes through the diagnostics a PASS will be displayed on the right side of that item If not a Fail will be presented there Press the Help link to know what the result Pass Fail represents for Take the Help link of ADSL Synchroniz...

Page 120: ...Management Control From Remote There are six interfaces for the remote access Please choose from them if you want to enable the remote access control Select the Internet Connect Select one connection item from the function ant to have remote control through telnet FTP Choose this box if you want to have remote control through FTP TFTP Choose this box if you want to have remote control through TFTP...

Page 121: ...get in contact with the ACS and establish the ngly other service functions can be provided ctivation of CPE in the range of DSL broadband ACS It defines a mechanism CPE and also incorporates other CP framework Using TR 069 the configuration automatically Accordi TR 069 is the current standard for a market Compliant with D ADSL Router is highly manageable w dynamic service provisioning firmware and...

Page 122: ... the ACS wants to communicate with nds the report to ACS for the first time it will contain information for this Periodic Transmission of Inform Request If this function is enabled the CPE will frequently report to ACS the status after a period of time set here The default setting is 300 seconds and the ISP can modify the value Generally users do not have to change the settings here If this functi...

Page 123: ...por certificate Note The certificate may have been imported in this device already plea check with your ISP To synchronize your time with the server go to Management Internet Time to adjust the setting Configure to set time by Time Server and make sure the time zone is the same as the server s Please refer to the next section for detailed information about Internet Time 111 ...

Page 124: ...y the time erver Time Zone Choose the time zone of your location Apply Save the data on the screen and apply the data after restarting the router Cancel Discard the new configuration and reserve the original settings Update Now Click this button to refresh the current time S T typing the date and the time manually to help the router perform tasks If you select Time Server the system will set time ...

Page 125: ...formation Owing to the limitation of the storage on the ADSL router the former information will be erased and replaced by the latest message automatically when the buffer is overflowed display level Log Level This function en how detailed the messages will be stored Set a proper level according to your needs The default Log Level i Debugging The Debugging Level logs all messages to the file while ...

Page 126: ... the log information to The default mode is Local If you choose Remote or Both you have to specify the Server IP Address and UDP Port and all events will be s displayed on the remote Log Server Example Suppose we are going to record the Server bearing IP address 10 11 95 2 System Log Configuration 1 Choose Enabled Log 2 Select De system logs on both the ADSL Router and the the procedures below ill...

Page 127: ...prises website 2 Install the Kiwi Syslog server software on the PC 10 11 95 2 3 Open the Kiwi Syslog Daemon application You will get to a screen shown as follows 1 2 The Date and Time record the logging time The Priority field shows the log level the Hostname exhibits the position of the host and the Message column displays the process the description of it before the colon is the name of the proc...

Page 128: ...isplays the process and the description of it the name of the process appears before the colon and the elaboration for that process after the colon For example message 3 shows critical level information which is a pppd PPP daemon process showing that a valid IP address had been received from server and connection is up message 4 is a kernel process belonging to critical level information which rev...

Page 129: ...n and the warning window will be prompted Click OK to continue the backup procedure The system will ask your command about the next procedure Click Save to backup Y cho ce to save the backup f ou may change the file name and ose a pla ile And when you want to restore the settings in the future simply open Backup Config web page and use Browse button to locate the file 117 ...

Page 130: ...re for this router you can open the Update Firmware web page and choose the correct file by pressing automatically When it is finished the system will tell you the update is successfully Reset Router To make the settings that you set for this router take effect please open the Reset Router web page and click the Reboot button to invoke all settings You can restore your web pages wit defau h lt set...

Page 131: ...the Internet Only Windows XP supports UPnP function alling UPnP components s Please follow the steps below for inst 1 Click on the Start menu point to Settings and click on Control Panel 2 Select Add or Remove Program Add Remove Windows Components to open Windows Components Wizard dialog box 3 Select Networking Services and click Details Click the UPNP User Interface check box 4 Click OK The syste...

Page 132: ... wil page via the por The IE address will be directed to the management main webpage as shown in the graphic 7 Now the NAT traversal function has already been provided The ADSL router will create a new virtual server automatically when the router detects that some internet applications is running on the PC 120 ...

Page 133: ... ADSL Router and the LAN If the LAN LED on the front panel is off or keeps blinking there may be problem on the cable connecting to the ADSL Router At the DOS prompt ping the IP address of the ADSL Router e g ping 192 168 1 1 If the following response occurs Reply from 192 168 1 1 bytes 32 time 100ms TTL 253 Then the connection between the ADSL Router and the network is OK If you get a failed ping...

Page 134: ...uter s web page atic IP address such as 192 168 1 2 and then by entering http 192 168 1 1 Then update the correct otherwise download a of memory ssage Image uploading failed No image file was selected ossible cause You did not select a file correctly the web firmware again Error Message Image uploading failed The selected file contains an illegal image Possible cause The firmware file format is in...

Page 135: ...n IP address from that network to each PC One of some public addresses is configured and mapped to a private workstation address when accesses are made through the gateway to a publi network For example the ADSL Router is assigned with the public IP address of 168 111 2 1 With NAT enabled it creates a Virtual LAN Each PC on the Virtual LAN is assigned with a private IP address with default value o...

Page 136: ...PVC is a logical po because routing decisions do not need to be made along the way Permanent means that the circuit is preprogrammed by the carrier as a path through the network It does not need to be set UDP User Datagram Protocol UDP is a connectionless transport service that dispenses with the reliability services provided by TCP UDP gives applications a direct interface with IP and the ability...

Page 137: ...uto crossover Ethernet connect z settings Regulatory Approvals and Compliance EMC FCC part 15 Class B CE Telecom FCC part 68 Safety UL CB LVD Power Requirement Powe and Operation Environment Requirement Output 9 VAC 1A Power Consumption less than 10 Watt Ambient Temperature 0 to 40 C 32 to 96 F r Adaptor Input 120 10 or 230 10 VAC Relative Humidity 20 to 90 non condensing Physical PCB 80 mm L x 10...

Reviews: