


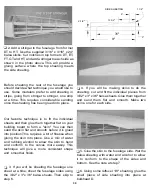


Q 9. Mount the landing gear and 4" wheels
(ROBQ1537).
Note: Optional landing gear struts are available
from Robart that fit this model. These struts not
only add a nice touch to the model but help
absorb landing stresses as well. Complete
instructions from Robart are included.
Ul 10. Mount the control horns to the ailerons,
flaps, elevators and rudder.
Q 11. Finish the installation of the control
linkages.
Q 12. Install the throttle servo and connect the
linkage to the engine.
Q 13. Final hookups and checks:
A. Take the servo arms off your servos, turn
on your radio and center all of the trims.
Reinstall all the servo arms and secure
them with screws.
B. Make sure that all clevises have a silicone
retainer installed.
C. Make sure that the control surfaces move
in the proper direction.
l-J 14. Identify your model. No matter if you fly
at an AMA sanctioned R/C club site or if you fly
somewhere on your own, you should always
have your name, address, telephone number
and AMA number on or inside your model. It is
required at all AMA R/C club flying sites and
AMA sanctioned flying events.
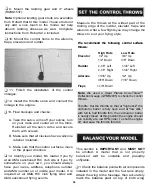
Measure the throws at the widest part of the
trailing edge of the rudder, elevator, flaps and
ailerons. After a few flights you may change the
throws to suit your flying style.
We recommend the following control surface
throws:
We recommend the following control surface
throws:
Elevator
High Rate
1/2" Up
Low Rate
3/8" Up
1-3/4" Left
1-3/4" Right
1/2" Up
1/2" Down 3/8" Down
Rudder
2-1/8"
2-1/8"
Left
Right
Ailerons
11/16" Up
9/16" Down 7/16" Down
1-1/8" Down
Flaps
Note: We used a Great Planes Accu-Throw™
Deflection Gauge (GPMR2405) to check the control
throws.
Throttle: Set the throttle so that at "high stick" the
carburetor barrel is fully open and at "low stick,"
with full to half throttle trim, the carburetor barrel
is nearly closed. At this position the engine should
run reliably at a low RPM (idle).To shut the engine
off, decrease the throttle trim tab.
This section is IMPORTANT and MUST NOT
be omitted. A model that is not properly
balanced will be unstable and possibly
unflyable.
l-l 1. Check the balance point with all components
installed in the model and the fuel tank empty.
Attach the wing to the fuselage, then accurately
mark the balance point on top of both wing
36


