


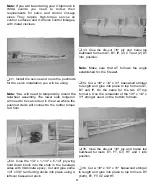


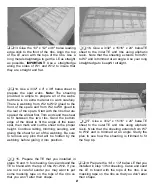


Q 12. Glue the die-cut 1/8" ply fuselage top and
bottom decks to the right fuselage side. The
parts interlock. Do not glue the bulkheads to the
decks. IMPORTANT: Be absolutely certain that
the shorter side of the top and bottom decks are
glued to the right ply side. This establishes the
proper amount of right thrust. The front of each
deck should extend exactly to the front of the
ply fuselage side.
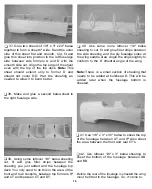
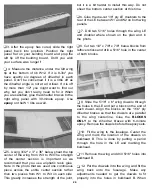
t_] 15. Lightly sand the sides of bulkheads F and
H to match the slope of the sides. Install them in
their proper locations in the fuselage sides and
hold them in position with pins. Do NOT glue
until later.
Q 16. Place the fuselage upside-down over the
top fuselage plan. Align the top deck with the
plan and pin it into place. Use some blocks to
hold the tail of the fuselage in place over the
plan. Align the center mark on each bulkhead
with the centerline on the plan. Sight down
from above the fuselage to double check the
alignment. When you are satisfied that
everything is aligned properly, glue bulkheads
F, H, and J to the fuselage sides.
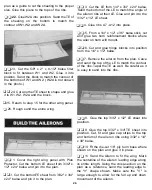
Q 17. Use the 1/4" x 1/4" x30" balsa stick to glue
a cross-brace between bulkhead D and F, and
between F and H.This bracing will make the tail
more rigid.
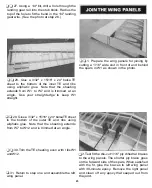
Q 13. Glue the left fuselage side to inner bulkheads
B, C and D using 6-minute epoxy. Align the
bulkheads with the marks you made earlier.
Before the epoxy cures, sight across the top of
both sides to double check the alignment.
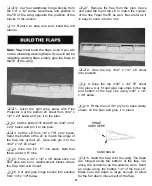
Q 14. Pull the tail together and tack glue die-cut
1/8" ply bulkhead J to the rear of the longerons.
l-l 18. Glue the die-cut 1/8" ply bottom bulkhead
formers AB and BB for bulkheads A and B into
position. Glue doubler BBD to the FRONT of BB.
Note: Make sure that AB follows the angle
established for the firewall. Use side formers A
and B to help in centering AB and BB.
14


