background image

5

Ç

 Make sure the labelmaker power is turned off before you 

disconnect the power adapter from the main power source. 

Otherwise, your most recent memory settings will be lost.

Inserting the Label Cassette

Your labelmaker comes with one 

label cassette. Visit 

www.dymo.

com


for information about purchasing 

additional label cassettes.


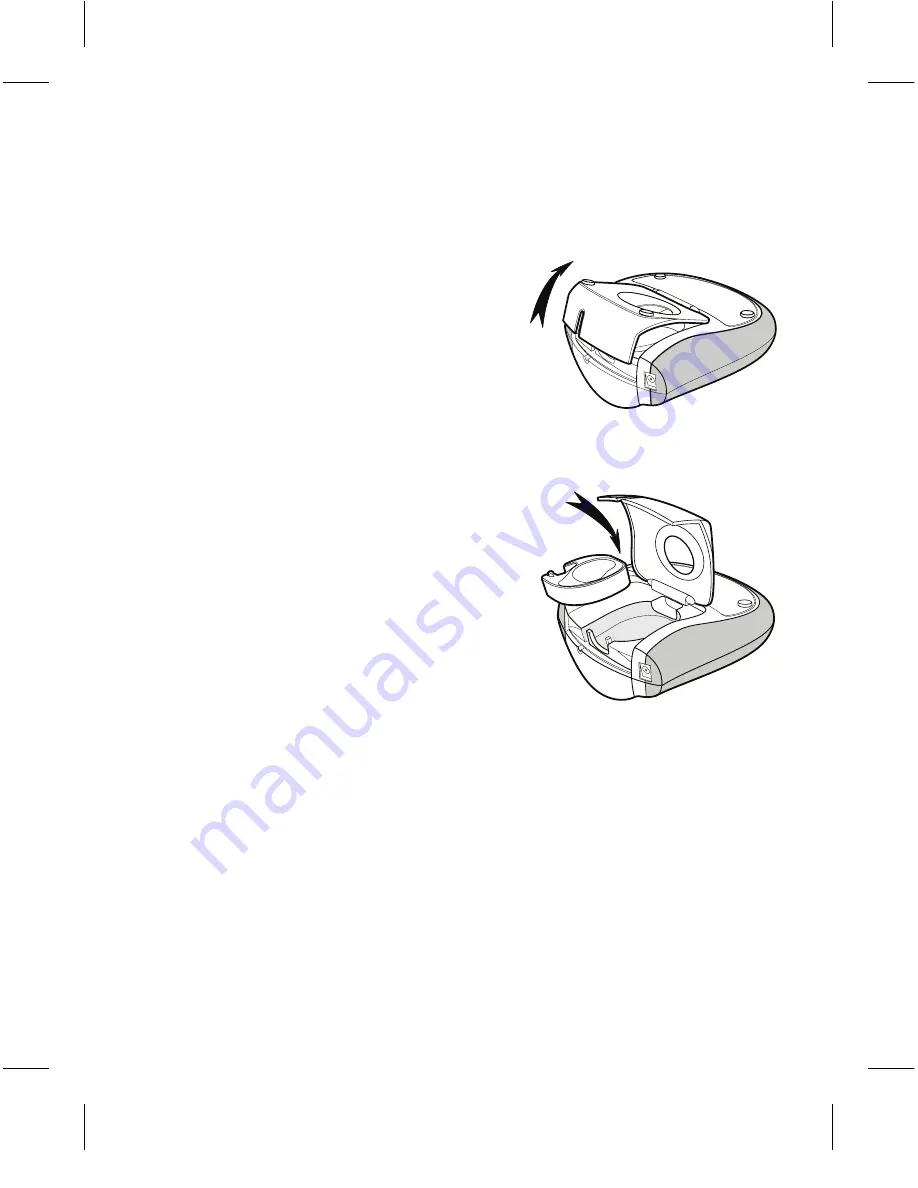
Figure 3

To insert the label cassette

1. Lift the label cassette cover to open 

the label compartment. 

See Figure .

  Ç

 Before using the labelmaker for 

the first time, remove the protective 

cardboard insert from label exit slot. 

See  Figure .


Figure 4

. Insert the cassette with the label positioned 

  between the print head and pinch roller.
. Press firmly until cassette clicks into place. 
. Close the label cassette cover and press 

â

 to turn on the power.

LT  Momentum WEU.indd   5

09-01-2007   17:23:37

Summary of Contents for LETRATAG 100T

Page 1: ...1 LetraTag LT 100T www dymo com UserGuide Page2 GuideD Utilisation Page24 Gebruikershandleiding Pagina48 Bedienungsanleitung Seite70 LT Momentum WEU indd 1 09 01 2007 17 23 36...

Page 2: ...ve Memory Recall Print LCD Display Power Connector Power Cutter Insert Format Settings Clear Space Bar OK Navigation Cancel Num Lock CAPS Back Space Figure 1 DYMO LetraTag Labelmaker Cancel Clear LT M...

Page 3: ...r information on obtaining labels and accessories for your labelmaker Warranty Registration Please complete the warranty registration card and return it to the appropriate Customer Support address wit...

Page 4: ...aker will not be used for a long period of time Figure 2 Connecting the Optional Power Adapter An optional 9Volt 1 5 A power adapter can also be used to power the labelmaker Connecting the AC adapter...

Page 5: ...al label cassettes Figure 3 To insert the label cassette 1 Lift the label cassette cover to open the label compartment See Figure 3 Before using the labelmaker for the first time remove the protective...

Page 6: ...wn arrow key to select the language you want and press Setting the Date andTime You need to set the current date and time so that the date is correct if you choose to automatically insert a date on yo...

Page 7: ...or decrease the value 6 When finished press PrintingYour First Label You are now ready to print your first label To print a label 1 Enter text to create a simple label 2 Press 3 Press the cutter butt...

Page 8: ...previously selected style settings are also restored You can also press to cancel printing and return to edit mode LCD Display You can enter up to 100 characters and spaces on a label however the dis...

Page 9: ...hen Num Lock mode is turned on the Num Lock indicator is shown on the display and the numbers 0 through 9 appear when you press the corresponding letter keys Num Lock is turned off by default Backspac...

Page 10: ...on your label Settings The key displays the Preview Language Set Date and Set Contrast submenus These features are described later in this User Guide FormattingYourLabel You can choose from a number...

Page 11: ...m six different font styles AaAbCc Normal AaAbCc Bold AaAbCc Italic Outline Shadow Vertical When you select a style that style applies to all characters Styles can be used with alphanumeric characters...

Page 12: ...e and press A multi line symbol is inserted at the end of the first line but will not print on the label 3 Type the text for the second line Adding the Date You can insert the date on your label The d...

Page 13: ...ded Flowers Crocodile A label can be underlined or enclosed in a box but not both together To add an underline or box style 1 Press 2 Select Borders and press 3 Select underline or a box style and pre...

Page 14: ...mbolsandSpecialCharacters Symbols and other special characters can be added to your labels Adding Symbols The labelmaker supports the extended symbol set shown below LT Momentum WEU indd 14 09 01 2007...

Page 15: ...bol that you used is automatically selected Adding International Characters The labelmaker supports the extended Latin character set using RACE technology Similar to using a mobile phone keypad when y...

Page 16: ...a line break character between the two lines To preview your label 1 Press 2 Select Preview and press The text of the label scrolls across the display Adjusting the Print Contrast You can adjust the...

Page 17: ...move through the fields You can store new text in any of the memory locations 3 Select a memory location and press Your label text is saved and you are returned to the label Recalling Stored Labels Yo...

Page 18: ...otton ball with alcohol 2 Remove the label cassette 3 Place the tip of a ball point pen or pencil on the black post as shown in Figure 6 and press the post down Print head Figure 6 4 While holding dow...

Page 19: ...head 1 Remove the label cassette 2 Remove the cleaning tool from inside the label compartment cover 3 Gently wipe the padded side of the tool across the print head See Figure 6 LT Momentum WEU indd 1...

Page 20: ...ade See Caring forYour Labelmaker Printing No action required Message disappears when printing is finished Too many characters Exceeded maximum number of characters in buffer Delete some or all of the...

Page 21: ...er and User Guide page number Brief description of instructions that are inaccurate or unclear areas where more detail is needed and so on We also welcome your suggestions about additional topics you...

Page 22: ...al resources we encourage you to use the appropriate take back systems Those systems will reuse or recycle most of the materials of your end life equipment in a sound way The crossed bin symbol marked...

Page 23: ...EMC Compatibility EN 61000 3 2 3 EN 61000 4 2 3 4 5 6 8 11 ENV 50204 EU Immunity EN 55024 addendum A1 A2 Electromagnetic Compatibility EMC InformationTechnology equipment Immunity Characteristics Emis...

Reviews: