Dyconn Butterfly DE540S Instruction Manual Download Page 2

Page 

2

Articulating TV/Mount Clamp/Grommet Desk Mount 

Model: DE540S (Butterfly Series) 


Instruction Manual 

Images may be different from actual product


Disclaimer 

It is Dyconn’s intention to have all the correct information present within this manual. Although we try 
our best, Dyconn makes no claim that the information comprised herein covers all conditions or details 
in connection with installation or use of this product. Dyconn assumes no responsibility for accuracy or 
adequacy of information comprised in this document. The information comprised here is subject to 
change without notice or obligation of any kind.


  This warning informs you of the possibilities of personal injury or damage to equipment if you 

do not follow the corresponding instructions. It is the installer's responsibility to make sure all 
components are properly assembled and installed using the instruction manual provided.   


Using improper screws or screw size may damage your display. If spacers are required, be 
sure to use screws of the correct size. Proper screws will easily and completely thread into 
the display mounting holes. Inadequate thread engagement in the display may cause display 
to fall.


  It is the installer’s responsibility to make sure the combined weight of all components does not 

exceed the weight capacity of 17.6lbs (8kg). Exceeding weight capacity can result in severe 
personal injury or damage to equipment.   


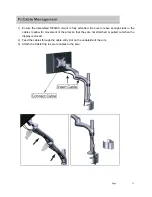
  Allowing any part of your component cables to be caught between movable parts can result in 

serious personal injury or damage to equipment. 


  The LCD Arm will spring upward and can cause serious personal injury or damage to 

equipment when weight of monitor is removed. Secure by lifting the arm to its full upright 
position when monitor is removed. 


Summary of Contents for Butterfly DE540S

Page 1: ......

Page 2: ...ller s responsibility to make sure all components are properly assembled and installed using the instruction manual provided Using improper screws or screw size may damage your display If spacers are required be sure to use screws of the correct size Proper screws will easily and completely thread into the display mounting holes Inadequate thread engagement in the display may cause display to fall...

Page 3: ...lease keep these items away from children z Do not exceed the maximum weight capacity for this product Exceeding the weight capacity can result in serious personal injury or damage to equipment z The table being used for installation must be stable and strong enough to support the DE540S mount and display Specifications Weight Capacity 17 6lbs 8kg Suits LCD Flat Panel Displays 12 24 300mm 610mm Le...

Page 4: ...Page 4 Product Dimensions ...

Page 5: ...Page 5 Parts List ...

Page 6: ...ions on Desk Clamp base 2 Place the Desk Clamp on the edge of the desk Adjust the screw on the Desk Clamp to ensure that pressure plate is pressed flat onto the desk surface Tighten the hex screw using the Allen Wrench 8mm until the Desk Clamp is secure ...

Page 7: ...Page 7 1 Remove the Desk Clamp and attach the Grommet Plate 2 Place the Gasket Cushions onto the Grommet Plate ...

Page 8: ...e Grommet mount over the cable management hole Adjust the screw until the pressure plate is pressed flat onto the desk surface Using the Allen Wrench 8mm tighten the hex screw until the Grommet mount is secured in place ...

Page 9: ... screws with a Philips Screwdriver until the mount head is firmly attached to the display Do not over tighten the screws Stop immediately if you encounter any resistance 2 Use spacers for displays with recessed mounting holes 1 Hold the top of collar and rotate the lower part counterclockwise to loosen Adjust the collar along the pole to desired location Tighten in a clockwise direction to secure ...

Page 10: ...ach the assembled LCD Arm and display down onto the pole If necessary tighten the collar to secure position Follow by tightening the hex grub screw using the Allen Wrench 2 5mm until the assembly is firmly in place ...

Page 11: ...e to leave enough slack in the cables to allow for movement of the arms so that they are not stretched or pulled out when the display is moved 2 Feed the cables through the cable entry slot on the underside of the arm 3 Attach the Cable Clip to secure cables to the pole ...

Page 12: ...Page 12 1 Adjust the screws to suit your desired display tilt and swivel of 90 degrees and also display orientation of 360 degrees ...

Page 13: ...r visit www dyconn com Dyconn disclaims any liability for modification improper installations or installations over specified weight range Dyconn will not be liable for any damages arising out of the use of or inability to use of Dyconn products Warranty specification is subject to change without prior notice ...

Reviews: