background image

6

E491008

2.

3.

1.

2.

3.

12

LED

+-

Numbers will correspond to 

following tags attached to the wires

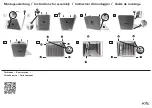
Use the following steps to wire mirror to an electrical wall switch 

and bypass the touch sensor:

1. Disconnect all connections from the touch sensor (#1-3).

2. Connect the LED Power Supply directly to the 12V DC LED

Connector (#1 and #2 circled in red).

Wall Switch Bypass Instructions

Summary of Contents for All CAT22W

Page 1: ...lit Mirror Sizes 48 W x 36 H horizontal or vertical 60 W x 35 H horizontal or vertical 70 W x 38 H horizontal or vertical Model Catella M09AT Catela Plus M10AT Royal M12AT Edison M13AT Swan M14AT Egret M16AT For easy installation of your Dyconn Mirror please do the following Thoroughly read all instructions before installing the enclosed product Read and take note of all safety care and maintenanc...

Page 2: ......

Page 3: ...ilable to install the mirror Remember to wear proper protective gear during instal lation All mirror glass is non tempered glass and can result in sharp shards if the glass is shattered wall Using the proper anchor and screws for securing the unit to the wall is crucial Screwing to the stud is recommended Feel free to contact us at 855 239 2666 or info dyconnfaucet com ...

Page 4: ...ht Can be hung vertical or horizontal Touch switch on o Touch switch dim function Anti fog pad Package Content LED backlit Mirror Screws Studs Lock catch Horizontal hanging only Horizontal Mount Vertical Mount Horizontal Mount Lock catch Horizontal hanging only Anti fog pad Touch switch Mirror E491008 ...

Page 5: ...nic Driller Warning Al installation and maintenance Do not switch on the electrical supply at the mains until the end of the installation Vertical Mount Back Frame Handles Lock catch Horizontal hanging only Horizontal Mount Horizontal Mount 1 E491008 ...

Page 6: ...m level to mount the back frame onto the wall use an anchor when installing on drywall concrete or tile surfaces connect the neutral White hot black and ground copper wire or Green wire between the mirror and the junction box 4 When hanging mirror horizontally place the mirror s side on to the mounting bracket in the metal frame Then push the bottom of the mirror onto the lock catch to lock it in ...

Page 7: ...d at the bottom of the metal frame by removing its screw 3 Using an I Beam level mount the back frame onto the wall Use an anchor when installing on drywall concrete or tile surfaces connect the neutral White hot black and ground copper wire or Green wire between the mirror and the junction box 5 Mount the mirror vertically by placing the mirror s side on to the mounting brackets Two L hooks on th...

Page 8: ... LED driver Scenario 1 Direct Wired This is the most common way to connect the mirror The LED light anti fog pad are both controlled by the built in touch switch on the mirror The LED light is dimmable Scenario 2 Wall Switch By doing so the mirror is now bridged to the wall switch In order to turn on the mirror the wall switch needs to be on The touch switch can be used to turn on the LED mirror a...

Page 9: ...4 29 76 M09AT7238W 72 x 38 2 Frosted Strips 2 3536 32 64 M10AT4836W 48 x 36 3 Frosted Strips 1 6448 59 52 M10AT6035W 60 x 35 3 Frosted Strips 1 6838 63 12 M10AT7238W 72 x 38 3 Frosted Strips 1 7956 73 44 All CAT22W Round Round 22 LED Frosted Edge 1 1638 15 12 All CAT34W Round Round 34 LED Frosted Edge 1 2600 24 All CAT42W Round Round 42 LED Frosted Edge 1 3250 30 All VAT1824W Oval 18 x 24 LED Fros...

Page 10: ...oes the wiring extend from the back of the mirror Answer Yes The electrician can bypass the touch sensor having the DC power from the internal power supply feed directly to the LED strips and let the non dimmable wall switch to control the mirror The down side is that you will have to choose between 3000K or 6400K at half its brightness or 4000K at its full brightness some wire soldering might be ...

Page 11: ...the wires Use the following steps to wire mirror to an electrical wall switch and bypass the touch sensor 1 Disconnect all connections from the touch sensor 1 3 2 Connect the LED Power Supply directly to the 12V DC LED Connector 1 and 2 circled in red Wall Switch Bypass Instructions ...

Page 12: ... the product s return Dyconn Faucet has full rights to inspect any Dyconn Faucet product reported as defective prior to repair or replacement Any repair and replacement costs EXCLUDE shipping labor for removal or re installation and any consequential or special damages associated with the return replacement and installation of your product To ease the duration and ss the product s condition and de...

Reviews: