background image

Customer Service 1-888-707-1880 


  Dyaco Canada Inc. 2016 

Email: [email protected] 


IMPORTANT 

SAFETY INSTRUCTIONS


THIS UNIT IS INTENDED FOR HOUSEHOLD USE ONLY 

READ ALL INSTRUCTIONS BEFORE USING THIS TREADMILL 

CAUTION:


Before starting any exercise program, it is recommended that you consult   

                     your physician. 
WARNING:


Connect this unit to a properly grounded outlet only. 

DANGER:


To reduce the risk of electric shock, always unplug the treadmill from the 


electrical outlet immediately after using and before cleaning. 


WARNING 

TO REDUCE THE RISK OF BURNS, FIRE, ELECTRIC SHOCK, OR INJURY TO 
PERSONS:


Grounding Instructions 

This product must be grounded. If it should malfunction or breakdown, grounding provides a 
path of least resistance for electric current to reduce the risk of electric shock. This product is 
equipped with a cord having an equipment-grounding conductor and a grounding plug. The plug 
must be plugged into an appropriate outlet that is properly installed and grounded in 
accordance with all local codes and ordinances. See diagram below for grounding methods


1. Use 110 volt a.c. household current on a dedicated circuit. 
2. It is the responsibility of the owner to ensure that all users of this treadmill are adequately 

informed of all warnings and precautions. 

3.  The use of an extension cord with this product is not recommended. If an extension cord is 

needed, use a short (less than 10 feet) heavy gauge (14 gauge or better) extension cord with 
a three prong (grounded) plug and receptacle. 

4. Never leave the treadmill unattended when plugged in. Remove the safety key and unplug 

the unit from the outlet when not in use and before removing or replacing parts. 

5. Never operate the treadmill if it has a damaged cord or plug, if it is not working properly, if it 

has been dropped, damaged, or exposed to water. Never move the treadmill belt while the 
power is turned off. 

6. Do not pull the treadmill by the power supply cord or use cord as a handle. Keep cord away 

from heated surfaces and open flames. 

7. Fitness equipment must always be installed and used on a flat surface. Do not use outdoors 

or near water. Do not place the unit on a loose rug or uneven surface. It is recommended to 
use an equipment mat to prevent the unit from moving while it is being used, which could 
possibly scratch or damage the surface of your floor. It is recommended to have a minimum 
of 3 meters safe clearance on all sides of the treadmill while in use. 

Summary of Contents for XT685

Page 1: ...Retain For Future Reference Owner s Manual Model No 16007606850 XT685 Assembly Operation Adjustments Parts Warranty CAUTION Read and understand this manual before operating unit ...

Page 2: ...ons 4 Important Electrical Instructions 6 Assembly Instructions 8 Transportation Instructions 13 Operation of Your New Treadmill 14 Using the Spirit Fit App 18 Programmable Features 19 Target Heart Rate 27 Using a Heart Rate Transmitter 29 Heart Rate Control Operation 30 Parts List and Diagram 32 General Maintenance 36 Manufacturer s Limited Warranty 40 ...

Page 3: ...ormed and any difficulties easier to remedy Please take a moment at this time to record the name of the dealer their telephone number and the date of purchase below to make any future needed contact easy We appreciate your support and we will always remember that you are the reason that we are in business Please complete and mail your registration card today and enjoy your new treadmill Name of De...

Page 4: ...edicated circuit 2 It is the responsibility of the owner to ensure that all users of this treadmill are adequately informed of all warnings and precautions 3 The use of an extension cord with this product is not recommended If an extension cord is needed use a short less than 10 feet heavy gauge 14 gauge or better extension cord with a three prong grounded plug and receptacle 4 Never leave the tre...

Page 5: ...fting or moving the equipment so as not to injure your back Always use proper lifting techniques You must not use any attachments that are not recommended by the manufacturer 19 Use the treadmill only for its intended use as described in this manual Do not use any attachments that are not recommended by the manufacturer 20 User weight should not exceed 425 lbs 193 kgs 21 Never allow more than one ...

Page 6: ...ing an equipment grounding plug The plug must be plugged into an appropriate outlet that is properly installed and grounded in accordance with all local codes and ordinances DANGER Improper connection of the equipment grounding conductor can result in a risk of electric shock Check with a qualified electrician or serviceman if you are in doubt as to whether the product is properly grounded Do not ...

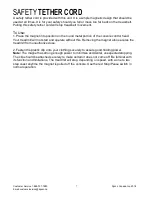
Page 7: ...al portion of the console control head Your treadmill will not start and operate without this Removing the magnet also secures the treadmill from unauthorized use 2 Fasten the plastic clip onto your clothing securely to assure good holding power Note The magnet has strong enough power to minimize accidental unexpected stopping The clip should be attached securely to make certain it does not come o...

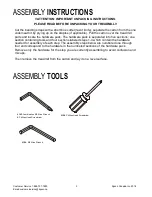
Page 8: ...re pack The hardware pack is separated into five sections one section containing tools and four sections labeled steps 1 4 which contain the hardware needed for assembly of each step The assembly steps below are numbered one through four and correspond to the hardware in the numbered sections of the hardware pack Remove only the hardware for the step you are currently assembling to avoid confusion...

Page 9: ...5 under the Upright Covers 5 Connect the LOWER COMPUTER CABLE 33 to the MIDDLE COMPUTER CABLE 32 Be sure not to pinch the cable or damage may occur 6 Insert the LEFT AND RIGHT UPRIGHTS into the MAIN FRAME 1 and use the COMBINATION WRENCH AND PHILLIPS SCREW DRIVER 103 to secure 4 BOLTS 100 and 4 Curved Washers 124 into place 7 Use the L SHAPED ALLEN WRENCH 104 to tighten the LEFT AND RIGHT GUSSET 7...

Page 10: ...he UPPER INCLINE CABLE 35 3 Connect the MIDDLE COMPUTER CABLE 32 to the UPPER COMPUTER CABLE 31 4 Be sure not to pinch any of the cables or damage may occur to the system 5 Insert the CONSOLE ASSEMBLY 36 onto the RIGHT AND LEFT UPRIGHTS 4 5 and secure with 4 BUTTON HEAD SOCKET BOLTS 91 and 4 SPRING WASHERS 86 Use the ALLEN WRENCH 104 to tighten HARDWARE 86 Ø 10 2 0T Spring Washer 4 pcs 91 3 8 x 1 ...

Page 11: ...rights Secure them with 8 SHEET METAL SCREWS 125 using the PHILLIPS HEAD SCREWDRIVER 126 2 Install the CONSOLE MAST SIDE CAP L 98 R 99 onto the MAIN FRAME 1 and secure it using 4 PHILLIPS HEAD SCREWS 127 by using the COMBINATION WRENCH AND PHILLIPS SCREWDRIVER 103 HARDWARE 125 3 5 x 16mm Sheet Metal Screw 8 pcs 127 M5 10mm Phillips Head Screw 4 pcs ...

Page 12: ...4 1 Place the HANDRAIL SUPPORT 3 between the LEFT AND RIGHT UPRIGHTS 5 4 and use the COMBINATION ALLEN WRENCH PHILLIPS HEAD SCREWDRIVER 103 to tighten 4 BUTTON HEAD SOCKET BOLTS 100 2 Place the BEVERAGE HOLDER 120 onto the HANDRAIL SUPPORT 3 HARDWARE 100 5 16 x 3 4 Button Head Socket Bolt 4 pcs ...

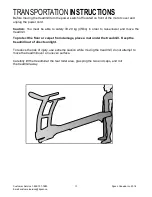
Page 13: ...must be able to safely lift 20 kg 45lbs in order to raise lower and move the treadmill To protect the floor or carpet from damage place a mat under the treadmill Keep the treadmill out of direct sunlight To reduce the risk of injury use extreme caution while moving the treadmill do not attempt to move the treadmill over an uneven surface Carefully lift the treadmill at the rear roller area graspin...

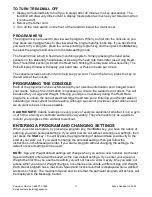
Page 14: ...line then select either 2 or 3 digits and the treadmill will automatically adjust to that value This saves time because you don t have to press and hold or hold a button down until reaching the desired value The maximum value you may input for speed is 12 0 MPH 18 0 KPH and incline 15 0 Examples Press the Quick Incline button then 1 0 Incline Level 1 0 Press the Quick Incline button then 3 5 Incli...

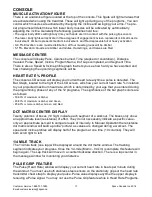
Page 15: ... Graph located to the right of the LCD screen will show your current heart rate in relation to your projected maximum heart rate which is determined by your age that you entered during the programming phase of any of the 12 programs The significance of the bar graph colors are as follows 50 60 of maximum is Amber 65 80 of maximum is Amber and Green 85 90 or more is Amber Green and Red DOT MATRIX C...

Page 16: ...e Stop key once This will slowly decelerate the tread belt to a stop The incline will go to zero percent The Time Distance and Calorie readings will hold while the unit is in the pause mode After 5 minutes the display will reset and return to the start up screen 2 To resume your exercise when in Pause mode press the Start key The speed and incline will return to their previous settings Pause is ex...

Page 17: ... your Age and Weight Entering your Age is necessary during the Heart Rate programs to ensure the correct predicted target heart rate zone Entering your Weight aides in calculating a more correct Calorie reading Although we cannot provide an exact calorie count we do want to be as close as possible CALORIE NOTE Calorie readings on every piece of exercise equipment whether it is in a gym or at home ...

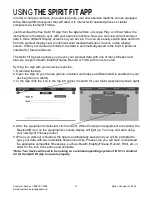
Page 18: ... sync your workout data with one of many fitness cloud sites we support iHealth MapMyFitness Record or Fitbit with more to come Syncing the App with your exercise machine 1 Download the App 2 Open the App on your device phone or tablet and make sure Bluetooth is enabled on your device phone or tablet 3 In the App click the icon in the top left corner to search for your Spirit equipment shown right...

Page 19: ...chine can give you an exact calorie count because there are too many factors which determine exact calorie burn for a particular person Even if someone is the exact same body weight age and height their calorie burn may be very different than yours The Calorie display is to be used as a reference only to monitor improvement from workout to workout 4 The Message Center will be blinking a value indi...

Page 20: ...also save the program to memory 8 The profile picture will be re scaled to fit in the window but the actual speed and incline settings will remain the same as programmed CALORIE PROGRAM 1 Press the Calorie key to select this program The display will prompt you through the programming 2 The Message Center will now be blinking a value indicating your Age default is 35 Entering your correct age affec...

Page 21: ...rrect body weight will affect the calorie count Use the or keys to adjust then press Enter A note about the Calorie display No exercise machine can give you an exact calorie count because there are too many factors which determine exact calorie burn for a particular person Even if someone is the exact same body weight age and height their calorie burn may be very different than yours The Calorie d...

Page 22: ...to get back on the treadmill Console displays PRESS START TO BEGIN RECOVERY user walks 2MPH KPH for 1 00 Console then displays 2nd cardio interval and the process proceeds until the user has performed 5 cardio strength and recovery intervals the 5 strength exercises will be performed sequentially as listed in this manual The last 2 00 are a Cool Down phase with the user walking on the treadmill 2 ...

Page 23: ... UP EMPHASIS CHEST SHOULDERS BACK OF ARMS There are two variations of this exercise If you aren t able to perform the exercise as shown in this illustration place your knees on the floor a padded mat or a pillow Also a wider hand position places more eMPHasis on the chest and shoulder muscles while a narrower hand position places more eMPHasis on the Tricep muscles back of the arm 1 Place your han...

Page 24: ...bells at shoulder height behind your head with a neutral grip palms facing one another your elbows should be pointed straight ahead 2 Raise the dumbbells overhead until your arms are fully extended your upper arms should remain stationary pivoting at the elbows 3 Slowly lower to the start position 4 Repeat this sequence for the duration of the strength interval DUMBBELL BICEP CURL EMPHASIS FRONT O...

Page 25: ...workout and lasts for 10 of the duration FAT BURN Resistance This program follows a quick progression up to the maximum speed level default or user input level that is sustained for 2 3 of the workout This program will challenge your ability to sustain your energy output for an extended period of time Incline The deck elevation is a quick and sustained progression up to the maximum value default o...

Page 26: ...hroughout this program The incline alternates between 25 65 of maximum elevation CALORIES Resistance This program follows a quick progression up to the maximum speed level default or user input level that is sustained for 2 3 of the workout This program will challenge your ability to sustain your energy output for an extended period of time Incline The treadmill elevation is a quick and sustained ...

Page 27: ... to 80 is the zone to stay in for maximum benefit For someone who is 40 years old their target heart rate zone is calculated 220 40 180 maximum heart rate 180 x 6 108 beats per minute 60 of maximum 180 x 8 144 beats per minute 80 of maximum So for a 40 year old the training zone would be 108 to 144 beats per minute If you enter your age during programming the console will perform this calculation ...

Page 28: ... The scale is as follows Rating Perception of Effort 6 Minimal 7 Very very light 8 Very very light 9 Very light 10 Very light 11 Fairly light 12 Comfortable 13 Somewhat hard 14 Somewhat hard 15 Hard 16 Hard 17 Very hard 18 Very hard 19 Very very hard 20 Maximal You can get an approximate heart rate level for each rating by simply adding a zero to each rating For example a rating of 12 will result ...

Page 29: ...ransmitter directly on bare skin assures you of proper operation If you wish you may wear the transmitter over a shirt To do so wet the areas of the shirt that the electrodes will rest upon Note Thetransmitterisautomaticallyactivatedwhenitdetectsactivityfromtheuser sheart Additionally it automatically deactivates when it does not receive any activity Although the transmitter is water resistant moi...

Page 30: ...o enter your Weight You may adjust the weight value using the Speed or keys then press Enter to continue 4 Next is Time You may adjust the time using the Speed or keys and press Enter to continue 5 Now you are asked to adjust the Heart Rate Target This is the heart rate level you will strive to maintain during the program Adjust the level using the Speed or keys then press Enter Note The heart rat...

Page 31: ...Customer Service 1 888 707 1880 Dyaco Canada Inc 2016 Email customerservice dyaco ca 31 EXPLODED VIEW DIAGRAM ...

Page 32: ...6068521 Incline Motor 1 22 1 6068522 1 Motor Controller 1 23 6068523 1200m m_Sensor W Cable 1 24 6068524 Breaker 1 25 6068525 Power Socket 1 26 6068526 On Off Switch 1 27 6068527 Power Cord 1 28 6068528 100m m_Connecting Wire Black 1 29 6068529 350m m_Connecting Wire White 1 30 6068530 350m m_Connecting Wire Black 1 31 6068531 800m m_Computer Cable Upper 1 32 6068532 1250m m_Computer Cable Middle ...

Page 33: ...1 36 43 6068536 43 Clear Acryl 1 36 44 6068536 44 Water resist Rubber 1 37 6068537 300m m_Speed Adjustment Switch W Cable 1 38 6068538 300m m_Incline Adjustment Switch W Cable 1 39 1 6068539 1 Handpulse Plate 4 39 2 6068539 2 1100m m_Handpulse Wire White 1 39 3 6068539 3 1100m m_Handpulse Wire Red 1 39 4 6068539 4 Handpulse Top Cover 2 39 5 6068539 5 Handpulse Bottom Cover 2 41 6068541 Cushion 6 4...

Page 34: ...068580 Ø 3 8 Ø 25 2 0T_Flat Washer 4 81 6068581 Ø 6 5 Ø 16 1 0T_Flat Washer 5 83 6068583 M5_Star Washer 7 84 6068584 Ø 6 Ø 23 Ø 13 5 5T 3T_Nylon Dished Washer 4 85 6068585 Ø 5 5 27 60 1 5T 3 0H_ Concave Washer 4 86 6068586 Ø 10 2 0T_Spring Washer 14 87 6068587 5 19m m_Tapping Screw 2 88 6068588 Ø 5 16L_Tapping Screw 36 89 6068589 4 12m m_Sheet Metal Screw 1 90 6068590 3 5 12m m_Sheet Metal Screw 3...

Page 35: ...6 60685116 400m m_Audio Cable 1 117 60685117 600m m_Ground Wire 1 120 60685120 Beverage Holder 1 123 60685123 3 8 2 1 2 _Button Head Socket Bolt 6 124 60685124 Curved Washer 4 125 60685125 Ø 3 5 16L_Sheet Metal Screw 8 126 60685126 Phillips Head Screwdriver 1 127 60685127 M5 10m m_Phillips Head Screw 4 128 60685128 Nyloc Nut 2 129 60685129 3 5 55m m_Sheet Metal Screw 1 130 60685130 Safety Key Slee...

Page 36: ... treadmill to prevent buildup Once a year you should remove the black motor hood and vacuum out dirt that may accumulate UNPLUG POWER CORD BEFORE THIS TASK BELT ADJUSTMENTS Tread belt Tension Adjustment Belt tension is not critical for most users It is very important for joggers and runners in order to provide a smooth steady running surface Adjustment must be made from the right side of the rear ...

Page 37: ...T TREADBELT TRACKING A 6 mm Allen wrench is provided to adjust the rear roller Make tracking adjustments from the left side only Set belt speed at approximately 2 to 3 MPH A small adjustment can make a dramatic difference Turn the bolt only a 1 4 turn and wait a few minutes for the belt to adjust itself Continue to make 1 4 turns until the belt stabilizes in the center of the running deck The belt...

Page 38: ... opposite from the belt movement See General Maintenance section on Tread belt Tension Adjust as necessary 1 If the belt moves but stops after a short time and the display shows E1 run calibration 2 If you press start and the belt never moves then the display shows E1 contact service This indicates motor should be receiving power to operate Low AC voltage to treadmill Do not use an extension cord ...

Page 39: ...cted to it 3 Make sure the sensor is as close as possible to the pulley without touching it You will see a magnet on the face of the pulley make sure the sensor is aligned with the magnet There is a screw that holds the sensor in place that needs to be loosened to adjust the sensor Re tighten the screw when finished ENGINEERING MODE MENU The console has built in maintenance diagnostic software The...

Page 40: ... not apply to treadmills which are 1 used for commercial or other income producing purpose or 2 subject to misuse neglect accident or unauthorized repairs and alterations This warranty provided herein is in lieu of all other express warranties Any implied warranties including any implied warranties of merchantability or fitness for particular purpose are limited in duration to the first 24 months ...

Page 41: ...ation about our other brands and products manufactured and distributed by Dyaco Canada Inc www spiritfitnesscanada ca www dyaco ca www spiritfitnesscanada ca www dyaco ca www trainorsports ca www dyaco ca www dyaco ca www dyaco ca www dyaco ca www dyaco ca www solefitness ca www dyaco ca www xterrafitness ca www dyaco ca ...

Reviews: