36
T C - 1 5 T R E E C H I P P E R
O P E R A T I N G I N S T R U C T I O N S
5.10 Anvil adjustment
ALWAYS FOLLOW NORMAL SHUT DOWN PROCEDURE!
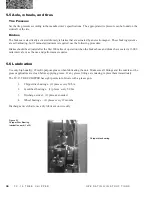
Locate the access hole on top of the feed housing in front of the bearing. Remove the three nuts and lift off cover.
Warning: Never turn disc while someone is adjusting the anvil. Disc should be turned by
operator adjusting the anvil only!
Operator adjusting anvil should only turn the disc in a clockwise
direction to avoid limbs dismembered.
Checking and adjusting anvil to knife clearance
1. Follow the above safety features.
2. Check the anvil clearance by reaching into the
access hole.
3. Using a feeler gauge, check the clearance between
the knife anvil and the cutting edge of each knife.
Anvil is set to the knife that is located closest to the
anvil.
4. Inspect anvil edge for wear. Flip/rotate anvil if
the cutting edge is unevenly worn or excessively
rounded.
5. Loosen the six anvil bolts enough to move the anvil
adjustment plate with the jam nuts.
6. Using the adjustment plate located by the anvil
bolts, adjust the jam nuts to move the anvil to the
desired position.
7. Retighten the anvil bolts and jam nuts.
8. Turning the disc clockwise, check the clearance
on the knives making sure the closest knife is no
closer than .050” and no further than 0.10”. If
anvil is not set close enough to knives, excessive
knife wear will occur.
Jam nuts
Anvil access
hole
Anvil
adjusment
plate
Summary of Contents for TC-15
Page 2: ...Clearing the Way for a Better Tomorrow...
Page 4: ...Clearing the Way for a Better Tomorrow...
Page 49: ...41 T C 1 5 T R E E C H I P P E R O P E R A T I N G I N S T R U C T I O N S...
Page 50: ...42 T C 1 5 T R E E C H I P P E R O P E R A T I N G I N S T R U C T I O N S...
Page 54: ...46 T C 1 5 T r e e C h i p p e r P A R T S R E F E R E N C E T R A I L E R A S S E M B L Y...
Page 60: ...52 T C 1 5 T r e e C h i p p e r P A R T S R E F E R E N C E D I S C A S S E M B L Y...


